Table of Contents
Advertisement
Quick Links
Advertisement
Table of Contents

Related Manuals for LG CM4230-AU


Summary of Contents for LG CM4230-AU
- Page 1 OWNER’S MANUAL Mini Hi-Fi System Please read this manual carefully before operating your set and retain it for future reference. CM4230 (CM4230, CMS4230F) CM4230_AU.DPANLLK ENG 7527.indd 1 CM4230_AU.DPANLLK ENG 7527.indd 1 2013-03-06 2013-03-06 9:28:08 9:28:08...
- Page 2 CM4230_AU.DPANLLK ENG 7527.indd 2 CM4230_AU.DPANLLK ENG 7527.indd 2 2013-03-06 2013-03-06 9:28:08 9:28:08...
- Page 3 Getting Started Safety Information CAUTION CAUTION: This product employs a Laser System. RISK OF ELECTRIC SHOCK DO NOT OPEN To ensure proper use of this product, please read this owner’s manual carefully and retain it for future CAUTION: TO REDUCE THE RISK OF ELECTRIC reference.
- Page 4 Getting Started This device is equipped with a portable battery or accumulator. Safety way to remove the battery or the battery from the equipment: Remove the old battery or battery pack, follow the steps in reverse order than the assembly. To prevent contamination of the environment and bring on possible threat to human and animal health, the old battery or the battery put it in the appropriate...
-
Page 5: Table Of Contents
Table of Contents Operating Table of Contents Basic Operations – CD/USB Operations Other Operations Getting Started – Programmed Playback – Displaying file information Safety Information – Searching for a folder Unique Features – Turn off the sound temporarily Accesories – Deleting an MP3/WMA file Playable file Requirement –... -
Page 6: Getting Started
Please check and identify the supplied accessories. with the LG players when formatting rewritable discs. When setting the option to Live File System, you cannot use it on LG players. (Mastered/Live File System : Disc format system for Windows Vista) -
Page 7: Compatible Usb Devices
Getting Started Compatible USB Devices MP3 Player : Flash type MP3 player. USB Flash Drive : Devices that support USB2.0 or USB1.1. The USB function of this unit does not support all USB devices. USB device requirement ... -
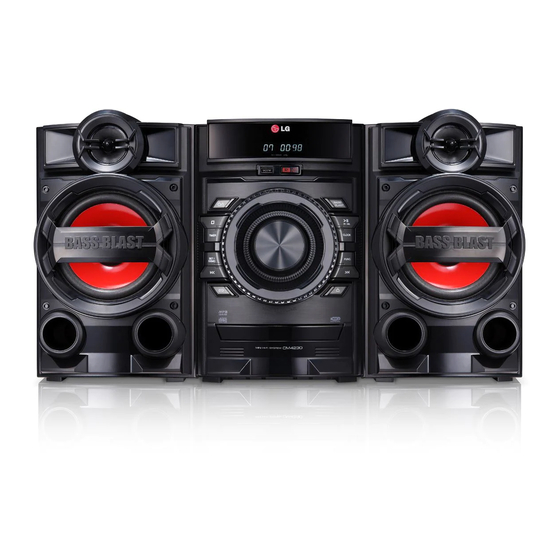
Page 8: Front Panel
Getting Started Front Panel CM4230_AU.DPANLLK ENG 7527.indd 8 CM4230_AU.DPANLLK ENG 7527.indd 8 2013-03-06 2013-03-06 9:28:09 9:28:09... - Page 9 Getting Started a Disc tray j BASS BLAST Loads a disc. Reinforces the treble, bass and surround eff ect. b EQ k TST./MO. Chooses sound impressions. - Starts or pauses playback. - Selects Stereo/Mono. c Y (Skip/Search) l CLOCK - Searches forward. - Skips to the previous track/fi le.
-
Page 10: Remote Control
Getting Started Remote Control • • • • • • a • • • • • • C/V (Skip/Search) : 1 (Power) : Switches the unit ON - Skips Fast backward or Forward. or OFF. - Searches for a section within a B (Open/Close) : Opens and track/fi le. -
Page 11: Rear Panel
Getting Started Rear Panel a AUX IN (L/R) connectors d SPEAKERS terminal b ANTENNA (FM/AM) c POWER IN CM4230_AU.DPANLLK ENG 7527.indd 11 CM4230_AU.DPANLLK ENG 7527.indd 11 2013-03-06 2013-03-06 9:28:09 9:28:09... -
Page 12: Connecting
Connecting Connecting to Optional Equipment speakers Connection Attaching the speakers to the AUX IN Connection unit Connect an output of auxiliary device(Camcoder, TV, Player, etc) to the AUX IN(L/R) connector. To connect the cable to the unit, press each plastic If your device has only one output for audio(mono), fi nger pad to open the connection terminals on the connect it to the left (white) audio jack on the unit. -
Page 13: Usb Connection
Connecting USB Connection Antenna Connection Connect the USB port of USB Memory (or MP3 Connect the supplied FM/AM antenna for listening player, etc.) to the USB port on the front of the unit. to the radio. Connect the FM wire antenna to the FM antenna connector. -
Page 14: Operating
Operating Basic Operations Other Operations CD/USB Operations Programmed Playback 1. Insert the disc by pressing B on the remote The program function enables you to store your control or R on the unit. favorite fi les from any disc or USB device. Connect the USB device to the USB port. -
Page 15: Turn Off The Sound Temporarily
Operating Turn off the sound temporarily DEMO Press MUTE@ on the remote control to mute In power off state, press SET/DEMO on the unit your sound. once. The unit will power on and display the each of functions in the display window. To cancel the You can mute your sound, for example, to answer DEMO function, press SET/DEMO once more. -
Page 16: Auto Dj Playback
Operating AUTO DJ playback Auto Power Down Auto DJ blends the end of one song into the This unit will be off itself to save electronic beginning of another for seamless playback. It consumption in the case main unit is not equalizes volume across tracks for uninterrupted connected to external device and is not used for 25 playback. -
Page 17: Radio Operations
Operating Presetting the Radio Stations Radio Operations You can preset 50 stations for FM/AM. Be sure that FM/AM aerial is connected. Before tuning, make sure to turn down the volume. (Refer to the page 13) 1. Press FUNCTION on the remote control or FUNC. -
Page 18: Sound Adjustment
Operating Note Sound adjustment On some speakers, sound may not be heard or heard in low sound depending on the sound mode. Setting the surround mode Maybe you need to reset the surround This system has a number of pre-set surround mode, after switching the input, sometimes sound fi elds. -
Page 19: Setting The Clock
Operating Sleep Timer Setting Setting the Clock Press SLEEP on the remote control repeatedly to select delay time between 10 and 180 minutes. 1. Turn the unit on. After delay time, the unit will turn off . (You can see 2. -
Page 20: Advanced Operation
Operating Note Advanced Operation You can check the recording percentage rate for the USB record on the display window during the recording. Recording to USB (MP3/WMA CD Only) During recording MP3/WMA, there is no You can record various sound sources to USB. sound. -
Page 21: Troubleshooting
Troubleshooting Troubleshooting Problem Cause & Correction The power cord is not plugged in. Plug in the power cord. Check whether electricity failed.Check the condition by operating other No Power. electronic devices. Check whether you select a right function. Press FUNC. and check the selected function. -
Page 22: Appendix
Appendix Specifications General Power requirements Refer to the main label. Power consumption Refer to the main label. Dimensions (W x H x D) 202 mm x 307 mm x 315 mm Net Weight (Approx.) 2.79 kg Operating temperature 5 °C to 35 °C (41 °F to 95 °F) Operating humidity 5 % to 90 % Bus Power Supply... -
Page 23: Speaker Specifications
Appendix Speaker specifications Front speaker Type 2 Way 2 Speaker Impedance 4 Ω Rated Input Power Max. Input power 130W Net Dimensions (W x H x D) 190 mm x 310 mm x 205 mm Net Weight 2.07 kg x 2 ... -
Page 24: Maintenance
Appendix Handling the Unit Maintenance When shipping the unit Notes on Discs Please save the original shipping carton and packing materials. If you need to ship the unit, for maximum protection, re-pack the unit as it was Handling Discs originally packed at the factory. Never stick paper or tape on the disc. - Page 25 CM4230_AU.DPANLLK ENG 7527.indd 25 CM4230_AU.DPANLLK ENG 7527.indd 25 2013-03-06 2013-03-06 9:28:09 9:28:09...
- Page 26 CM4230_AU.DPANLLK ENG 7527.indd 26 CM4230_AU.DPANLLK ENG 7527.indd 26 2013-03-06 2013-03-06 9:28:09 9:28:09...
Need help?
Do you have a question about the CM4230-AU and is the answer not in the manual?
Questions and answers