Table of Contents
Advertisement
Quick Links
Advertisement
Table of Contents

Subscribe to Our Youtube Channel
Related Manuals for Gear Head WP7000U


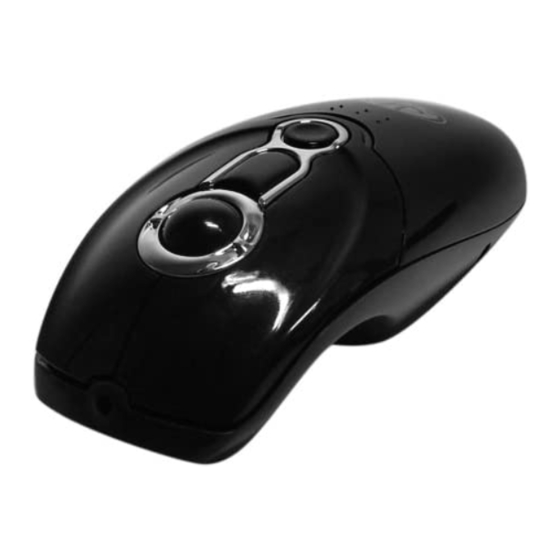
Summary of Contents for Gear Head WP7000U
- Page 1 Wireless Presenter Mouse Model #: WP7000U User’s Manual Rev. 060801...
-
Page 2: User's Record
User’s Record: To provide quality customer service and technical support, it is suggested that you keep the following information as well as your store receipt and this user’s manual. Date of Purchase: __________________________________ Model Number: __________________________________ Serial Number: __________________________________ Product Rev Number (located below the UPC on the package): __________________________________... -
Page 3: Package Contents
Package Contents: Your new Wireless Presenter will ship with the following items. § Wireless Presenter Mouse § USB Dongle § Desktop USB Recharger/Receiver § 2 AAA Ni-MH Rechargeable Batteries § USB Trickle Charge Cable § User’s Manual and Warranty Information §... -
Page 4: Hardware Descriptions
Hardware Descriptions:... -
Page 5: Hardware Installation
NOTE: The pictures shown in the User’s Manual are for demonstration purposes only. Your computer or product may look slightly different. Your Wireless Presenter may interfere with other PS/2 or USB input devices. Please remove any PS/2 or USB mouse connected to your computer prior to installing your Wireless Presenter. - Page 6 Connect Using ONLY The USB Dongle: a. Pull the USB Dongle out of the Desktop USB Recharger / Receiver: b. Turn on your computer. c. Connect the USB Dongle into an available USB port on your computer. d. After Windows ®...
- Page 7 3. Establish a Connection: a. Turn on the Power Switch on the bottom of your Wireless Presenter. b. Press the Connect button on the USB Dongle, and then the LED Connection Indicator will blink. c. Press the Connect button on the bottom of your Wireless Presenter. d.
-
Page 8: Presenter Mode
Presenter Mode automatically. In Presenter Mode, there are two special features: Mouse Trackball: In Presenter Mode, the Scroll Wheel will respond as a mouse trackball and you can use it to control your mouse pointer. Laser Pointer: Press and hold the Laser Pointer Button to turn on the Laser Pointer function. (WARNING: Do NOT have direct... -
Page 9: Mouse Mode
When your Wireless Presenter is turned on and has established a connection to your computer, place it on a stable and flat surface. Within a short moment, your Wireless Presenter will switch to Mouse Mode automatically. In Mouse Mode, your Wireless Presenter will respond as a 3-button mouse and the Laser Pointer Button will be disabled. Recharge Your Wireless Presenter: You can either recharge your Wireless Presenter by plugging the USB Dongle into the Desktop USB Recharger/Receiver or by plugging the USB Dongle directly into an available USB port on your computer. - Page 10 d. The LED Charging Indicator will turn solid red to indicate the charging is in progress, and will turn to solid green when your Wireless Presenter is fully charged. Status Description LED Off Not Charging Solid Red Charging Solid Green Charging Completed...
- Page 11 Recharge Your Wireless Presenter Using the USB Trickle Charge Cable (included): a. Plug the Power Connector of the USB Trickle Charge Cable into the Power Port on your Wireless Presenter, and then connect the other end into an available USB port on your computer. b.
-
Page 12: Software Installation
Your Wireless Presenter comes with Presenter Mouse software that integrates with your Windows software allows you to assign special functions to the 3 programmable buttons on your Wireless Presenter. To install the Presenter Mouse software, please follow the instructions below: 1. - Page 13 6. After the installation is complete, click “Restart” to restart your computer. 7. After your computer has restarted, a new icon will be added to the system tray of your Desktop. The Presenter Mouse software for your Wireless Presenter is now installed successfully.
- Page 14 Test Area This text box can be used to test your settings after you have applied the changes. 5. After you have made your selections, click “Apply” to save the changes, then click “OK” to close the Mouse Properties screen. Descriptions The Scroll Wheel on your Wireless Presenter can be configured on this page.
- Page 15 Tapping the button assigned with this function will temporarily turn your screen black. To resume, click any button on your Wireless Presenter. 7. After you have made your selections, click “Apply” to save the changes, then click “OK” to close the Mouse Properties screen.
-
Page 16: Fcc Information
FCC Information: This equipment has been tested and found to comply with limits for Class B digital device pursuant to Part 15 of Federal Communications Commission (FCC) rules. FCC Compliance Statement These limits are designed to provide reasonable protection against frequency interference in residential installation. This equipment generates, uses, and can radiate radio frequency energy, and if not installed or used in accordance with the instructions, may cause harmful interference to radio communication. -
Page 17: Warranty Information
Return Merchandise for Service Any claim under this warranty must be made in writing to Gear Head, LLC, at the address provide by our technician, within 30 days after the owner discovers the circumstances giving rise to any such claim, and must include a copy of this warranty document, a receipt or copy of your invoice marked with the date of purchase, and the original packaging.
Need help?
Do you have a question about the WP7000U and is the answer not in the manual?
Questions and answers