Table of Contents
Advertisement
Quick Links
CABLE FREE WEATHER
STATION
MODEL: WMR928N
USER'S MANUAL
SECTION 1 INTRODUCTION
Congratulations on your purchasing the WMR928N Cable Free
Weather Station. An all-purpose easy-to-use system, the WMR928N
lets you monitor the following weather elements:
- Air temperature
- Relative humidity
- Barometric pressure
- Wind speed and direction
- Rainfall
The WMR928N is also equipped with:
- RF calendar clock with daily alarm
- Weather forecast within 32 to 48 km (20- to 30-mile) radius
- Weather alarms
- Memory for maximum and minimum readings
- Simple, touch-screen operation
- RS232 PC connection jack
-
backlight
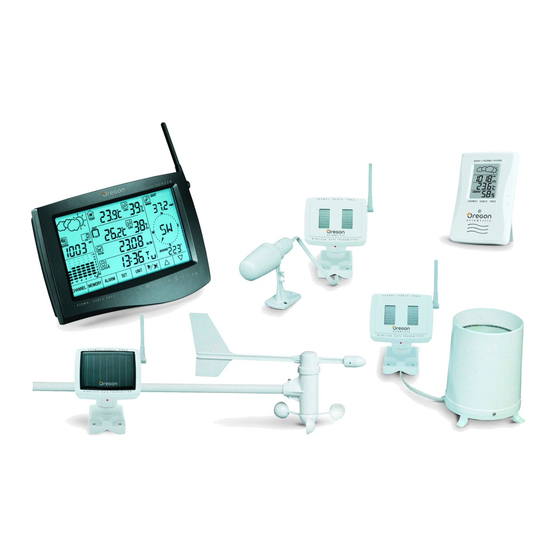
STANDARD PACKAGE
The original WMR928N comes complete with the following:
- Main unit (WMR928N)
- Anemometer (WGR918N)
- Thermo-hygrometer (THGR918N)
- Rain gauge (PCR918N)
- Baro-thermo-hygrometer (BTHR918N)
- 12V AC adapter
The thermo-hygrometer and rain gauge are powered by solar
transmitters STR928 while the anemometer is powered by solar
transmitter STR938.
The WMR928N can support up to seven different remote instruments.
You can also connect up to three optional thermo or thermo-hygro
sensors to the system.
Optional items include:
- Thermo-hygro sensor (THGR228N/THGR238N)
- Thermo sensor (THR228N/THR238N)
Contact an authorized dealer for optional items.
SECTION 2 INSTALLATION
The WMR928N operates at 433MHz. No wire installation is required
among units.
The WMR928N has an effective range of 100 meters in an open area.
Position the units within the range and be sure the transmission
path is clear of interference and obstacles.
Note:The anemometer, thermo-hygrometer and rain gauge should
be installed outdoors and in locations that best measure the weather
elements the instruments are designed for. As for the baro-thermo-
hygrometer, it must be installed indoors. If you have any optional
thermo or thermo-hygro sensors, they can be installed outdoors or
indoors.
THE ANEMOMETER
The anemometer measures wind speed and direction.
To install it,
1. Place the wind cup over the thinnest shaft on the anemometer's
T-bar.
2. Tighten the screw on the base of the wind cup.
1
Advertisement
Table of Contents

Subscribe to Our Youtube Channel
Related Manuals for Oregon Scientific WMR928N


Summary of Contents for Oregon Scientific WMR928N
-
Page 1: Section 1 Introduction
The WMR928N operates at 433MHz. No wire installation is required among units. MODEL: WMR928N The WMR928N has an effective range of 100 meters in an open area. USER’S MANUAL Position the units within the range and be sure the transmission path is clear of interference and obstacles. -
Page 2: The Rain Gauge
3. Align the red markings on the wind vane’s shaft. 3. Mount the rain gauge and its solar transmitter safely in place. 4. Put drops of water on the cross at the base on the rain collector to check the leveling. Water stay at position 1 - 4 means the gauge... -
Page 3: The Main Unit
SECTION 3 OPERATION THE MAIN UNIT The main unit gives you all the readings and controls. It should be THE MAIN UNIT placed indoors. The main unit is powered up by the 12V AC adapter. To install it, 1. Position the main unit and other units within effective range (100 meters). -
Page 4: Weather Forecast
ABOUT RADIO CONTROLLED CLOCK RECEPTION THE RF CALENDAR CLOCK Whenever the WMR928N is brought within range of the radio signal with its radio reception function activated, it will search for The calendar clock is radio-controlled. It automatically the clock signal at a predefined time on each day while the manual synchronizes its current time and date when it is brought within calendar clock settings will be overridden. -
Page 5: Indoor Humidity
INDOOR BAROMETRIC READING INDOOR HUMIDITY The atmospheric pressure reading is displayed in the weather The current indoor relative humidity, taken by the indoor baro- forecast and barometric reading window. thermo-hygrometer, is displayed on the indoor hygrometer window. The pressure reading can be displayed in mb (millibars), hPa To display the maximum, minimum and current humidity, (Hecto-Pascal), inHg (inch mercury) or mmHg (millimeter mercury). -
Page 6: Wind Speed And Direction
Note: Yesterday’s rainfall record will be updated when the real time OUTDOOR AND CHANNEL HUMIDITY clock runs from 11:59:59 pm to 12:00:00 am. And it is counted for 12:00:00 am of one day to 12:00:00 am on the next day. The relative humidity readings taken by the outdoor thermo- hygrometer and separate thermo-hygro sensors are displayed on If the rain sensor detects no rainfall for about two consecutive... -
Page 7: Maintenance
3. Press and hold [SET]. MAINTENANCE 4. Press [I] and [J] for the desired setting. When handled properly, this unit is engineered to give you years 5. Press [SET]. of satisfactory service. Here are a few product care instructions: For temperatures and humidity, the high and low alarms can be set 1. -
Page 8: Note On Compliance
Measuring Range Daily and Cumulative : 1 mm (0.04 inch) Resolution Rainfall Rate Resolution : 1mm/hr (0.04 m/h) typical Electromagnetic compatibility (Article 3.1.b of the R&TTE Direc- WMR928N : tive) Weight : 505 g Applied standards ETS 300 683 : 1997... - Page 9 COUNTRIES RTTE APPROVAL COMPLIED: Austria, Belgium, Denmark, Finland, France, Germany, Greece, Italy, Luxembourg, Netherlands, Portugal, Spain, Sweden, UK and Ireland.
Need help?
Do you have a question about the WMR928N and is the answer not in the manual?
Questions and answers