Table of Contents
Advertisement
Pro Weather Station
Model: WMR86 / WMR86A
USER MANUAL
CONTENTS
Introduction ............................................................... 1
Packaging Contents ................................................. 1
Base Station ........................................................ 1
Wind Sensor ........................................................ 1
Temperature & Humidity Sensor .......................... 1
Rain Gauge .......................................................... 2
Accessories - Sensors ............................................. 2
Overview .................................................................... 2
Front View ............................................................ 2
Back View ............................................................ 2
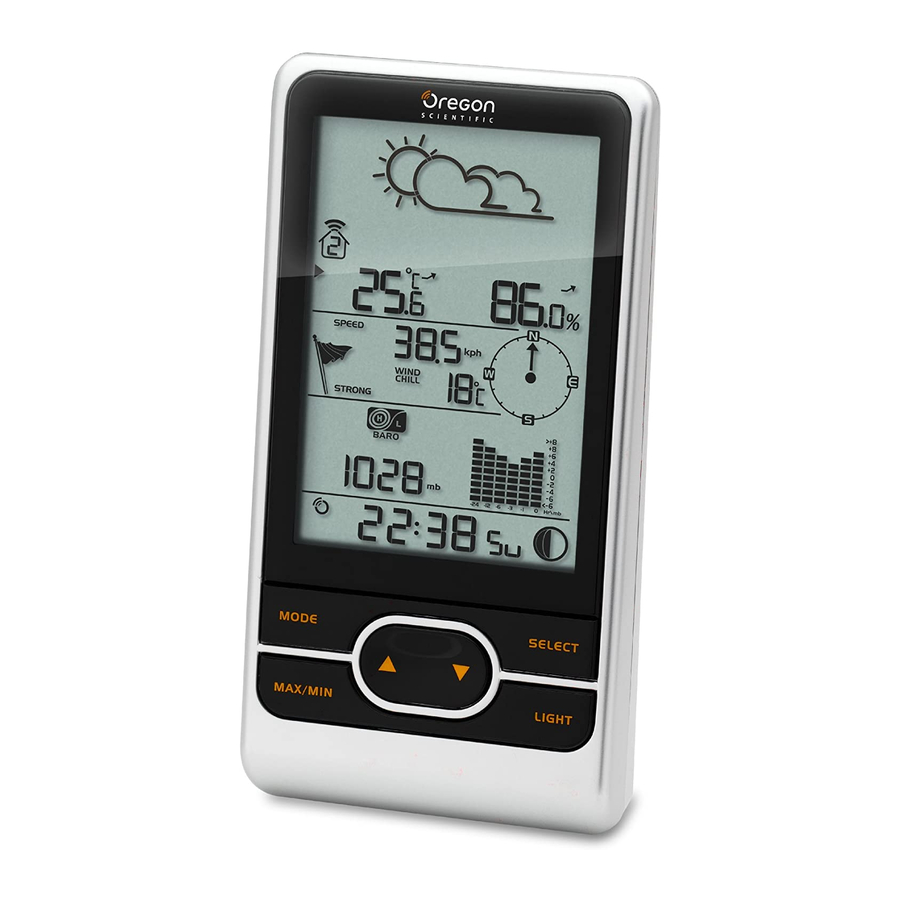
LCD Display ......................................................... 2
Wind Sensor ........................................................ 3
Rain Gauge .......................................................... 3
Outdoor Temperature / Humidity Sensor ............. 4
Getting Started .......................................................... 4
Set Up Remote Wind Sensor ............................... 4
Set Up Rain Gauge .............................................. 4
Set Up Base Station ............................................ 4
Verify Connection ..................................................... 5
Wind Sensor ........................................................ 5
Temperature / Humidity Sensor ........................... 5
Rain Gauge .......................................................... 5
Mounting / Placing Of Sensors ............................... 5
Wind Sensor ........................................................ 5
Temperature / Humidity Sensor ........................... 6
Rain Gauge .......................................................... 6
Clock Reception ....................................................... 6
Clock / Calendar ....................................................... 7
Moon Phase .............................................................. 7
Auto Scanning Function .......................................... 7
Weather Forecast ..................................................... 7
Temperature And Humidity ...................................... 7
Temperature And Humidity Trend ........................ 8
Wind Chill / Direction / Speed .................................. 8
Uvi / Barometer / Rainfall ......................................... 8
UV Index .............................................................. 9
Barometer ............................................................ 9
Rainfall ................................................................. 9
Backlight ................................................................... 9
Reset .......................................................................... 9
Specifications ........................................................... 9
About Oregon Scientific ........................................ 10
EU Declaration Of Conformity ............................... 11
FCC statement ........................................................ 11
INTRODUCTION
Thank you for selecting the Oregon Scientific™ Weather
Station (WMR86 / WMR86A).
The base station is compatible with other sensors. To purchase
additional sensors, please contact your local retailer.
Sensors with this logo
unit.
NOTE Please keep this manual handy as you use
your new product. It contains practical step-by-step
instructions, as well as technical specifications and
warnings you should know about.
PACKAGING CONTENTS
BASE STATION
1 x Base Station
WIND SENSOR
1 x Wind Sensor (1
x Wind Vane Above
and 1 x Anemometer
Below)
TEMPERATURE & HUMIDITY SENSOR
1 x Temperature /
1 x wall mount
Humidity Sensor
1
are compatible with this
3 x AA UM-3
1.5V batteries
1 x sensor
2 x AA UM-3
connector
1.5V batteries
4 x Screws
1 x Round
(Type A)
U- bolt
1 x Table stand
2 x AAA UM-4
bracket
1.5V battery
Advertisement
Table of Contents

Subscribe to Our Youtube Channel
Related Manuals for Oregon Scientific WMR86A


Summary of Contents for Oregon Scientific WMR86A
-
Page 1: Table Of Contents
Pro Weather Station INTRODUCTION Thank you for selecting the Oregon Scientific™ Weather Model: WMR86 / WMR86A Station (WMR86 / WMR86A). USER MANUAL The base station is compatible with other sensors. To purchase additional sensors, please contact your local retailer. CONTENTS Introduction ............... -
Page 2: Rain Gauge
2. MAX/MIN: Read the max / min memory readings; RAIN GAUGE clear readings 3. SELECT: Switch between the different areas 4. LIGHT: Activate backlight : Increase / decrease values of the selected 2 x AA UM-3 setting; toggle between indoor / outdoor channels 1.5V batteries BACK VIEW 4 x Screws... -
Page 3: Wind Sensor
: Main unit battery low 3. Past 24hrs rainfall is displayed 2. Weather forecast 4. UVI level indicator 5. UVI / barometric pressure (mmHg, inHg or mb) / A. Temperature Area rainfall readings (in or mm) for the current hour B. -
Page 4: Outdoor Temperature / Humidity Sensor
1. Unscrew the anemometer from the wind sensor carefully. 2. Insert batteries matching the polarities (+ / -) and replace the anemometer. Press RESET after each battery change. SET UP REMOTE TEMPERATURE / HUMIDITY SENSOR The remote sensor can collect data from up to 3 channels. To set up the remote sensor: 1. -
Page 5: Verify Connection
• Wind direction indicator. Move the direction of the wind indication and verify the icon moves in the same direction TEMPERATURE / HUMIDITY SENSOR 2. Insert the batteries, matching the polarities (+ / -). 3. Press RESET after each battery change. 4. -
Page 6: Temperature / Humidity Sensor
b. Insert 4 type A screws into the holes of the sensor connector. Screw firmly into place, i.e., fence. Slide wind vane onto the smaller end of the sensor connector. Water will pool to the center of the cross when the rain gauge is level. -
Page 7: Clock / Calendar
To enable (and force a signal search) / disable the AUTO SCANNING FUNCTION clock radio reception (clock synchronization): To activate the outdoor temperature and humidity 1. Press SELECT to navigate to the Clock / Calendar / auto-scan function: Moon Phase Area. will show next to the Area. -
Page 8: Temperature And Humidity Trend
NOTE The unit of all temperature related displays will be The wind level is shown by a series of icons: changed simultaneously. ICON LEVEL DESCRIPTION <2 mph (<4km/h) To view temperature (Current / Min / Max temperature) readings: Light 2-8 mph (3~13 km/h) 1. -
Page 9: Uv Index
2. Press MODE repeatedly to select Barometric E.g., if it is 10:30 pm now, the bar plotted directly above -1 shows the reading recorded from 9 to 10 pm and display. -6 shows the reading recorded earlier in the evening, 3. -
Page 10: About Oregon Scientific
433MHz your local retailer. Range Up to 100 meters (328 feet) with no obstructions ABOUT OREGON SCIENTIFIC Transmission Approx. every 102 seconds Visit our website (www.oregonscientific.com) to learn Channel no. more about Oregon Scientific products. If you're in the US... -
Page 11: Eu Declaration Of Conformity
EU DECLARATION OF CONFORMITY Name: Oregon Scientific, Inc. Hereby, Oregon Scientific, declares that this Pro Weather Address: 19861 SW 95 Ave.,Tualatin, Station (models: WMR86 / WMR86A) is in compliance Oregon 97062 USA with the essential requirements and other relevant provisions of Directive 1999/5/EC. A copy of the signed Telephone No.: 1-800-853-8883 and dated Declaration of Conformity is available on...
Need help?
Do you have a question about the WMR86A and is the answer not in the manual?
Questions and answers