Table of Contents
Advertisement
Available languages
Available languages
Quick Links
W4D7 xxx x x
Italiano
Istruzioni per l'uso
COMBINATO FRIGORIFERO/CONGELATORE
Sommario
Istruzioni per l'uso, 1
Assistenza, 3
Installazione, 16
Avvio e utilizzo, 17
Anomalie e rimedi, 18
English
REFRIGERATOR/FREEZER COMBINATION
Contents
Operating Instructions, 1
Assistance, 3
Description of the appliance, 6
Description of the appliance, 11
Installation, 20
Start-up and use, 21
Troubleshooting, 23
Français
Mode d'emploi
COMBINE REFRIGERATEUR/CONGELATEUR
Sommaire
Mode d'emploi, 1
Assistance, 3
Description de l'appareil, 7
Description de l'appareil, 12
Installation, 24
Anomalies et remèdes, 27
Deutsch
Gebrauchsanleitungen
KÜHL-/GEFRIERKOMBI
Inhaltsverzeichnis
Gebrauchsanleitungen, 1
Kundendienst, 4
Beschreibung Ihres Gerätes, 7
Beschreibung Ihres Gerätes, 12
Installation, 28
Nederlands
Gebruiksaanwijzingen
KOEL/DIEPVRIESCOMBINATIE
Inhoud
Gebruiksaanwijzingen, 1
Service, 4
Beschrijving van het apparaat, 8
Beschrijving van het apparaat, 13
Installatie, 32
Advertisement
Table of Contents

Related Manuals for Hotpoint Ariston W4D7 Series


Summary of Contents for Hotpoint Ariston W4D7 Series
-
Page 1: Table Of Contents
W4D7 xxx x x Français Mode d’emploi COMBINE REFRIGERATEUR/CONGELATEUR Sommaire Mode d’emploi, 1 Assistance, 3 Description de l’appareil, 7 Description de l’appareil, 12 Installation, 24 Mise en marche et utilisation, 25 Entretien et soin, 26 Précautions et conseils, 27 Anomalies et remèdes, 27 Italiano Deutsch Istruzioni per l’uso... - Page 2 Español Română Instrucţiuni de folosire Manual de instrucciones COMBINĂ FRIGIDER/CONGELATOR COMBINADO FRIGORÕFICO/CONGELADOR Sumar Sumario Manual de instrucciones, 2 Instrucţiuni de folosire, 2 Asistenţă, 5 Asistencia, 4 Descriere aparat, 10 Descripción del aparato, 8 Descriere aparat, 15 Descripción del aparato, 13 Instalación, 36 Instalare, 48 Pornire şi utilizare, 49...
- Page 3 Assistance Before calling for Assistance: • Check if the malfunction can be solved on your own (see Troubleshooting). • If after all the checks, the appliance still does not operate or the problem persists, call the nearest Service Centre Communicating: • type of malfunction • appliance model (Mod.) • serial number (S/N) This information can be found on the data plate located on the bottom left side of the refrigerator compartment. Never call on unauthorized technicians and always refuse spare parts which are not originals. Assistance Avant de contacter le centre d’Assistance : • Vérifiez si vous pouvez résoudre l’anomalie vous-même (voir...
- Page 4 Kundendienst Asistencia Bevor Sie sich an den Kundendienst wenden: Antes de llamar al Servicio de Asistencia Técnica: • Prüfen Sie, ob die Störung selbst behoben werden kann (siehe • Verifique si la anomalía puede ser resuelta por Ud. mismo Störungen und Abhilfe). (ver Anomalías y Soluciones). • Sollte trotz aller Kontrollen das Gerät nicht funktionieren und • Si, no obstante todos los controles, el aparato no funciona y der von Ihnen festgestellte Fehler weiter bestehen bleiben, el inconveniente por Ud detectado continúa, llame al Centro dann fordern Sie bitte den nächstgelegenen technischen de Asistencia Técnico más cercano.
- Page 5 Asistenţă Assistência Antes de contactar a Assistência técnica: Înainte de a apela Asistenţa: • Verifique se pode resolver sozinho a anomalia (veja as • Verificaţi dacă puteţi remedia singuri anomalia (vezi Anomalii şi remedii). Anomalias e Soluções). • Se, apesar de todos os controlos, o aparelho não funcionar e • Dacă, în ciuda tuturor controalelor, aparatul nu funcţionează o inconveniente detectado continuar, contactar o Centro de şi problema observată...
-
Page 6: Descrizione Dell'apparecchio
Descrizione dell’apparecchio Description of the appliance Pannello di controllo Control panel 1 Pulsante FUNZIONAMENTO CONGELATORE per regolare la 1 FREEZER OPERATION Button to regulate the temperature the temperatura del vano congelatore. Il pulsante è utilizzato con freezer compartment. Button is used with SUPER FREEZE SUPER FREEZE per accendere/spegnere il prodotto premere Button to switch on/switch off the product by pressing both entrambi per 3 secondi. 3 seconds 2 Pulsante SUPER FREEZE (congelamento rapido) per 2 SUPER FREEZE Button (rapid freezing) to freeze fresh food. - Page 7 Description de l’appareil Beschreibung Ihres Gerätes Tableau de bord Bedienblende 1 Touche de COMMANDE DU CONGÉLATEUR permettant de 1 Taste GEFRIERFACHBEDIENUNG zur Temperaturregelung régler la température dans le compartiment congélateur. La des Gefrierfachs. Die Taste wird zusammen mit SUPER touche est utilisée avec le SUPER FREEZE. Pour allumer/ FREEZE zum Ein- und Ausschalten des Produkts verwendet. éteindre le produit, appuyez sur les deux pendant 3 secondes. Halten Sie beide Tasten 3 Sekunden lang gedrückt. 2 Touche SUPER FREEZE (congélation rapide) permettant de 2 Taste SUPER FREEZE (Schnellgefrieren) zum Einfrieren von congeler les aliments frais. Appuyez pendant 3 secondes sur frischen Lebensmitteln. Zum Einschalten bei ausgeschaltetem...
- Page 8 Beschrijving van het Descripción del aparato Panel de control apparaat 1 FUNCIONAMIENTO DEL CONGELADOR Mando para regular Bedieningspaneel la temperatura del compartimiento congelador. El botón se utiliza con SUPER FREEZE, para encender y apagar el producto pulse ambos durante 3 segundos. 1 Knop voor BEDIENING VRIEZER, om de temperatuur in 2 CONGELACIÓN RÁPIDA Tecla para congelar alimentos het vriesgedeelte te regelen. De knop wordt gebruikt met SUPERVRIEZEN. Om het apparaat in of uit te schakelen drukt frescos. Si el aparato está apagado, para encenderlo hay que...
- Page 9 Opis urządzenia Descrição do aparelho Panel kontrolny Painel de comandos 1 Przycisk FREEZER OPERATION do regulacji temperatury w 1 FUNCIONAMENTO DO CONGELADOR Botão para regular komorze zamrażarki. Przycisk jest używany z SUPER FREEZE, a temperatura do compartimento do congelador. O botão é w celu włączanie/wyłączenia urządzenia, należy przytrzymać utilizado com SUPER FREEZE; para ligar/desligar o produto, wciśnięte oba przyciski przez 3 sekundy.
- Page 10 Descriere aparat Panoul de control 1 FUNCŢIONARE CONGELATOR Buton pentru a regla temperatura congelatorului. Butonul este utilizat cu SUPER FREEZE pentru a aprinde/stinge produsul, apăsaţi-le pe amândouă timp de 3 secunde. 2 Buton SUPER CONGELARE (congelare rapidă), pentru a congela alimente proaspete. Apăsaţi butonul pentru 3 secunde pentru a porni produsul în timp ce este oprit 3 Lumina albastră...
-
Page 11: Descrizione Dell'apparecchio
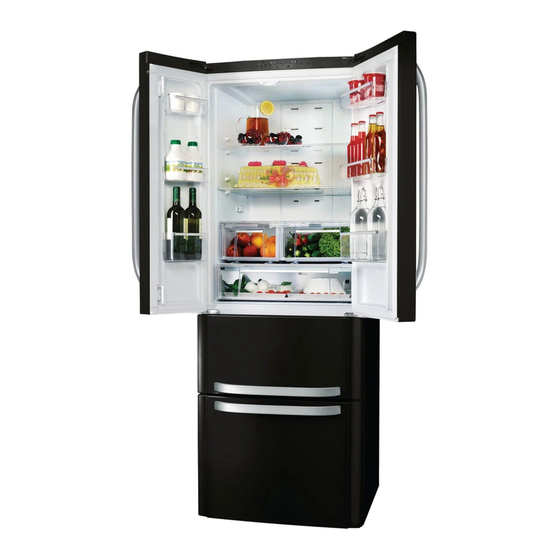
Descrizione dell’apparecchio Description of the appliance Vista d’insieme Overall view Le istruzioni sull’uso valgono per diversi modelli per cui è The instructions contained in this manual are applicable to different possibile che la figura presenti particolari differenti rispetto a model refrigerators. The diagrams may not directly represent the quelli dell’apparecchio acquistato. La descrizione degli oggetti appliance purchased. For more complex features, consult the più complessi si trova nelle pagine seguenti. - Page 12 Description de l’appareil Beschreibung Ihres Gerätes Vue d’ensemble Geräteansicht Ces instructions d’utilisation s’appliquent à plusieurs modèles, Die Gebrauchsanleitungen gelten für mehrere Gerätemodelle. il se peut donc que les composants illustrés présentent des Demnach ist es möglich, dass die Abbildung Details enthält, différences par rapport à ceux de l’appareil que vous avez acheté.
- Page 13 Beschrijving van het apparaat Descripción del aparato Algemeen aanzicht Vista en conjunto Deze gebruiksaanwijzingen gelden voor verscheidene modellen Las instrucciones sobre el uso son válidas para distintos modelos en het is daarom mogelijk dat de figuur andere details afbeeldt y por lo tanto es posible que la figura presente detalles diferentes dan het door u aangeschafte apparaat. De beschrijving van de a los del aparato que Ud. ha adquirido. La descripción de las meest complexe elementen vind u terug in de volgende pagina’s. piezas más complejas se encuentra en las páginas sucesivas. 1 Verstelbare POOTJES. 1 PATAS de regulación 2 INVRIES- en BEWAARGEDEELTE 2 Compartimiento CONGELAMIENTO y CONSERVACIÓN 3 Vak voor FLESSEN 3 Balconcito BOTELLAS Food Care Zone / Food Care Zone 0°C / Safe Defrost Food Care Zone / Food Care Zone 0°C / Safe Defrost 5 GROENTE- en FRUITLADE 5 Recipiente FRUTA y VERDURA...
- Page 14 Opis urządzenia Descrição do aparelho Widok ogólny Visão geral Estas instruções sobre a utilização são válidas para vários modelos, Instrukcje dotyczące użytkowania są takie same dla różnych portanto é possível que na figura haja pormenores diferentes do modeli, dlatego też rysunki mogą przedstawiać inne szczegóły aparelho que adquiriu. Há uma descrição dos assuntos mais niż w zakupionym urządzeniu. Opis bardziej skomplikowanych elementów znajduje się...
- Page 15 Descriere aparat Vedere de ansamblu Instrucţiunile de utilizare sunt valabile pentru mai multe modele, deci este posibil ca ilustraţiile să nu corespundă întocmai aparatului pe care l-aţi achiziţionat. Descrierea componentelor care pot varia este cuprinsă în paginile următoare. 1 SUPORT de reglare. 2 Compartimentul CONGELARE şi CONSERVARE 3 Raft STICLE Food Care Zone / Food Care Zone 0°C / Safe Defrost...
-
Page 16: Installazione
Installazione 1 Inserire la spina nella presa ed accendere il prodotto tramite l’apposito pulsante, accertarsi che si accenda la spia gialla TEMPERATURA FREEZER e TEMPERATURA FRIGORIFERO. ! È importante conservare questo libretto per poterlo consultare 2 Dopo qualche ora sarà possibile inserire alimenti nel frigorifero. in ogni momento. In caso di vendita, di cessione o di trasloco, 3 Premere il tasto SUPER FREEZE (congelamento rapido): si assicurarsi che resti insieme all’apparecchio per informare il nuovo accenderà la spia blu SUPER FREEZE. Essa si spegnerà proprietario sul funzionamento e sui relativi avvertimenti. quando il congelatore avrà raggiunto la temperatura ottimale: ! Leggere attentamente le istruzioni: ci sono importanti informazioni a quel punto sarà possibile inserire gli alimenti sull’installazione, sull’uso e sulla sicurezza. Sistema di raffreddamento Posizionamento e collegamento No Frost Posizionamento 1. Posizionare l’apparecchio in un ambiente ben aerato e non... - Page 17 le due manopole: i cubetti di ghiaccio cadranno nel contenitore RIPIANI: sottostante, pronti per essere serviti (vedi figura). Sono estraibili e regolabili in altezza grazie alle apposite guide , per l’inserimento di contenitori o alimenti di notevole dimensione. Indicatore TEMPERATURA : per individuare la zona più...
-
Page 18: Manutenzione E Cura
Sostituire la lampadina ! Non riporre cibi troppo voluminosi nella parte del cassetto freezer La nuova illuminazione a led, grazie alla potente luce diffusa, superiore occupata dall’ Ice Device ove presente. permette una chiara visione di ogni alimento senza alcuna zona ! Durante il congelamento evitare di aprire la porta. d’ombra. Nel caso sia necessario sostituire il led, rivolgersi al ! In caso di interruzione di corrente o di guasto, non aprire la servizio Assistenza Tecnica porta del congelatore: in questo modo congelati e surgelati si conserveranno senza alterazioni per circa 9-14 ore. - Page 19 c )Suona líallarme e lampeggiano le due spie gialle blu e • La direttiva Europea 2012/19/EU sui rifiuti di apparecchia¬ture quella verde. elettriche ed elettroniche (RAEE), prevede che gli • L’apparecchio segnala un riscaldamento pericoloso del elettrodo¬mestici non debbano essere smaltiti nel normale congelatore: gli alimenti devono essere gettati. flusso dei rifiuti solidi urbani. Gli apparecchi dismessi devono essere raccolti separatamente per ottimizzare il tasso di recupero e riciclaggio dei materiali che li compongono ed impedire potenziali danni per la salute e l’ambiente. Il simbolo del cestino barrato è riportato su tutti i prodotti per ricordare...
-
Page 20: Operating Instructions
Installation 1. Insert the plug into the socket and switch on the product using the appropriate button, ensure that yellow refrigerator and freezer temperature lights illuminates ! Before placing your new appliance into operation please read these 2. After a few hours you will be able to put food in the refrigerator. operating instructions carefully. They contain important information for 3. Press the SUPER FREEZE button (rapid freezing): the SUPER safe use, for installation and for care of the appliance. FREEZE indicator light will illuminate. Once the refrigerator has ! Please keep these operating instructions for future reference. reached the optimal temperature, the indicator light goes out Pass them on to possible new owners of the appliance. and you can begin food storage. Positioning and connection Chiller system Positioning NO FROST 1. Place the appliance in a well-ventilated humidity-free room. 2. Do not obstruct the rear fan grills. The compressor and condenser give off heat and require good ventilation to operate correctly and save energy. -
Page 21: Maintenance And Care
store food in a less humid environment like fruit, or close it (position A) to store food in a more humid environment like vegetables. ICE DEVICE After pouring water in the special ice cups, place them in their TEMPERATURE Indicator light : to identify the coldest area in places in the ice device. -
Page 22: Precautions And Tips
Precautions and tips 1. press the FREEZER OPERATION Button and SUPER FREEZE Button for 3 seconds to switch off the product 2. pull the plug out of the socket ! The appliance was designed and manufactured in compliance with international safety standards. The following warnings are ! If this procedure is not followed, the alarm may sound. This provided for safety reasons and must be read carefully. alarm does not indicate a malfunction. To restore normal operation insert the plug into the socket, press the FREEZER OPERATION and SUPER FREEZE button and set the FREEZER OPERATION button on the desired value.To disconnect the appliance, follow point 1 and 2. This appliance complies with the following Community Directives: Cleaning the appliance - 73/23/EEC of 19/02/73 (Low Voltage) and subsequent amendments;... - Page 23 Respecting and conserving the • The food is near the back inside wall of the refrigerator. environment The motor runs continuously. • Install the appliance in a fresh and well-ventilated room. Ensure • The SUPER FREEZE button has been pressed (rapid freezing): that it is protected from direct sunlight and do not place it near the blue SUPER FREEZE light is on (see Description). heat sources. • The door is not closed properly or is continuously opened. • Try to avoid keeping the door open for long periods or opening • The outside ambient temperature is very high. • Do not fill the appliance with too much food: cold air must The appliance makes a lot of noise. circulate freely for food to be preserved properly. If circulation • The appliance has not been installed on a level surface (see is impeded, the compressor will work continuously.
-
Page 24: Installation
Installation Mise en marche et utilisation ! Conservez ce mode d’emploi pour pouvoir le consulter à tout moment. En cas de vente, de cession ou de déménagement, veillez à ce qu’il suive l’appareil pour informer le nouveau Mise en service de l’appareil propriétaire sur son fonctionnement et lui fournir les conseils ! Avant de mettre l’appareil en service, suivez bien les correspondants. - Page 25 ICEDEVICE CLAYETTES: Sortez les récipients spéciaux de glace, mettez-y de l’eau et Elles sont amovibles et réglables en hauteur grâce à des glissières placez-les dans leur location dans Icedevice. Approximativement spéciales , pour le rangement de récipients ou d’aliments de 2 heures après, les cubes de glace seront prêts.
-
Page 26: Entretien Et Soin
Pour profiter à plein de votre congélateur Lorsque cette fonction est activée, 4 voyants s’allumeront pendant 2 secondes : le voyant SUPER COOL, le voyant SUPER FREEZE • Utilisez la touche de COMMANDE DU CONGÉLATEUR pour et deux voyants de température, l’un pour le réfrigérateur et l’autre ajuster la température (voir Description). pour le congélateur. Au bout de 5 secondes, l’interface entre en • Ne recongelez pas des aliments décongelés ou en cours de mode économie d’énergie et les voyants s’éteignent. L’interface décongélation; il faut les faire cuire et les consommer (dans reste éteinte même lors de l’ouverture de la porte. Pour rallumer les 24 heures). l’interface, il suffit d’appuyer sur une touche quelconque. Il est • Les aliments frais à congeler ne doivent pas être placés au possible de modifier la température en appuyant sur les touches contact d’aliments déjà congelés; il faut les stocker dans le de réglage.L’optimisation des consommations se produira au bout compartiment supérieur CONGELATION et CONSERVATION de 48 heures après l’activation de la fonction. Pour désactiver la où la température qui descend au-dessous de -18°C garantit fonction I Care, éteignez le produit (Voir la description). Le produit une vitesse de congélation adéquate. peut être de nouveau allumé pour le fonctionnement normal.Dans • Ne stockez pas dans votre congélateur des bouteilles en verre des endroits humides, l’activation de la fonction I Care pourrait contenant des liquides, bouchées ou fermées hermétiquement, entraîner la légère formation de condensation sur les portes. La elles pourraient se briser. désactivation de cette fonction rétablit toutefois les conditions • La quantité journalière maximale d’aliments pouvant être standard du produit. - Page 27 Le moteur ne démarre pas. • Ne touchez pas à l’appareil pieds nus ou si vos mains ou pieds • L’appareil est équipé d’un système protège-moteur (voir Mise sont mouillés ou humides. en marche et utilisation). • Ne touchez pas aux parties refroidissantes: vous pourriez vous brûler ou vous blesser. Les voyants sont faiblement éclairés. • Pour débrancher la fiche de la prise de courant, sortez la fiche, • Débranchez la fiche et rebranchez-la dans la prise de courant ne tirez surtout pas sur le câble. après l’avoir retournée sens dessus dessous. • Il ne suffit pas seulement d’éteindre le produit pour interrompre toutes les connexions électriques. a) L’alarme sonne. • En cas de panne, n’essayez en aucun cas d’accéder aux a) La porte du réfrigérateur est restée ouverte pendant plus de mécanismes internes pour tenter de réparer l’appareil.
-
Page 28: Installation
Installation Inbetriebsetzung und Gebrauch ! Es ist äußerst wichtig, diese Bedienungsanleitung sorgfältig aufzubewahren, um sie jederzeit zu Rate ziehen zu können. Sorgen Sie dafür, dass sie im Falle eines Umzugs oder Übergabe Einschalten Ihres Gerätes an einen anderen Benutzer das Gerät stets begleitet, damit auch ! Bevor Sie Ihr Gerät in Betrieb setzen, beachten Sie bitte aufmerksam die Installationshinweise (siehe Installation). der Nachbesitzer die Möglichkeit hat, diese zu Rate zu ziehen. - Page 29 ! Achten Sie beim Schließen der Kühlschranktüren auf die Position des Pfostens (siehe Abbildung) ICEDEVICE Nehmen Sie die zur Eisbereitung bestimmten Schalen heraus, füllen Sie diese mit Wasser und stellen Sie sie in das Fach “Icedevice” (Abb. 7). Nach ca. 2 Stunden stehen Ihnen die fertigen Eiswürfel bereits zur Verfügung.
-
Page 30: Vorsichtsmaßregeln Und Hinweise
Optimaler Gebrauch des Gefrierfachs Reinigung Ihres Gerätes • Das Gehäuse des Gerätes, außen und innen, sowie die • Mit der Taste GEFRIERFACHBEDIENUNG kann die Temperatur Türdichtungen können mit einem mit Wasser und Bikarbonat geregelt werden (siehe Beschreibung). oder einer milden Spüllauge getränkten Schwamm gereinigt • An- oder aufgetautes Gefriergut darf nicht wieder eingefroren werden. Vermeiden Sie Löse-, Scheuer-, Bleichmittel oder werden. Solche Lebensmittel müssen zu einem Fertiggericht Ammoniak. verarbeitet werden (innerhalb 24 Std.) • Das Zubehör kann herausgenommen und in einer warmen • Bereits gefrorene Lebensmittel dürfen nicht mit den frisch Spüllauge gereinigt werden. Anschließend sorgfältig klarspülen einzufrierenden Lebensmitteln in Berührung kommen. -
Page 31: Störungen Und Abhilfe
Der Motor startet nicht. • Berühren Sie nicht den Rückwandverdampfer: • Das Gerät ist mit einem Motorschutzkontrollsystem ausgestattet es besteht Verletzungsgefahr. (siehe Inbetriebsetzung und Gebrauch). • Ziehen Sie den Gerätestecker nicht am Netzkabel aus der Steckdose, sondern nur am Stecker selbst. Das Licht der Kontrollleuchten ist zu schwach. • Es ist nicht ausreichend, das Gerät abzuschalten, um alle • Ziehen Sie den Netzstecker aus der Steckdose und stecken Stromverbindungen zu trennen. -
Page 32: Installatie
Installatie ! Dit model is voorzien van een motorbeschermende controlefunctie die de compressor pas circa 8 minuten na het aanzetten doet starten. Dit gebeurt ook na elke opzettelijke of onopzettelijke ! Bewaar dit boekje zorgvuldig voor eventuele toekomstige onderbreking van de stroomtoevoer (black out). raadpleging. Wanneer u het product weggeeft, verkoopt of wanneer u verhuist, dient u dit boekje bij het apparaat te bewaren 1. Doe de stekker in het stopcontact en doe het apparaat aan zodat alle nodige informatie voorhanden blijft. m.b.v. de speciale knop. Controleer of het gele controlelampje ! Lees de gebruiksaanwijzingen zorgvuldig door: er staat aangaat van de VRIEZERTEMPERATUUR en de- belangrijke informatie in over installatie, gebruik en veiligheid. -
Page 33: Optimaal Gebruik Van De Diepvrieskast
Food Care Zone * DRAAGPLATEAUS : deze kunnen dankzij de speciale gleuven Gedeelte voor het bewaren van verse levensmiddelen zoals vlees worden verwijderd of in hoogte geregeld , voor het invoeren van en vis. Dankzij de lage temperatuur in het deel van de koelkast grote verpakkingen of etenswaren. -
Page 34: Onderhoud En Verzorging
voor het snel invriezen SUPERVRIEZEN (het overeenkomstige behouden moet u levensmiddelen altijd goed bewaren en blauwe controlelampje zal aangaan), doe de levensmiddelen afsluiten. Hierdoor vermijdt u ook het vormen van vlekken. • Als u het apparaat voor langere tijd uitzet moet u de binnenkant in de vriezer en sluit de deur. De functie wordt automatisch na 24 uur uitgeschakeld, of wanneer de optimale temperaturen reinigen en de deuren openlaten. zijn bereikt (aanwijzerlicht gaat uit); Het lampje vervangen ! Plaats geen voedsel met grote afmetingen in het deel van het De nieuwe ledverlichting zorgt ervoor dat u d.m.v. een sterke bovenste vriesvak waar zich de ‘Ice Device’ bevindt (indien verspreiding van het licht elk levensmiddel goed kunt zien en aanwezig). -
Page 35: Storingen En Oplossingen
door een persoon die verantwoordelijk is voor hun veiligheid We raden u aan de staat van de etenswaren te controleren: begeleid worden bij of geïnstrueerd zijn over het gebruik van het zou kunnen dat u ze moet weggooien. het apparaat. Kinderen moeten gecontroleerd worden om te zorgen dat ze niet met het apparaat spelen. • Het verpakkingsmateriaal is geen speelgoed voor kinderen. Afvalverwijdering + geluidssignaal = Overmatige verwarming • Verwijdering van het verpakkingsmateriaal: houdt u aan de plaatselijke normen, zodat het verpakkingsmateriaal c) Het alarm gaat af en het groene en de twee blauwe hergebruikt kan worden. controlelampjes knipperen. • De Europese Richtlijn 2012/19/EU over Vernietiging van • Het apparaat geeft een gevaarlijke verhitting van de Electrische en Electronische Apparatuur (WEEE), vereist... -
Page 36: Instalación
Instalación 8 minutos del encendido. Esto sucede también después de cada interrupción de la alimentación eléctrica, voluntaria o involuntaria (black out). ! Es importante conservar este manual para poder consultarlo cuando sea necesario. En caso de venta, cesión o traslado, 1. Introduzca la clavija en la toma de corriente y encienda verifique que permanezca junto al aparato para informar al nuevo el producto a través del botón correspondiente, verifique propietario sobre su funcionamiento y sobre las precauciones que se encienda la luz testigo amarilla TEMPERATURA durante su uso... - Page 37 ICEDEVICE BANDEJAS: Lleven y rellenen pequenos vasos de hielos con agua y ponganles Son extraíbles y su altura es regulable gracias a las guías en la zona de icedevice. Despues de 2 horas los hielos seran especiales , se utilizan para introducir recipientes o alimentos listos para su uso.
-
Page 38: Mantenimiento Y Cuidados
• La cantidad máxima diaria de alimentos por congelar En ambientes húmedos, con la función I Care activada, podría está indicada en la placa de características ubicada en el presentarse una leve formación de condensación en las compartimiento refrigerador abajo a la izquierda (por ejemplo: puertas; desactivando la función se restablecen las condiciones 4 Kg/24h). estándares del aparato. • Para congelar (si el congelador ya está en funcionamiento): Evitar la formación de moho y malos pulse el botón de congelamiento rápido SUPER FREEZE (se encenderá la luz testigo azul correspondiente), introduzca olores... -
Page 39: Anomalías Y Soluciones
b) La alarma suena y los dos indicadores azules parpadean. • No introduzca en su boca cubitos apenas extraídos del • El aparato señala un calentamiento excesivo del congelador. congelador. Se aconseja verificar el estado de los alimentos: podría ser • Este aparato no puede ser utilizado por personas (incluidos necesario desecharlos. los niños) con capacidades físicas, sensoriales o mentales disminuidas o sin experiencia, salvo que estén supervisadas o instruidas sobre el uso del aparato por una persona responsable de su seguridad. Los niños deberían ser controlados para garantizar que no jueguen con el aparato. -
Page 40: Instalação
Instalação Início e utilização Iniciar o aparelho ! É importante guardar este folheto para poder consultá-lo a qualquer momento. No caso de venda, cessão ou mudança, ! Antes de iniciar o aparelho, obedeça as instruções para a assegure-se que o mesmo permaneça junto com o aparelho para instalação (veja a Instalação). informar ao novo proprietário sobre o funcionamento e as suas ! Antes de ligar o aparelho limpe bem os compartimentos e os respectivas advertências. - Page 41 ICE DEVICE Depois de colocar a água nas formas de gelos, coloque-os nos PRATELEIRAS:Podem ser extraídas e têm altura regulável seus lugares no compartimento de gelo. Os cubos de gelo estarão mediante as guias para este fim , para introduzir recipientes ou prontos em aproximadamente 2 horas.
-
Page 42: Manutenção E Cuidados
Utilize melhor o congelador de temperatura, um para o frigorífico e outro para o congelador. Após 5 segundos, a interface entra na modalidade de poupança • Utilize o botão FUNCIONAMENTO DO CONGELADOR para energética e os indicadores desligam-se. A interface permanece ajustar a temperatura (consulte a descrição). desligada mesmo quando a porta é aberta. É suficiente pressionar • Não congele novamente alimentos que estiverem a um botão qualquer para voltar a acendê-la. É possível modificar descongelar-se ou descongelados; estes alimentos devem a temperatura pressionando os botões de ajuste.A optimização ser cozidos para ser consumados (dentro de 24 horas). dos consumos será feita 48h após a activação da função. Para • Os alimentos frescos a serem congelados não devem ser desactivar a função I Care, desligar o produto (ver descrição). colocados encostados nos já congelados. - Page 43 Os indicadores luminosos estão acesos fracos. • Não é suficiente apagar o produto para interromper todas as • Desligue a ficha e ligue-a novamente na tomada, depois da ligações eléctricas. tê-la rodada para inverter os pinos. • No caso de avaria, nunca mexa nos mecanismos internos para tentar reparar. a) O alarme está a tocar. • Não utilize, no interior dos compartimentos para guardar • A porta do frigorífico permaneceu aberta mais do que dois alimentos congelados, utensílios cortantes e pontiagudos ou minutos. O aviso acústico pára de tocar quando a porta for dispositivos eléctricos se não forem do tipo recomendado pelo...
-
Page 44: Instalacja
Instalacja Uruchomienie i użytkowanie Włączenie lodówko-zamrażarki ! Należy zachować niniejszą książeczkę instrukcji dla przyszłych konsultacji. W razie sprzedaży, odsprzedania, czy przeniesienia ! Przed włączeniem urządzenia, należy postąpić zgodnie z urządzenia w inne miejsce należy upewnić się, by przekazane instrukcją instalowania (patrz Instalowanie). została ono razem z instrukcją, aby nowy właściciel zapoznać... - Page 45 ICE DEVICE* PÓŁKI: Wyjąć i napełnić wodą specjalne pojemniczki i włożyć je z Można je wyciągnąć, a prowadnice służą do wyregulowania powrotem do strefy Icedevice. Po około 2 godzinach kostki lodu wysokości ich umieszczenia tak, aby umożliwić ustawienie na nich są...
-
Page 46: Konserwacja I Utrzymanie
Najlepszy sposób użytkowania zamrażarki pozostaje zgaszony również przy otwieraniu drzwi. Wystarczy wcisnąć jakikolwiek przycisk w celu jego ponownego włączenia. Zmianę temperatury można przeprowadzać przy użyciu przycisków • Do regulacji temperatury używać przycisku FREEZER regulacji.Optymalizacja zużycia energii nastąpi po upływie 48h OPERATION (patrz Opis). - Page 47 • Nie wyjmować wtyczki z gniazdka, ciągnąc za kabel, lecz tej funkcji), wtyczka nie jest włożona do gniazdka prądu lub jest trzymając za wtyczkę. włożona w sposób niewystarczający do uzyskania kontaktu lub • Samo wyłączenie urządzenia nie jest wystarczające do też...
-
Page 48: Asistenţă
Instalare 1. Introduceţi ştecherul în priză şi aprindeţi produsul de la butonul respectiv, verificaţi dacă se aprinde indicatorul galben TEMPERATURĂ FREEZER şi TEMPERATURĂ FRIGIDER. ! Este important să păstraţi acest manual pentru a-l putea consulta 2. După câteva ore puteţi pune alimentele în frigider. în orice moment. - Page 49 Indicator TEMPERATURĂ rece di frigider. 2. Dacă nu apare mesajul OK înseamnă că temperatura este prea mare: setaţi o temperatură mai rece şi aşteptaţi circa 10 h până când temperatura se stabilizează. 3. Controlaţi din nou indicatorul; dacă este necesar, reglaţi încă o dată...
-
Page 50: Întreţinere Şi Curăţire
! Nu amplasaţi alimente voluminoase în partea sertarului de sus al congelatorului, unde se găseşte şi Ice Device (dacă este prezent). ! În timpul congelării evitaţi deschiderea uşii congelatorului. ! Dacă se întrerupe curentul sau este vreo defecţiune (pană) de la reţea, nu deschideţi uşa congelatorului: în acest mod alimentele îngheţate şi congelate se vor păstra intacte timp de 9-14 ore. -
Page 51: Anomalii Şi Remedii
Atenţionări în conformitate cu legislaţia în Indicatoarele emit o lumină slabă. • Scoateţi ştecherul din priză, rotiţi-l în jurul propriului ax, după vigoare care introduceţi-l din nou în priză (invers decât înainte). a) Sună alarma. • Uşa frigiderului a rămas deschisă mai mult de două minute. Alarma încetează... - Page 52 W11317323...
Need help?
Do you have a question about the W4D7 Series and is the answer not in the manual?
Questions and answers