
Related Manuals for ETNA OM971RVS


Summary of Contents for ETNA OM971RVS
- Page 1 GEBRUIKSAANWIJZING INSTRUCTIONS FOR USE OVEN OM945RVS OM971RVS OM971ZT OP971RVS OP971ZT...
- Page 2 Gebruiksaanwijzing NL 3 - NL 31 Instructions for use EN 3 - EN 31 Gebruikte pictogrammen - Pictograms used Belangrijk om te weten - Important information...
-
Page 3: Table Of Contents
INHOUD Uw oven Inleiding Beschrijving Geleiderails/Telescopische geleiderails Accessoires Bediening Eerste gebruik Andere belangrijke instructies Beschrijving van de elektronische klok De klok gelijkzetten Handmatige werking van de oven De kookwekker programmeren De baktijd programmeren De eindtijd van het bakproces programmeren De baktijd en eindtijd programmeren Vergrendeling van de klok (kinderslot) Handmatige deurvergrendeling Ovenfuncties tabel... -
Page 4: Uw Oven
UW OVEN Inleiding Gefeliciteerd met uw keuze voor deze Etna oven. In het ontwerp van dit product heeft eenvoudige bediening en optimale gebruiksvriendelijkheid centraal gestaan. De oven biedt een uitgebreide reeks instellingen, zodat u altijd de juiste bereidingswijze kunt kiezen. -
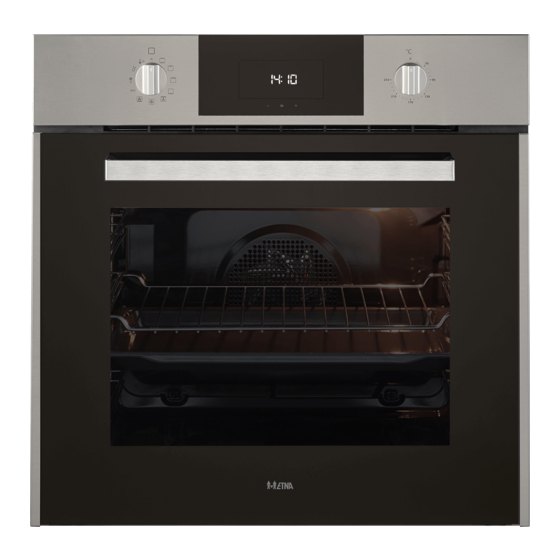
Page 5: Beschrijving
UW OVEN Beschrijving Bedieningspaneel Deurvergrendeling (alleen voor modellen met pyrolyse) Grill-element Geleiderail Ovenrooster Bakplaat Scharnier Binnenglas Ventilatie-openingen 10. Bevestiging aan meubel 11. Lamp 12. Achterpaneel 13. Ventilator 14. Ovendichting 15. Deur 16. Functiekeuzeknop 17. Functiekeuzeknop (alleen voor modellen met pyrolyse) 18. -
Page 6: Geleiderails/Telescopische Geleiderails
UW OVEN Geleiderails/Telescopische geleiderails • Afhankelijk van het model beschikt de oven over drie of vijf geleiderails (niveau 1 tot 3/5). • Voor ovens van 60 cm: niveau 1 wordt voornamelijk gebruikt in combinatie met onderwarmte. De niveaus 4 en 5 zijn geschikt om te gratineren of te roosteren. •... - Page 7 UW OVEN Montage van de telescopische geleiderails bij 60 cm ovens Verwijder de beschermfolie. Maak de grote clips aan de bovenste stang van niveau 2 vast. Klap de rail neer totdat de kleine clips aan de onderste stang zijn vastgeklemd. ▷...
-
Page 8: Accessoires
UW OVEN Accessoires Bij u toestel zitten diverse accessoires, afhankelijk van het model. Gebruik alleen de originele accessoires; deze zijn speciaal voor uw toestel geschikt. Wees er zeker van dat de gebruikte accessoires bestand zijn tegen de temperatuurinstellingen van de gekozen ovenfunctie. Let op: niet alle accessoires zijn geschikt of beschikbaar voor elk toestel (dit kan ook per land verschillen). -
Page 9: Bediening
BEDIENING Eerste gebruik Door het productieproces kunnen er zich in de oven vetresten of andere onzuiverheden bevinden. Ga om deze te verwijderen als volgt te werk: Verwijder alle verpakkingsonderdelen, met inbegrip van het beschermplastic als dat er is. Zet uw oven een uur lang aan op 200 ºC, op functie Laat de oven afkoelen door de deur te openen. - Page 10 BEDIENING De gevoeligheid van de toetsen past zich continu aan de omgevingsomstandigheden aan. Wanneer u de oven op het elektriciteitsnet aansluit, let er dan op dat het oppervlak van het bedieningspaneel schoon en niet bedekt is. Als u de toetsen met uw vinger aanraakt maar de oven niet op juiste wijze reageert, koppel dan de oven van het elektriciteitsnet los en sluit hem na een tijdje opnieuw aan.
-
Page 11: De Klok Gelijkzetten
BEDIENING De klok gelijkzetten Om de tijd van de ovenklok gelijk te zetten moeten de functiekeuze- en temperatuurknop op stand staan. • Wanneer u de oven inschakelt, ziet u dat op de klok de aanduiding 12:00 begint te knipperen. • Door aan te raken kunt u eerst het uur en daarna de minuten gelijkzetten. -
Page 12: De Kookwekker Programmeren
BEDIENING De kookwekker programmeren Druk op totdat het symbool op het scherm gaat knipperen. Druk op ▷ Op het scherm verschijnt 00:00. Stel de tijd in waarna de kookwekker moet afgaan door te drukken op ▷ Er klinkt een geluidssignaal ter bevestiging en de aftelling vanaf de geselecteerde tijd wordt weergegeven. -
Page 13: De Eindtijd Van Het Bakproces Programmeren
BEDIENING U kunt de resterende baktijd op elk moment wijzigen door op te drukken totdat het symbool snel gaat knipperen. Druk vervolgens op om de tijd te wijzigen. Als de baktijd is geprogrammeerd, kan de huidige tijd niet op het scherm worden weergegeven. -
Page 14: Vergrendeling Van De Klok (Kinderslot)
BEDIENING Stel de eindtijd van het bakproces in door te drukken op ▷ Er klinkt een geluidssignaal en de huidige tijd wordt op het scherm weergegeven. Stel een ovenfunctie en -temperatuur in. ▷ De oven blijft uitgeschakeld en de symbolen blijven branden. -
Page 15: Handmatige Deurvergrendeling
BEDIENING Handmatige deurvergrendeling Alleen in ovens met pyrolyse. Met deze functie kan de ovendeur worden vergrendeld. Nadat de deur is vergrendeld kunt u gewoon beginnen met het bakproces. Deze functie kan alleen worden geselecteerd als de functiekeuzeknop zich in de ruststand bevindt. -
Page 16: Ovenfuncties Tabel
BEDIENING Ovenfuncties tabel Let op Houd er rekening mee dat het van het ovenmodel afhangt welke functies er beschikbaar zijn. Raadpleeg onderstaande tabel voor het kiezen van de juiste functie. Lees ook de instructies op de verpakking voor het bereiden van het gerecht. Functie Beschrijving Bovenwarmte + onderwarmte... - Page 17 BEDIENING Functie Beschrijving Voor het bereiden van voedsel in uw oven met minimaal energieverbruik. De oven maakt gebruik van geforceerde convectieverwarming en afhankelijk van het model gaat de oven enkele minuten voordat het bakproces is afgelopen uit. Hiermee is het mogelijk om de restwarmte binnenin de oven te benutten en een perfect gerecht te verkrijgen.
-
Page 18: Onderhoud
ONDERHOUD Het toestel reinigen Reinig het toestel regelmatig om te voorkomen dat vet- en voedsel resten zich ophopen, vooral op de oppervlakken aan de binnen- en buitenkant, de deur en de afdichting. • Reinig de oppervlakken aan de buitenkant met een zachte doek en warm water met zeep. •... -
Page 19: Ovens Met Neerklapbare Grill
ONDERHOUD Ovens met neerklapbare grill Voor het schoonmaken van de bovenkant van de oven: Wacht totdat de oven is afgekoeld. Druk met beide handen de staaf van het grillelement (A) tegen de achterkant van de oven totdat hij loskomt uit de bevestigingsmoer (B). Klap het grillelement naar beneden en maak de bovenkant van de oven schoon. -
Page 20: Pyrolytische Zelfreinigingsfunctie
ONDERHOUD Draai de functiekeuzeknop op stand ▷ U hoort een geluidssignaal ter bevestiging van het feit dat de Aqua Clean functie in werking is gesteld. Het symbool gaat traag knipperen en op het scherm wordt de resterende tijd weergegeven. De duur van deze functie kan niet gewijzigd worden. Draai de functiekeuzeknop op stand om de tijd eerder te beëindigen. - Page 21 ONDERHOUD Waarschuwing! Verwijder eerst alle accessoires en inschuifgeleiders/telescopische geleiders uit de oven. Verwijder daarna losliggende voedselresten uit de ovenruimte en veeg na met een vochtige doek. Restanten voedsel en vet kunnen ontbranden tijdens het pyrolyse proces. Brandgevaar! Waarschuwing! Laat geen doeken of andere stoffen voorwerpen aan het handvat van de oven hangen of ermee in aanraking komen.
-
Page 22: Demonteren Ovendeur
ONDERHOUD Zet de functiekeuzeknop op stand ▷ Het verwarmingsproces van de oven is voltooid, maar de oven is nog te warm en kan niet worden gebruikt. Zolang de oven niet is afgekoeld, blijft de koeling werken en blijft het symbool branden. - Page 23 ONDERHOUD Demontage van de ovendeur bij 60 cm ovens Doe de ovendeur helemaal open. Vergrendel het scharnier door de blokkeerhendels naar voren te draaien. Sluit de ovendeur tot in de vergrendelstand. Pak de deur met beide handen aan de zijkanten beet en til de deur omhoog. Om de deur weer terug te plaatsen, herhaalt u deze handelingen in omgekeerde volgorde.
-
Page 24: Demontage/Montage Van De Binnenglazen Van De Ovendeur
ONDERHOUD Demontage/montage van de binnenglazen van de ovendeur Demonteer eerst de ovendeur. Druk met de vingers op de knoppen aan de bovenkant aan weerszijden van de ovendeur. Trek, terwijl u blijft drukken, aan de bovenste vergrendeling van de deur. Verwijder de glazen uit de deur. Afhankelijk van het model heeft uw oven 2 of 3 glazen. Let op de volgorde en de positie van de glazen wanneer u ze verwijderd, want ze moeten weer in dezelfde volgorde en positie worden gemonteerd nadat ze zijn schoongemaakt. -
Page 25: Ovenlamp Vervangen
ONDERHOUD De ovenlamp vervangen De lamp is een gebruiksartikel en valt daarom niet onder de garantie. Vervang de defecte lamp door een lamp van hetzelfde type. Maak voor vervangen eerst het toestel spanningsloos door de stekker uit de stopcontact te verwijderen of de zekering in de meterkast uit te schakelen! De lamp in dit huishoudelijke apparaat is uitsluitend bedoeld voor verlichting van dit apparaat. -
Page 26: Installatie
INSTALLATIE Deze informatie is uitsluitend bestemd voor de installateur, aangezien hij verantwoordelijk is voor de montage en elektrische aansluiting. Als u zelf de oven installeert, dan is de fabrikant niet aansprakelijk voor mogelijke schade. Voorafgaand aan de installatie • Pak de oven bij de handvaten aan de zijkant om hem te verplaatsen. Gebruik het handvat van de deur nooit om de oven op te tillen. - Page 27 INSTALLATIE Let op! * Voor de installatie van pyrolytische ovens mogen GEEN openingen in de grijze vlakken van het keukenmeubel worden aangebracht. NL 27...
-
Page 28: Electrische Aansluiting
INSTALLATIE Electrische aansluiting De installateur moet controleren of: • De netspanning en frequentie overeenstemmen met de op het gegevensplaatje aangeduide gegevens. • De elektrische aansluiting op het gegevensplaatje het aangeduide maximale vermogen kan verdragen. • Controleer na de elektrische aansluiting de juiste werking van alle elektrische onderdelen van de oven. -
Page 29: Problemen Oplossen
PROBLEMEN OPLOSSEN Algemeen Probeer onderstaande oplossingen als u problemen hebt met uw oven. Mogelijk bespaart u zich zo de tijd en moeite van een onnodig telefoontje naar de klantenservice. De oven werkt niet. • Controleer of er een ovenfunctie en temperatuur gekozen is. •... - Page 30 Reparaties mogen uitsluitend worden uitgevoerd door een gekwalificeerde servicemonteur. Als er een reparatie nodig is, haalt u de stekker uit het stopcontact en neemt u contact op met de klantenservice van Etna. Houd de volgende informatie bij de hand wanneer u belt: •...
-
Page 31: Uw Oven En Het Milieu
UW OVEN EN HET MILIEU Afvoer van het apparaat en de verpakking Dit product is gemaakt van duurzame materialen. Aan het einde van zijn nuttige leven moet het apparaat echter op een verantwoorde manier worden afgevoerd. De overheid kan u hierover informeren. De verpakking van het apparaat kan worden gerecycled. - Page 32 NL 32...
- Page 33 CONTENTS Your oven Introduction Description Guide rails/Telescopic guide rails Accessories Operation First use Other important instructions Description of the electronic clock/timer Setting the time Manual operation of the oven Programming the kitchen timer Programming the cooking time Programming the cooking end time Programming the cooking time and the cooking end time Safety child lock Manual door lock...
-
Page 34: Your Oven
YOUR OVEN Introduction Congratulations on choosing this Etna oven. This product is designed with simple operation and optimum comfort in mind. The oven has a wide range of settings enabling you to select the correct cooking method every time. This manual shows how you can best use this oven. In addition to information about operating the oven, you will also find background information that may be useful when using the appliance. -
Page 35: Description
YOUR OVEN Description Control panel Door lock (only for pyrolytic models) Grill element Tray supports Oven rack Baking tray Hinge Inner Glass Air cooling outlet 10. Unit mounting 11. Oven lighting 12. Back Wall Panel 13. Fan 14. Oven Seal 15. -
Page 36: Guide Rails/Telescopic Guide Rails
YOUR OVEN Guide rails/Telescopic guide rails • The oven has three or five guide rails (Level 1 to 3/5), depending on the model. • For 60 cm ovens: level 1 is mainly used in combination with bottom heat. Levels 4 and 5 are suitable for grilling and toasting. - Page 37 YOUR OVEN Assembling the telescopic guide rails for 60 cm ovens Remove the protective film. Hook the large clips on the upper rail on level 2. Lower the telescopic guide rail until it hooks on the small clips on the lower rail. ▷...
-
Page 38: Accessories
YOUR OVEN Accessories Your appliance is accompanied by a range of accessories, depending on the model. Only use original accessories; they are specially suited to your appliance. Be sure that all the accessories that are being used are able to withstand the temperature settings of the chosen oven function. Note: not all accessories are suitable/available for every appliance (it may also differ by country). -
Page 39: Operation
OPERATION First use There may be traces of fat and other substances in the oven as a result of the manufacturing process. These should be removed using the following procedure: Remove all the packaging from your oven, including the protective plastic, if present. Turn the function control dial to and the temperature control dial to 200 ºC for 1 hour. - Page 40 OPERATION Symbols Clock settings Kitchen timer • Lights up when the clock/timer is selected. • Generates an audio signal when the time has passed. • The oven does not turn off at the end of the timer period. • This function can always be used, also while the oven is cooking. Programming Light up to indicate that the oven is programmed (cooking time, stop time or total).
-
Page 41: Setting The Time
OPERATION Setting the time To set the time on the oven, the function and temperature dials must be in the position. • When you plug in the oven, you will see the clock flashing 12:00. • Touch to adjust the hours and then the minutes. You will hear an audio signal confirming the time is set. -
Page 42: Programming The Kitchen Timer
OPERATION Programming the kitchen timer Touch until the symbol on the display starts flashing. Touch ▷ The indication ‘00:00’ will appear on the display. Select the time after which you want the audio signal of the kitchen timer to sound by touching ▷... -
Page 43: Programming The Cooking End Time
OPERATION You can change the remaining cooking time at any time by touching until the symbol starts to flash quickly. Now touch to change the time. With the Cooking Time function, the remaining time will show permanently on the display. You cannot see the current time on the display when this function is set. -
Page 44: Safety Child Lock
OPERATION Select the cooking end time by touching ▷ An audio signal will sound and the current time will be shown on the display. Select a cooking function and temperature. ▷ The oven will not be in operation, the symbols lit up. The oven is now programmed. -
Page 45: Manual Door Lock
OPERATION Manual door lock Available in pyrolytic models only. This function allows the oven door to be locked. Once the door has been locked, you can start cooking normally. This function can only be selected when the oven command functions are set to the rest position Touch until the... -
Page 46: Oven Functions Table
OPERATION Oven functions table Attention Please note that the available functions will vary according to each model. Consult the table to select the preferred function. Also consult the instructions for preparation on the dish packaging. Function Description Top Heat + Bottom Heat This function is for use when baking cakes where the heat should be even to give a spongy texture. - Page 47 OPERATION Function Description For cooking in the oven with the minimum energy consumption possible. The oven uses convention heating, and depending on the model, switches off a few minutes before the end of cooking, using the residual heat inside the oven and completing the dish perfectly.
-
Page 48: Maintenance
MAINTENANCE Cleaning the appliance Clean your appliance regularly to prevent a build-up of grease and food particles, especially on interior and exterior surfaces, the door and door gasket. • Clean the exterior surfaces with a soft cloth and soapy warm water. •... -
Page 49: Ovens With A Folding Grill
MAINTENANCE Ovens with a folding grill To clean the top part of the oven: Wait until the oven has cooled down. Push the rail of the grill element (A) with both hands towards the back of the oven, to release it from the upper fastening nut (B). Lower the grill element and clean the top part of the oven. -
Page 50: Pyrolytic Self-Cleaning Function
MAINTENANCE Turn the control dial to the position. ▷ You will hear an audio signal indicating that the Aqua Clean cycle has started. The symbol will flash slowly and the time remaining to complete the cycle will appear on the display. - Page 51 MAINTENANCE Caution! First, remove all accessories and guide rails / telescopic guide rails from the oven. Then remove any remaining food from the oven space and wipe the space with a damp cloth. Chunks of food and fat may ignite during the pyrolysis process. Fire hazard! Caution! Do not leave any cloths or fabric hanging from the oven handle or in close contact with Programming the pyrolytic function...
-
Page 52: Removing The Oven Door
MAINTENANCE Turn the control dial to the position. ▷ The oven’s heating process has finished. However, the oven is extremely hot and cannot be used. The cooling process will continue to operate and the symbol will remain lit until the oven cools down. ▷... - Page 53 MAINTENANCE Removing the oven door (60 cm ovens) Open the oven door fully. Block the hinge by turning the latches to the front. Close the door to the lock mode position. Hold the door with both hands holding on to both sides, lift up and pull out the oven door. To assemble the door, carry out the steps in the reverse order.
-
Page 54: Dismantling/Assembling The Interior Glass Of The Door
MAINTENANCE Dismantling/assembling the interior glass of the door First, remove the oven door. Using your fingers, press the buttons located at the top of both sides of the oven door. Keep them pressed and pull on the plastic seal above the door. Remove the glass panes from the door. -
Page 55: Replacing The Oven Light Bulb
MAINTENANCE Replacing the oven light bulb The light bulb is a consumer item and therefore does not fall under the guarantee. Before replacing the light bulb, disconnect the appliance from electricity by unplugging it or switching off the fuse in the circuit breaker box! The light bulb in this household appliance is designed exclusively for lighting this appliance. -
Page 56: Installation
INSTALLATION This information is exclusively for the installer who is responsible for assembly and electrical connection. The manufacturer will not accept liability for possible damage caused if you install the oven yourself. Before installation • To move the oven, use the grips at the sides. Do not use the door handle to lift the oven. •... - Page 57 INSTALLATION Caution! * When installing pyrolytic ovens, DO NOT drill any holes in the unit inside the shaded areas. EN 27...
-
Page 58: Electrical Connection
INSTALLATION Electrical connection The fitter must ensure that: • The mains power voltage and frequency correspond to what is marked on the identification plate. • The domestic wiring system can withstand the maximum power marked on the identification plate. • After connecting the power supply, check that all electrical parts of the oven are working correctly. -
Page 59: Troubleshooting
TROUBLESHOOTING General Try the solutions below if you have problems with your oven. You could save yourself the time and effort of an unnecessary phone call to customer services. The oven doesn’t work • Check whether an oven function and temperature have been selected. •... - Page 60 Repairs should only be performed by a qualified service technician. If maintenance is required, take the plug out of the socket and contact the Etna customer service. Have the following information at hand when you call: •...
-
Page 61: Your Oven And The Environment
YOUR OVEN AND THE ENVIRONMENT Disposal of the appliance and packaging This product is made from sustainable materials. However, the appliance must be disposed of responsibly at the end of its useful life. The government can provide you with information about this. The appliance packaging can be recycled. - Page 62 EN 32...
- Page 63 EN 33...
- Page 64 *721884* 721884...
Need help?
Do you have a question about the OM971RVS and is the answer not in the manual?
Questions and answers