Table of Contents
Advertisement
R
R
E
V
E
R
E
V
E
R
O
'
O
'
W
N
E
R
S
W
N
E
R
S
M
M
O
O
S
E
S
M
S
E
S
M
M
M
A
N
U
A
L
A
A
N
U
A
L
A
H
6
0
0
0
H
6
0
0
0
O
D
E
L
S
O
D
E
L
S
V
V
E
R
E
R
A
A
O
S
I
S
O
S
I
S
I
I
N
D
N
S
T
A
L
N
D
N
S
T
A
L
,
H
6
5
0
0
,
L
,
H
6
5
0
0
,
L
A
N
D
A
N
D
1
.
1
1
.
1
S
I
O
N
S
I
O
N
P
P
L
I
A
N
C
P
P
L
I
A
N
C
G
G
L
A
T
I
O
N
U
L
A
T
I
O
N
U
C
1
0
0
P
C
1
0
0
P
E
E
I
D
E
I
D
E
Advertisement
Table of Contents

Related Manuals for Hague Quality Water WaterMax H6000


Summary of Contents for Hague Quality Water WaterMax H6000
- Page 1 ’ ’...
- Page 2 Hague Quality Water International will household use from an independent Hague dealer. Appliances not be liable for, nor will it pay service call or labor charges installed in commercial establishments will only qualify for the incurred or expended with respect to this warranty.
-
Page 3: Table Of Contents
Contents OWNER INFORMATION ............................4 General Information ............................4 Service Log ..............................5 Introduction to Reverse Osmosis ........................6 How Your Appliance Works..........................8 WQA–Performance Data Sheet ........................10 Fact Section for Pentavalent Arsenic Treatment Appliances................ 12 INSTALLATION AND MAINTENANCE INFORMATION ................... 13 Checklist Before Installation ......................... -
Page 4: Owner Information
WNER NFORMATION General Information Congratulations on choosing a superior Hague water treatment appliance! Use this guide to attain the maximum benefit from your appliance. As an owner, you may find the first few pages to be the most helpful in solving your needs. If you have trouble with the operation of your appliance, see Troubleshooting in the back of this manual or contact your independent Hague dealer. -
Page 5: Service Log
Service Log Services We recommend that you have your local independent Hague dealer service this appliance. Important: Meeting operational maintenance and replacement requirements are essential for this product to perform to specifications. Hague recommends that the storage tank be drained weekly to maintain highest quality water. -
Page 6: Introduction To Reverse Osmosis
Introduction to Reverse Osmosis Reverse Osmosis (RO) operates by removing contaminants from water at the molecular level. By using your household water pressure to squeeze your water against a special membrane, water molecules are separated from impurities. Rejected dissolved solids are automatically rinsed down the drain leaving only high-quality, delicious water for you to use. - Page 7 General Information WaterMax Reverse Osmosis Drinking Water Appliances replenish at about one-half gallon per hour, ® depending on your tap water pressure and the water temperature. Low water pressure and temperature will cause all RO appliances to produce a lower quantity of treated water. This appliance is designed with a self-regulating flush feature that limits the reject water to approximately four gallons for every gallon of permeate water.
-
Page 8: How Your Appliance Works
(feed water). Meeting operational maintenance and replacement requirements are essential for this appliance to perform to specification. Contact your local dealer for replacement filters and parts, or contact Hague Quality Water International for the dealer nearest you. - Page 9 How Your Appliance Works, Cont. Second Stage—The Reverse Osmosis Membrane The semi-permeable RO membrane separates the majority of the remaining suspended solids and most of the dissolved solids from the water molecules. These separated impurities are then washed down the drain. Maintenance The RO membrane is critical for effective reduction of total dissolved solids.
-
Page 10: Wqa-Performance Data Sheet
WQA–Performance Data Sheet FACTORS WHICH AFFECT THE LIFETIME AND Reverse Osmosis / Activated Carbon Drinking Water Appliance PERFORMANCE OF YOUR WATERMAX ® 1. TYPE OF MEMBRANE: Thin-Film Composite (TFC): Up to 2,000 PPM TDS with pressure of at least 40 psi (276 kPa). Not chlorine tolerant- 4343 South Hamilton Rd. - Page 11 WQA–Performance Data Sheet Reverse Osmosis / Activated Carbon Drinking Water Appliance WQA production is measured against a pressure tank General Operation Limits Model H6000 Model H6500 @ 5 psi (34 kPa) backpressure, 77°F (25°C), 50 psi Membrane Type (345 kPa) and 750 mg/L ± 40 mg/L TDS. Efficiency Rating means the percentage of the influent water to the system that is available to the user as Production, WQA...
-
Page 12: Fact Section For Pentavalent Arsenic Treatment Appliances
#200290 and #200295 can be purchased from the http://www.epa.gov/ORD/publications/ordpubs.html original source of this appliance (retailer or distributor), from other sources of these appliances, or directly from the manufacturer. Hague Quality Water 4343 S. Hamilton Rd. Groveport, OH 43125 WaterMax RO Owner’s Manual 8/7/2018... -
Page 13: Installation And Maintenance Information
NSTALLATION AND AINTENANCE NFORMATION Checklist Before Installation Refer to this checklist before installation. WaterMax H6000 and H6500 are designed for chlorinated municipal and well water supplies.*Refer to RO ® Specifications. WaterMax Water Softener or additional types of pretreatment are highly recommended should your water not ®... -
Page 14: Installation Tool List
Installation Tool List The following are the tools you may need for installation. Recommended Tool List Optional Tool List 1/4-inch High-speed drill bit Needle nose pliers 7/16-inch High-speed drill bit 7/8-inch High-speed hole saw 1/2-inch High-speed drill bit, with 3/8-inch shank Air-pressure test gauge, 1-20 psi (for non air gap spigot) 1-inch High-speed drill bit with 1/2-inch shank... -
Page 15: Installation Diagram
Installation Diagram ® WaterMax H6000 and H6500 Figure 2: Installation Diagram Notes: For maximum flow, keep yellow tubing to tank and blue tubing to spigot as short as practical. Install feed water line on COLD WATER LINE ONLY. Installation procedures for the WaterMax H6000, and H6500 are identical. -
Page 16: Typical Flow Diagram
Typical Flow Diagram ® WaterMax H6500 Figure 3: WaterMax H6500 Flow Diagram ® WaterMax RO Owner’s Manual 8/7/2018... -
Page 17: Booster Pump Retrofit Diagrams
Booster Pump Retrofit Diagrams ® WaterMax H6000 For retrofit instructions see form #F0874 Figure 4: WaterMax H6000 ® Installation Steps and Start-Up Procedures We recommend that you have your local Hague dealer install and service this appliance. Warning: Installation of this appliance must conform with state and local plumbing and electrical codes, laws, regulations, and the instructions provided with this appliance. - Page 18 Installation Steps and Start-Up Procedures Con’t A. Cut tube square D. Insert the locking clip Collet Cut the tube square. It is essential that the outside Insert the locking clip. The locking clip secures the collet in its diameter be free of score marks and that burrs and sharp position to prevent an accidental disconnection of the tube.
- Page 19 Installation Steps and Start-Up Procedures, Cont. Install the Spigot Assembly Step 3 The most convenient installation would allow the use of an existing spray attachment hole. If the spray attachment hole is not available, then follow the basic procedures outlined below. Drilling a stainless steel sink: Mark the sink location for the center of the faucet.
- Page 20 Installation Steps and Start-Up Procedures, Cont. Prepare the RO Air Gap Spigot Assembly for Installation Step 4 Using the diagram in Figure 5, assemble the Air Gap Spigot with all the components except the slot washer. Begin with the escutcheon, followed by the rubber gasket, spacer, flat washer, 9/16-inch nut, and 3/8-inch spigot adapter.
- Page 21 Installation Steps and Start-Up Procedures, Cont. Install the Feed Water Supply Valve Step 5 For Installation with Standard Angle Stop Water Supply Valve Shut off the water at the angle stop valve. Use a 5/8-inch open-end wrench to loosen the compression nut on the angle stop riser tube. Install the Feed Water Supply valve onto the angle stop.
- Page 22 Installation Steps and Start-Up Procedures, Cont. Install the Drain Saddle Assembly Step 6 The drain assembly should be installed above the P-trap on the vertical or horizontal tailpiece. (See Figure 9) Position the drain saddle in the desired location, mark the spot to be drilled, and remove the saddle.
- Page 23 Installation Steps and Start-Up Procedures, Cont. Mount the Reverse Osmosis Appliance Step 7 Mount the RO Appliance on the cabinet wall using the screws supplied. Leave 3 inches (8 cm) below the bottom of the filter housing for clearance when changing filters (See Figure 2). Start-Up Procedure Step 8 Check all connections to ensure they are tight, with locking clips in place.
-
Page 24: Changing Filters
Changing Filters When replacing the primary filter of any RO appliance equipped with a permeate pump, be sure to follow the purge procedures exactly. Failure to do this may result in premature failure of the permeate pump due to an “air locked”... - Page 25 Changing Filters, Cont. Open the tank valve to allow the shutoff valve to open and resume normal operation of the RO. If the permeate pump does not begin to cycle, lift up on the black handle of the dispensing spigot and let the water run until the permeate pump begins to cycle.
- Page 26 Changing Filters, Cont. Changing the Membrane We strongly recommend that you seek the services of a Hague dealer to change your RO membrane, as well as perform a complete check-up and re-sanitize your appliance. Be sure to order the proper membrane for your appliance: TFC. See Assembly and Parts, RO Assembly. Turn off the ball valve on top of the storage tank 1/4 turn clockwise (See Figure 2).
-
Page 27: Sanitizing The Watermax Ro Appliance
® Sanitizing the WaterMax RO Appliance Sanitize the RO assembly and storage tank during installation and when replacing filters to prevent bad taste and odor in the drinking water. Common household chlorine bleach (5.25% - unscented) is suitable for this purpose. - Page 28 ® Sanitizing the WaterMax RO Appliance, Cont. Sanitize the Storage Tank The two options outlined below are the most convenient ways to sanitize the storage tank of your drinking water appliance. Other methods may be used but require more complex procedures and apparatus typically used by a professional Hague service technician.
-
Page 29: Assembly And Parts
Assembly and Parts Feed Water Service Valve Assembly Figure 12: Feed Water Assembly Part # Description Quantity 200540 Feed Water Service Valve Assembly 200200 1/4-inch Locking clip WaterMax RO Owner’s Manual 8/7/2018... - Page 30 Assembly and Parts, Cont. RO Air Gap Spigot (Lead Free) Figure 13: RO Air Gap Spigot (Lead Free) Part # Description Quantity 202310 Filter housing wrench 200350 Air gap spigot assembly 200360 Spigot adapter, 3/8-inch x 7/16-inch J.G. 200199 Locking clip, 3/8-inch 10271 Spigot rebuild kit WaterMax RO Owner’s Manual...
- Page 31 Assembly and Parts, Cont. Drain Saddle Assembly Figure 14: Drain Saddle Assembly Part # Description Quantity 200130JG Drain saddle assembly, 2 Piece (Plastic) 200199 3/8-inch Locking clip WaterMax RO Owner’s Manual 8/7/2018...
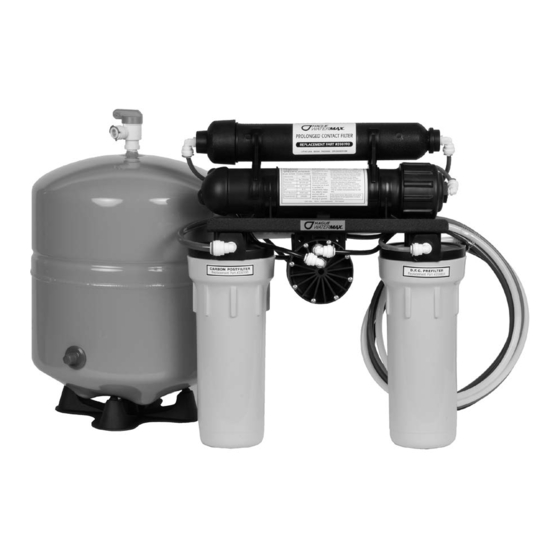
- Page 32 Assembly and Parts, Cont. RO Assembly (Front View) Figure 15: H6500 RO Assembly (Front View) WaterMax RO Owner’s Manual 8/7/2018...
- Page 33 Assembly and Parts, Cont. RO Parts (Front View) Part # Description Quantity 200412 20-inch sump housing 1/4-inch LC100P (Not Shown) 200460 Filter sump 200408 O-Ring, 10-inch filter sump 200142 20-inch carbon cartridge LC100P (Not Shown) 200195 Carbon Pre-Filter/Post-Filter, 10-inch GAC 90816 Male elbow, 3/8-inch x 1/4-inch (Plastic) 200199...
- Page 34 Assembly and Parts, Cont. RO Assembly (Back View) Figure 16: H6500 RO Assembly (Back View) WaterMax RO Owner’s Manual 8/7/2018...
- Page 35 Assembly and Parts, Cont. RO Parts (Back View) Part # Description Quantity 201030 Male elbow, 1/4-inch x 1/4-inch (Plastic) 200200 Locking clip, 1/4-inch 200930 3/8-inch x 5-foot tubing, yellow 200190 Prolonged contact filter, 12-inch 200191 Inline nitrate filter (Optional) 90816 Male elbow, 3/8-inch x 1/4-inch (Plastic) 200199 Locking clip, 3/8-inch...
- Page 36 Assembly and Parts, Cont. RO Assembly (Top/Back View) Figure 17: H6500 RO Assembly (Top/Back View) WaterMax RO Owner’s Manual 8/7/2018...
- Page 37 Assembly and Parts, Cont. RO Parts (Top/Back View) Part # Description Quantity 202356 Reducing tee, 3/8-inch x 3/8-inch x 1/4-inch (Plastic) 200200 Locking clip, 1/4-inch 200199 Locking clip, 3/8-inch PAMASV Permeate pump shutoff valve, H6500, LC100P 200910 1/4-inch x 5-foot tubing, red 200900 1/4-inch x 5-foot tubing, black 200920...
- Page 38 Assembly and Parts, Cont. Storage Tank Assembly Figure 18: Storage Tank Assembly Part # Description Quantity Tank shutoff valve, 3/8-inch x 1/4-inch, plastic (Not Included with 201140 Tank) 200199 3/8-inch Locking clip 200100 RO storage tank, 4.4 gallon (16.7 L) capacity 200030 Tank stand, plastic (Not for Sale) WaterMax RO Owner’s Manual...
- Page 39 Assembly and Parts, Cont. Parts-Booster Pump Kit Figure 19: Parts-Booster Pump Kit Optional Parts Part # Description Quantity Parts-Booster Pump Kit PAB6800 Booster pump PAT115 Transformer, 24VAC PAW260 Pressure switch 200910 1/4-inch x 5-foot tubing, red PAB6800KIT Parts-Booster Pump Kit—includes 1–4 Options, Storage Tanks 200109 10.7 gallon pressure tank* and Reducer Kit...
-
Page 40: Troubleshooting
Troubleshooting Problem Possible Cause Solution High product water TDS Membrane expended Replace Membrane module. Contact your local Hague dealer Membrane attack by chlorine Precarbon may be exhausted. Replace with a new cartridge and a new membrane Check valve failure (H6000 & LC100P Only) Replace check valve. - Page 41 Troubleshooting, Cont. Problem Possible Cause Solution Bad tasting water Increase in product TDS See “High product water TDS” Carbon Post-Filter exhausted Replace Carbon Post-Filter cartridge Tank and appliance contaminated Replace Pre- and Post-Filter, sanitize tank and appliance Tank contaminated Sanitize tank Tank diaphragm failure Replace tank and postfilter cartridges Carbon Post-Filter cartridge not flushed...
-
Page 42: Ro Specifications
RO Specifications H6000 H6500 LC100P Model Part # 3140 2141 Membrane Production Rates Gallons per day Liters per day WQA gpd WQA lpd Water Pressure 40–100 40–100 40–100 (Min-Max) psi (kPa) (276–689) (276–689) (276–689) Water Temperature 40–113 40–113 40–113 (Min-Max) Deg. F (Deg. C) (4.4–45) (4.4–45) (4.4–45) - Page 43 Notes...
- Page 44 Arsenic (5), Barium, Cadmium, Chromium (3) & (6), Copper, Fluoride, Lead, Nitrate/Nitrite (H6500 only), Radium 226/228, Selenium, TDS, and Turbidity, as verified and substantiated by test data. The H6500 is certified to CSA B483.1. Hague Quality Water, Int’l 4343 South Hamilton Road, Groveport, OH 43125 LITHO USA ©2013...
- Page 45 Phone: 614-836-2115 • Fax: 614-836-5349 LITHO USA ©2013 21410 8/7/2018...
Need help?
Do you have a question about the WaterMax H6000 and is the answer not in the manual?
Questions and answers
Where is turn off connecting hose to line to refrigerator
To turn off the connecting hose to the line for the Hague Quality Water H6000 refrigerator, close the feed water valve and the tank valve. This stops water flow through the system, including to the refrigerator line.
This answer is automatically generated