
Subscribe to Our Youtube Channel
Related Manuals for Beko BCFD350


Summary of Contents for Beko BCFD350
- Page 1 Frost Free Combi Built-In Fridge / Freezer Installation & User instructions BCFD350...
- Page 3 Please read these instructions first before using your appliance Thank you for choosing a Beko appliance. Please take some time to read this user manual before using your appliance, to ensure you know how to safely operate the controls and functions. Carefully follow all unpacking and installation instructions to ensure the appliance is correctly connected and fitted prior to use.
-
Page 4: Table Of Contents
Contents Introduction & safety warnings................2 Electrical requirements..................3 Transportation instructions.................4 Important installation instructions ..............5 Getting to know your fridge / freezer..............6 Suggested arrangement of food in the fridge / freezer........7 Temperature control and adjustment..............8 Starting.......................9 Storing frozen food.....................9 Freezing fresh food.....................9 Making ice cubes....................9 Defrosting......................10 Cleaning and care....................11... -
Page 5: Introduction & Safety Warnings
If there is a blue light on the refrigerator, do not look at the blue light with optical tools. • Frost Free Combi Fridge Freezer PERFORMANCE BCFD350 Energy ef Energy consumption - Kwh/year 163 (5.76) Net storage - vol fresh food ltrs (cu. ft.) 91 (3.21) -
Page 6: Electrical Requirements
Should the mains lead of the appliance become damaged or should it need replacing at any time, it must be replaced by a special purpose made mains lead which can only be obtained from a Beko Authorised Service Agent. WARNING! THIS APPLIANCE MUST BE EARTHED If the fitted moulded plug is not suitable for your socket, then the plug should be cut... -
Page 7: Transportation Instructions
/ moving the appliance, to avoid the mains cable becoming cut or damaged." Do not allow children to play with the appliance or tamper with the controls. Beko plc declines to accept any liability should the instructions not be followed. -
Page 8: Important Installation Instructions
IMPORTANT INSTALLATION INSTRUCTIONS 1. The space in the room where the appliance is installed must not be smaller than 10 cubic metres. 2. See pages 14 to 21 for detailed Installation Instructions including reversing door opening direction. 3. This appliance has been designed to operate in ambient temperatures up to 38 degrees C (100 degrees F) and is equipped with Freezer Guard technology which ensures that even if the ambient temperature falls to -15°C, frozen food in the freezer does not thaw thanks to this. -
Page 9: Getting To Know Your Fridge / Freezer
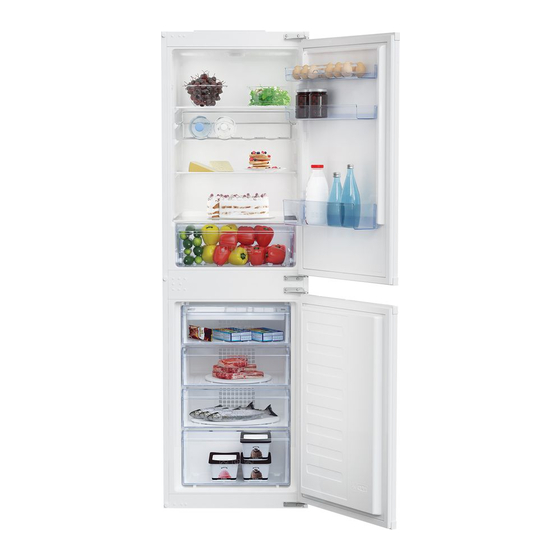
GETTING TO KNOW YOUR COMBI T FRIDGE / FREEZER DOOR SHELF TEMPERATURE SETTING KNOB INTERIOR LIGHT EGG TR AY CABINET SHELVES DOOR SHELF WINE RACK CABINET SHELVES DEFROST WATER COLLECTION CHANNEL BOTTLE SHELF SALAD CRISPER ICE TRAY FREEZER FAST FREEZE COMPARTMENT FROZEN FOOD STORAGE DRAWERS... -
Page 10: Suggested Arrangement Of Food In The Fridge/Freezer
SUGGESTED ARRANGEMENT OF FOOD IN THE FRIDGE/FREEZER Arrangement examples (see diagram) 1. Baked, chilled cooked food, dairy products, cans. 2. Wine bottles. 3. Meat, sausages, cold cuts. 4. Fresh fruit and vegetables. 5. Frozen food and freezing of fresh food. 6. -
Page 11: Temperature Control And Adjustment
TEMPERATURE CONTROL AND ADJUSTMENT Operating temperatures are controlled by the thermostat knob (see diagram) located on the ceiling of fridge compartment. Settings may be made from MIN to MAX, MAX being the coldest position. When the appliance is switched on for the first time, the thermostat should be adjusted so that after 24 hours, the average fridge temperature is no higher than +5°C (+41°F). -
Page 12: Starting
STARTING Final Check Before you start using the fridge/freezer check that: 1. The interior is dry and air can circulate freely at the rear of the cabinet. 2. Clean the interior as recommended under "CLEANING AND CARE". 3. Insert the plug into the wall socket and switch on the electricity supply. •... -
Page 13: Defrosting
DEFROSTING A) ) FRIDGE COMPARTMENT The fridge compartment defrosts automatically. The defrosting water runs to the drain tube via a collection container at the back of the appliance (1) (see diagram). During defrosting water droplets may form at the back of the fridge compartment where concealed evaporator is located. -
Page 14: Cleaning And Care
CLEANING AND CARE ** We recommend that you switch off the appliance at the socket outlet and pull out the mains plug before cleaning. ** Never use any sharp abrasive instrument, soap, household cleaner, detergent and wax polish for cleaning. ** Use lukewarm water to clean the cabinet of the appliance and wipe it dry. -
Page 15: Do's And Don'ts
DO'S AND DON'TS Clean and defrost your appliance regularly (see "Defrosting"). Keep raw meat and poultry below cooked food and dairy products. Take off any unusable leaves on vegetables and wipe off any soil. Leave lettuce, cabbage, parsley and cauliflower on the stem. Wrap cheese firstly in greaseproof paper and then in a polythene bag excluding as much air as possible. -
Page 16: Energy Saving Tips
ENERGY SAVING TIPS 1- Ensure your appliance is installed in a well ventilated area. If the ambient temperature is low (but in no case lower than 10 degrees C), then the energy saving will be more. In this case, check temperatures of fridge and freezer compartments with an accurate thermometer and lower the thermostat setting (towards 1) if necessary. -
Page 17: Installation Instructions Detailed Step By Step
INSTALLATION INSTRUCTIONS DETAILED STEP BY STEP No wooden back wall 71 mm 40 mm The back wall of the wooden cabinet must be left open completely to kitchen wall in order to allow sufficient air circulation to cool down the condenser unit for energy efficiency. Adjusting the legs If your refrigerator is unbalanced: You can balance your refrigerator by turning the legs of it as illustrated in the figure. - Page 19 Torx Wood Plastic Sheet Wood (PS) (1TW) * Spares included * If the subject parts are not included in the product you have purchased, then it is valid for other models. view 42 mm ≤ 17 Note: Installation step for 2, screws for connecting top plastic part should not be screwed very hard, because of moving the plastic part easily left or right side.
- Page 20 4 mm...
- Page 21 4 2 . (1TW)
- Page 22 (1TW) (1TW) 2.0 mm...
- Page 23 21 mm 2 mm 4 mm 2 mm 2 mm...
-
Page 24: Reversing The Doors
REVERSING THE DOORS Proceed in numerical order. Top Door 1.Unscrew top hinge (1). 2.Carefully remove the top door (2). 3.Unscrew lower hinge (3). 4.Remove plastic plugs (7 & 8). 5.Refit top hinge (1) as lower hinge (16) on the left hand side. 6.Replace top door (17). -
Page 25: Installation Of High Levelling Foot
INSTALLATION OF HIGH LEVELLING FOOT (All dimensions are in mm) FRONT FEET... - Page 26 45 ° REAR FEET...
- Page 27 71 mm 91 mm...
-
Page 28: Standard Manufacturer Guarantee Terms And Conditions
• Repairs necessary as a direct or indirect result of: - Accidental damage, misuse or abuse of a product. - An attempted repair of a product by anyone other than a Beko Approved Engineer (the “Engineer”). - Installation or use of a product where such installation or use fails to meet the requirements contained in this guarantee or the User Instructions Booklet. -
Page 29: Built-In Appliances Guarantee Terms And Conditions
If you are resident in the Republic of Ireland, this guarantee will be governed by Irish law and the Irish courts will have jurisdiction. This guarantee is provided by Beko plc. Beko House, 1 Greenhill Crescent, Watford, Hertfordshire. WD18 8QU. Beko plc is registered in England and Wales with company registration number 02415578. -
Page 30: How To Obtain Service For Your Appliance
Complete the required details and click send message. Product registrations For UK registrations please visit beko.co.uk/register and for the Republic of Ireland visit beko.ie/register. Recycling This product bears the selective sorting symbol for waste electrical and electronic equipment (WEEE). - Page 32 Beko plc Beko House 1 Greenhill Crescent Watford, Hertfordshire WD18 8QU Tel: 0845 6004911 Fax: 0845 6004922 4578337767_AA e-mail: service@beko.co.uk website: www.beko.co.uk...
Need help?
Do you have a question about the BCFD350 and is the answer not in the manual?
Questions and answers