Table of Contents
Advertisement
Quick Links
Always there to help you
Register your product and get support at
www.philips.com/welcome
Question?
Question?
Contact
Contact
Philips
Philips
User manual
The Accelebrate prizes (in-ear
headphones) will be sent to the team
leaders (highlighted in purple) by end of
this week.
Again we thank you all for your
participation and support, and request
you to upkeep the Accelerate spirit,
demonstrate the Accelerate behaviors,
and keeping our pledges made to
maintain Philips high performance culture
and achieve exceptional business results.
Let's continue our Accelerate journey
together, keep running and winning!
3
Руководство пользователя
CED230/51
29
Advertisement
Table of Contents

Related Manuals for Philips CED230/51


Summary of Contents for Philips CED230/51
- Page 1 Accelerate spirit, demonstrate the Accelerate behaviors, and keeping our pledges made to maintain Philips high performance culture and achieve exceptional business results. Let’s continue our Accelerate journey together, keep running and winning! User manual Руководство...
-
Page 2: Table Of Contents
Contents 7 Adjust sound Dynamic Bass Boost MAX sound Select equalizer settings 1 Important Select listening zone Safety Other sound settings Notice 8 System settings 2 Your car audio system Adjust general settings Introduction Select video settings What's in the box Select language settings Overview of the main unit Adjust turner settings... -
Page 3: Important
1 Important • The product/remote control may contain a coin/button type battery, which can be swallowed. Keep the battery out of reach of children at all times! If swallowed, the Safety battery can cause serious injury or death. Severe internal burns can occur within two hours of ingestion. - Page 4 This apparatus includes this label: your area. Any changes or modifications made to this device that are not expressly approved by Philips Consumer Lifestyle may void the user’s authority to operate the equipment. 2012 © Koninklijke Philips Electronics N.V. Specifications are subject to change without Environmental information notice.
-
Page 5: Your Car Audio System
Always follow the instructions in this chapter in sequence. system If you contact Philips, you will be asked for the model and serial number of your apparatus. The model number and serial number are on the bottom of your apparatus. Write the numbers... -
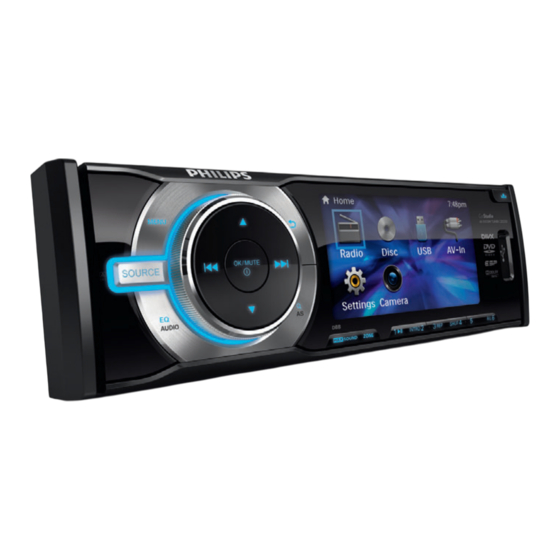
Page 6: Overview Of The Main Unit
Overview of the main unit d Screen a SOURCE • Select source. • Turn off the display. • Unlock the front panel. b MENU f USB socket • Access the system menu. g Remote control sensor h R/L, 6 • Return to previous menu. • Select preset station no. -
Page 7: Overview Of The Remote Control
v Disc slot i 5, • Select preset station no. 5 w RESET • Stop playback. • Restore default settings. j SHUF, 4 • Turn random play on or off. • Select preset station no. 4 Overview of the remote control k 3, REP • Select repeat play mode. - Page 8 d VOLUME +/- s INTRO, 2 • Adjust volume. • Turn intro play on or off. • Select preset station no. 2 e EQ • Select equalizer (EQ) setting. t AUDIO • Access audio setting menu. f DBB u Navigation buttons • Turn on or off Dynamic Bass Boost (DBB) sound.
-
Page 9: Install The Car Audio
• As different cars have different requirements, you might your Philips car audio dealer. need to connect the device differently from the user manual's instructions. In that case, consult a professional mechanic to connect. -
Page 10: Mount Into Dashboard
Illumination switch Caution To the +12V car battery which is • Keep the connection of the car battery if there is an energized at all time on-board drive or navigation computer. Otherwise, the Motor/electric antenna relay control lead/ computer may lost its memory. •... -
Page 11: Attach The Front Panel
Slide the unit into the sleeve until you hear a "click" Detach the front panel Note • Before you detach the front panel, make sure that the system is turned off. Press to release the front panel. Pull the front panel leftward to release it from the chassis of the main unit. -
Page 12: Get Started
4 Get started Turn on and turn off Turn On Press the power button ( Turn Off Press and hold the same power button for 3 CR2025 seconds. CR2025 Adjust volume To adjust volume, rotate knob on the front panel or press VOLUME +/- on the remote control. -
Page 13: Play Audio/Video/Picture
5 Play audio/ Press the navigation buttons to select [TIME MODE], then press video/picture » The time mode options are displayed: • [12 HOUR MODE] • [24 HOUR MODE] Select a mode, then press Make sure that the disc or device contains Press the navigation buttons to select playable music or video. -
Page 14: Insert And Remove Usb Device
Russia, India Insert and remove USB device Press to open the front panel. Slide down the USB socket cover. Insert the disc into the disc slot with label Insert the USB device into the USB socket. side facing up. » The unit starts playing from the USB »... -
Page 15: Select Language
During MP3/WMA play • To select a track, press to select a folder. Press to skip to previous or next track. • To skip to a specified chapter or track, press the numeric buttons. Intro play Select Language This feature plays the first 10 seconds of each audio track. You can select the subtitle language if the DVD Press the button to select an discs contain two or more subtitle languages. -
Page 16: Random Play
6 Radio Random play There are different modes of random play for Manual tune to a radio audio and MP3/WMA. station Press the button repeatedly to select. [SHUFFLE]:[ON] - start random play for • Press all tracks. • [RANDOM DIR]: start random play in Press the navigation buttons to select [RADIO], then press current folder. -
Page 17: Store Stations Automatically
NEWS News services Store stations automatically AFFAIRS Politics and current affairs You can store up to 6 stations in each band. INFO Special information Press programs » The six strongest stations of the SPORT Sports selected band are saved in preset EDUCATE Education and advanced channels 1-6 automatically. -
Page 18: Adjust Sound
7 Adjust sound Press the navigation buttons to select [SETTINGS], the press to confirm. » The settings menu is displayed Press the navigation buttons to select [Radio], then press to select an option. • TA (traffic announcement): allows Dynamic Bass Boost you to receive traffic announcements automatically no matter what source Press on the car... -
Page 19: Select Equalizer Settings
You can also select [USER]. to select of [BASS], and Press [TREBLE]. Press to adjust the values. Press to exit. Select listening zone Select equalizer settings Press » The current zone setting is displayed. You can select preset equalizer settings, and they are: •... -
Page 20: System Settings
8 System settings Within system settings, there are: • General settings, • DVD settings, • Language settings, and • Radio settings. Press to select the audio settings to be adjusted. • [BALANCE]: 7L to 7R (L= left speaker Adjust general settings ;... -
Page 21: Select Video Settings
[BEEP] [ON]/[OFF] Turn on or [PAL] Used in the off the beep United States, sound. When Canada, Japan, it turned on, Mexico, the each time you Philippines, press a button, South Korea, the device Taiwan, and beeps some other countries. [LOUDNESS] [ON]/[OFF] [AUTO] The correct... -
Page 22: Select Language Settings
[3 PG] Parental Select language settings guidance suggested. Press [4 PG Unsuitable for children under Press the navigation buttons to select age 13 [SETTING], the press to confirm. [5 PGR] Recommend Press buttons to select the parents to language setting restrict children Press , and then to select a... -
Page 23: Other Settings
9 Other settings Set rear view camera If you connected a rear view camera, you can Turn on or off the screen see from the screen of the car audio system backlight what the camera takes when the back lamp lights up. -
Page 24: Replace Fuse
Replace fuse If the system does not power on, the fuse may be damaged and need replacement. Detach the front panel and take out the system. Check the electric connection. Buy a new fuse that matches the voltage of the damaged fuse (15A). Replace the fuse. -
Page 25: Product Information
10 Product Tuner information Frequency range - FM1/FM2 87.5 - 107.9 MHz - FM3 (ORIT) 65 - 74 MHz Note Frequency range - AM 522 - 1620 kHz (MW) (9kHz per step) • Product information is subject to change without prior Usable sensitivity - FM 8 uV notice. -
Page 26: Unsupported Formats
Unsupported formats • Empty albums: an empty album is an album that does not contain MP3 / WMA files, and is not be shown in the display. • Unsupported file formats are skipped. For example, Word documents (.doc) or MP3 files with extension .dlf are ignored and not played. • AAC, WAV, and PCM audio files. • DRM protected WMA files (.wav, .m4a, .m4p, .mp4, .aac) •... -
Page 27: Troubleshooting
DVD. Adjust video DVD settings. requesting service. If the problem remains • Video connection is improper. Check the unsolved, go to the Philips web site (www. connections. philips.com/support). When you contact Philips, make sure that your system is nearby and the Noise in broadcasts. - Page 28 Specifications are subject to change without notice © 2012 Koninklijke Philips Electronics N.V. All rights reserved. CED230_51_UM_V2.0...
Need help?
Do you have a question about the CED230/51 and is the answer not in the manual?
Questions and answers