Advertisement
Available languages
Available languages
Table of Contents
WARNING
The C2M HEXACOMP is designed to be used in a standard household environment.
PROTECTING YOURSELF AND THE C2M HEXACOMP
•
Allow only an AKAI professional dealer or qualified professional engineer to repair or reassemble
the C2M HEXACOMP.
•
Do not put, or allow anyone to put any object, especially metal objects, into the C2M HEXACOMP.
•
Use only the DC power supply specified. Never use an AC power supply directly.
•
If water or any other liquid is spilled into or onto the C2M HEXACOMP, disconnect the power and/
or battery, and call your dealer.
•
Make sure that the unit is well-ventilated, and away from direct sunlight.
•
To avoid damage to internal circuitry, as well as the external finish, keep the C2M HEXACOMP
away from sources of direct heat (stoves, radiators, etc.).
•
Avoid using aerosol insecticides, etc. near the C2M HEXACOMP. They may damage the surface,
and may ignite.
•
Do not use denaturated alcohol, thinner or similar chemicals to clean the C2M HEXACOMP. They
will damage the finish.
•
Modification of this equipment is dangerous, and can result in the functions of the C2M HEXACOMP
being impaired. Never attempt to modify the equipment in any way.
•
Make sure that the C2M HEXACOMP is always well-supported when in use on a firm level surface.
•
In order to assure optimum performance of your C2M HEXACOMP, select the setup location
carefully, and make sure the equipment is used properly. Avoid setting up the C2M HEXACOMP
in the following locations:
1. In a humid or dusty environment
2. In a room with poor ventilation
3. On a surface which is not horizontal
4. Inside a vehicle such as a car, where it will be subject to vibration
5. In an extremely hot or cold environment
•
Be sure to wait for a few seconds before tuning the unit on again after the power has been turned
off to ensure proper operation.
•
When the battery becomes low, the unit will not operate properly. In this case, please replace the
battery with a new one.
•
When you insert or replace the batteries, please turn off the power before connecting this unit to
other equipment in order to prevent malfunction or damage to speakers.
•
When you connect this unit to other equipment, make sure that all of the other equipment is turned
off in order to prevent malfunction or damage to speakers.
English
English
CHANGES OR MODIFICATIONS NOT EXPRESSLY APPROVED BY THE MANU-
FACTURER FOR COMPLIANCE COULD VOID THE USER'S AUTHORITY TO
OPERATE THE EQUIPMENT.
CAUTION: TO REDUCE THE RISK OF ELECTRIC SHOCK
NO USER-SERVICEABLE PARTS INSIDE.
REFER SERVICING TO QUALIFIED SERVICE PERSONNEL.
THE SYMBOLS ARE RULED BY UL STANDARDS (U.S.A.)
The lightning flash with arrowhead symbol, within an equilateral triangle,
is intended to alert the user to the presence of uninsulated "dangerous
voltage" within the product's enclosure; that may be of sufficient magni-
tude to constitute a risk of electric shock to persons.
The exclamation point within an equilateral triangle is intended to alert
the user to the presence of important operating and maintenance
(servicing) instructions in the literature accompanying the appliance.
Leisten Sie einen Beitrag Zum Umweltschutz
Verbrauchte Alt-Batterien die mit dem ISO-Symbolfür
Recycling gekennzeichnet sind, sowie Kein-Akkumul-atoren (wideraufladbare
Batterien), Knopfzellen und Starterbatterien, gehören nicht in den Hausmüll.
Geben Sie diese Batterien bei entsprechenden Samm-elstellen ab.
WARNING!
To prevent fire or shock hazard, do not expose this appliance to rain or moisture.
English
English
I n s e r t i n g t h e b a t t e r y :
Loosen the screw and
remove the cover.
• Do not charge, heat or disassemble the battery. Do not put it in fire or water, either.
The battery may leak the electrolyte, heat up or explode.
• Take the battery out of the unit when the unit is not used for a long time.
The gas released from the battery may cause the leakage of electrolyte or may damage the unit.
• Do not mix it with other batteries or metal objects when carried, stored or discarded.
The battery may get short-circuited causing the leakage of electrolyte, heating or explosion.
• When the electrolyte gets into your eyes, as you may lose your eye sight, wash your eyes thoroughly
with clean water and see the doctor immediately. When the electrolyte gets on your skin or cloths,
as it may harm your skin, wash it off with lots of clean water.
CAUTION
RISK OF ELECTRIC SHOCK
DO NOT OPEN
DO NOT REMOVE COVER (OR BACK).
Battery: 9V 006P / 6F22 / 6LR61/ 6LF22
Attach the snap fit terminal firmly
to the battery in correct polarity
as illustrated and place it in the
compartment.
Replace the cover and tighten
the screw.
32-En
5B-En
29A-G
1-En
Advertisement
Table of Contents

Related Manuals for Akai Hexacomp C2M


Summary of Contents for Akai Hexacomp C2M
- Page 1 The C2M HEXACOMP is designed to be used in a standard household environment. PROTECTING YOURSELF AND THE C2M HEXACOMP • Allow only an AKAI professional dealer or qualified professional engineer to repair or reassemble the C2M HEXACOMP. • Do not put, or allow anyone to put any object, especially metal objects, into the C2M HEXACOMP.
-
Page 2: Specifications
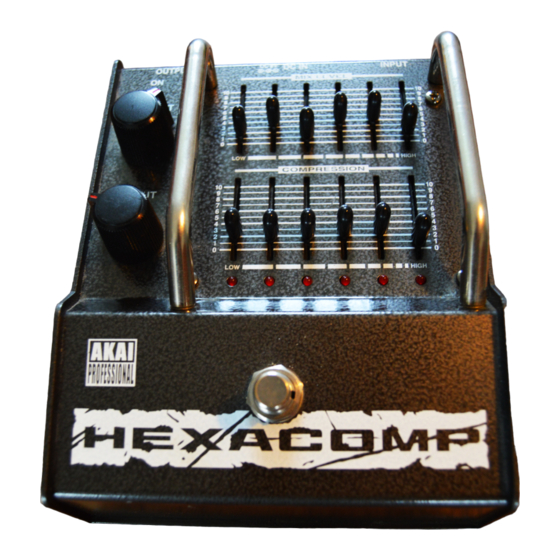
NOTE: The battery case is located at the bottom. OPERATION 1. Connect the OUTPUT jack to your amp or the input of another effect unit. 2. Connect your guitar or bass (or the output of another effects pedal) to the INPUT jack. 3. Turn your system on. - Page 3 Pour votre protection et celle du C2M HEXACOMP • Ne confiez les réparations ou installations sur votre C2M HEXACOMP qu’aux revendeurs AKAI professional ou à des ingénieurs qualifiés. • Ne laissez aucun objet métallique sur le C2M HEXACOMP ou tomber dedans.
-
Page 4: Caractéristiques
LED (rouge) indicateurs S'allument lorsqu'une compression est appliquée aux diverses gammes de fréquence. Lorsque vous ne souhaitez pas appliquer de compression à une fréquence particulière, réglez faiblement son gain de COMPRES- SION pour que l'indicateur LED ne s'allume pas. PEDALE Active ou désactive l'effet. - Page 5 ACHTUNG! Der C2M HEXACOMP ist für Betrieb mit gewöhnlichem Haushaltsnetzstrom vorgesehen. Wichtige Hinweise zu Ihrer Sicherheit und zum Schutz des C2M HEXACOMP • Überlassen Sie alle Wartungs- und Instandesetzungsarbeiten am C2M HEXACOMP dem AKAI- professional-Fachhändler oder dem geschulten Kundendienstpersonal. • Achten Sie darauf, daß keine Fremdkörper (insbesondere Gegenstände aus Metall) in das Geräteinnere gelangen.
-
Page 6: Betrieb
Effektpedals) an die INPUT-Buchse an. 3. Schalten Sie Ihre Anlage ein. 4. Betätigen Sie das Pedal, um den Effekt einzuschalten (die ON LED leuchtet). 5. Stellen Sie, während Sie Ihre Gitarre oder Bassgitarre spielen, den Ausgangspegel mit dem OUTPUT-Regler ein. - Page 7 安全上のご注意 ● ご使用の前に、 この 「安全上のご注意」 をよくお読みのうえ正しくお使いください。 ● ここに示した注意事項は、 安全に関する重大な内容を記載していますので、 必ず守ってください。 ● お読みになった後は、 お使いになる方がいつでも見られる所に保管してください。 ● 表示と意味は、 次のようになっています。 誤った取扱いをすると、死亡や重傷などを負う可能性が想定 される内容を示しています。 誤った取扱いをすると、傷害または家屋・財産などの損害の 発生が想定される内容を示しています。 ●本文中の “図記号” の意味は次のとおりです。 「禁止」 を表わします。 「改造・分解の禁止」 を表わします。 「風呂、シャワー室での使用禁止」 を表わします。 「ぬれ手禁止」 を表わします。 「水ぬれ禁止」 を表わします。 電源コードを引っ張らないでください。 「必ずしてほしい行為」 を表わします。 電源プラグを必ずコンセントから抜いてください。 ■万一、 機器内部に水や異物が入った場合は、 電 ■ACアダプターの電源コードが傷んだ場合...
- Page 8 • 機器の電源を切ってからもう一度電源を入れなおすときは、機器の動作を確実にするため、数秒 の間をおいてから行なってください。 ■故障が発生したら ご使用の製品が故障したり異常を感じた場合は、 すみやかに電池を外し、 またはACアダプターをコ ンセントから抜き、 接続コードなどを取り外してください。 そして、 ・ モデル名 : HEXACOMP C2M ・ 故障や異常の具体的な症状 ・ ご自宅の住所 ・ 電話番号 などをお買い上げの販売店、 またはアカイ プロフェッショナル エムアイ 株式会社 サービス係まで ご連絡ください。 ■保証について この製品に添付されている 「保証書」 に、 お買い上げの年月日 ・ 販売店名などの所定事項が記入され ているのをご確認ください。故障に際して 「保証書」 の提示がございませんと保証期間内でも有料修 理となりますので、 保証書記載内容をご確認の上この取扱説明書と一緒に大切に保管してください。...
- Page 9 それぞれの周波数帯域でコンプレッションがかかると点灯します。 コンプレッションをかけたくない周波数帯域に対してはCOMPRESSION のレベルを低く設定し LED が点灯しないようにします。 フットスイッチ エフェクトをオン/オフします。 オフのときは入力信号が内部エフェクト回路を通らないので、 入力され た信号は何の味付けもされずクリーンなままに出力されます。 注:電池ケースは本体の底にあります。 操作方法 1. OUTPUT端子をアンプの入力端子または別のエフェクターの入力端子に接 続します。 2. ギター、 またはベース (または他のエフェクターの出力) を INPUT端子に 接続します。 3. システムの電源をオンにします。 4. フットスイッチを押してエフェクトをオンにします。ON のインジケー ターが点灯します。 5. ギター、またはベースを演奏しながら OUTPUT コントロールで出力レベ ルを調整します。 ・ INPUT コントロールは入力レベルを調整します。 ・ COMPRESSION スライダーはそれぞれの周波数帯域でのコンプレッ ションのかかり具合を調整します。 コンプレッションがかかるとそれぞ れの周波数帯域のLEDインジケーターが点灯します。...
- Page 10 1-3, Hiranuma 1-chome, Nishi-ku, Yokohama, Japan 001220 Printed in Japan...
Need help?
Do you have a question about the Hexacomp C2M and is the answer not in the manual?
Questions and answers