
Subscribe to Our Youtube Channel
Related Manuals for Stryker T-Tops SUNBRELLA SG900

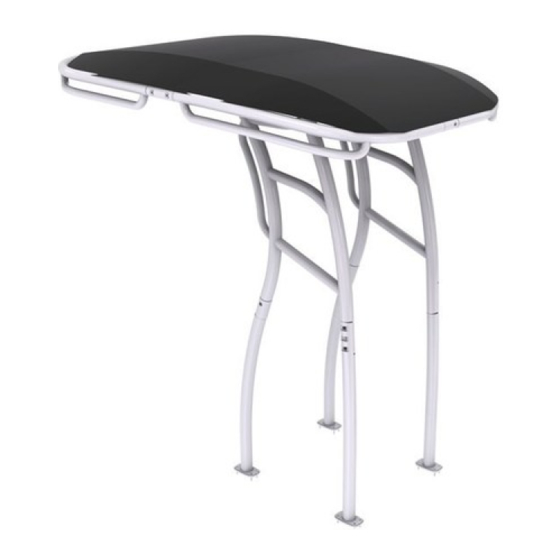
Summary of Contents for Stryker T-Tops SUNBRELLA SG900
- Page 1 SG900 I N S T A L L AT I O N G U I D E & O W N E R S M A N U A L K I T I N C L U D E S : SG 90 0 T - T OP F R A M E SUN BR EL LA CA N OPY...
-
Page 2: Before You Get Started
SG900 Congratulations! O N Y O U R S T R Y K E R T - T O P P U R C H A S E O N Y O U R S T R Y K E R T - T O P P U R C H A S E You have selected a quality aftermarket t-top to upgrade your center console boat. - Page 3 SG900 D I M E N S I O N S Minumum width: 18” (45.70 mm) 6’ 10” Maximum width: 50” (1270 mm) 2082.80 mm 6’ 10” 7’ 2 ½” 2082.80 mm 2194.80 mm 4’ 5 ” 1355.73 mm M I N . 2' 1 6 10 ”...
- Page 4 SG900 P A R T S L I S T Front Starboard Top Section Rear Starboard Top Section Front Port Top Section Rear Port Top Section Starboard Upper Leg Section Port Upper Leg Section Front Leg Sections Rear Leg Sections Deck Screws Leg &...
- Page 5 SG900 C A U T I O N ! Check for wires, water/fuel tanks & lines before you drill into your deck. If unsure, contact your boat’s manufacturer. STEP 1 Lay overlapping strips of blue painter’s tape on both sides of the deck next to the center console unit.
- Page 6 SG900 STEP 2 A S S E M B L E T H E L E G S E C T I O N S F R O N T ( B O W ) N Y L O N Insert the nylon washer for the center hole.
- Page 7 SG900 P os i ti o n t he l o wer halv es of e ac h si d e s ec tion on th e de c k . M a k e s ure yo u t a k e t h e s a me mea s urement s f ro m the s i d es and aft of t h e b oa t f or e ach sid e .
- Page 8 SG900 O p t i on a l U pgra de R O C K E T L A U N C H E R S Probably our most popular upgrade for t-top customers who plan on fishing is one of our fishing rod rocket launchers.
- Page 9 SG900 STEP 7 M E A S U R E W I D T H B E T W E E N L E G S Measure and record the distance between each leg section. We recommend measuring from the inside of the left and right leg section.
- Page 10 SG900 STEP 10 D R I L L M O U N T I N G H O L E S I N T H E D E C K PILOT HOLE PILOT DRILL SIZE: 1/8” (0.125” ) Before drilling, consult your owner’s manual or boat manufacturer 3.175 to make sure no wires, cables or tanks are directly below deck.
- Page 11 SG900 STEP 11 M O U N T T - T O P T O T H E D E C K It’s time to mount the t-top frame to your boat’s deck. Prepare the deck so it’s cleared out and ready. Remove the painter’s tape from both sides.
- Page 12 SG900 STEP 12 M O U N T S T A N D - O F F S From step two of this installation guide, you should have already determined where to mount your stand-offs. E X P L O D E D V I E W O F A S T A N D O F F PRO TIP Check the thickness of your console’s side walls.
- Page 13 SG900 STEP 12 M O U N T S T A N D - O F F S ( C O N T . ) M A R K C U T L I N E O N S T A N D - O F F S Transfer the measurements from the previous step by marking each standoff with a cut line.
- Page 14 SG900 STEP 12 M O U N T S T A N D - O F F S ( C O N T . ) D R I L L T H R O U G H T - T O P & C O N S O L E Drill through the marked locations on the t-top and on the console.
-
Page 15: Optional Upg Rade
SG900 Optional Upg rade T - T O P V - B R A C E K I T For those who have choppy local waters or would like to reinforce their t-top, Stryker has designed the V-Brace kit as an optional add-on. It diagonally connects the forward facing legs with the front side of the center console with solid clamps and thick aluminum bars. - Page 16 SG900 STEP 15 M O U N T R E A R T O P S E C T I O N T O T - T O P STEP 16 L A Y C A N O P Y I N P L A C E Lay the canopy out flat on the top frame.
- Page 17 STRYKER T-TOPS ALWAYS USES PREMIUM MARINE CANVAS MATERIAL BY SUNBRELLA Instaation Complete! Add Your Boat to Our Customer Gallery! C O N G R A T U L A T I O N S O N F I N I S H I N G Y O U R S T R Y K E R T - T O P I N S T A L L A T I O N After you have installed your Stryker T-Top, take some photos and send them to us.
-
Page 18: Wiring Instructions
Stryker T-Tops is not responsible or liable for damage due to a customer’s misuse of our products or negligence. -
Page 19: Care And Maintenance
SG900 Folding Your T-Top Down For t-top models that feature a folding capability, please make sure you are following the correct steps. First, only collapse the t-top when you need to minimize vertical clearance to either safely navigate under a low bridge on the water or to fit your boat in a garage or other storage location. - Page 20 SG900 Care & Maintenance (continued) A N O D I Z E D A L U M I N U M C A R E You can save yourself a lot of time and unnecessary extra effort by simply committing to a regular, stress-free cleaning regimen.
-
Page 21: Warranty Information
Any cost of shipping and installation related to the return and replacement of products is the responsibility of the customer unless otherwise deemed by Stryker. Stryker T-Tops disclaims any warranty of merchantability or fitness for a particular purpose in connection with the Buyer’s purchase of units of any Product under this agreement. -
Page 22: Product Returns
Contact Us Prior to returning any products to Stryker T-Tops for a return or replacement, please fill out the form at www.strykerttops.com/warranty-returns. If you are requesting to return multiple products, please complete a form for each product. We will contact you via email within 2-3 business days with further instructions.
Need help?
Do you have a question about the SUNBRELLA SG900 and is the answer not in the manual?
Questions and answers