
Subscribe to Our Youtube Channel
Related Manuals for Axis P1275


Summary of Contents for Axis P1275
- Page 1 AXIS P12 Series AXIS P1244 Network Camera AXIS P1245 Network Camera AXIS P1254 Network Camera AXIS P1264 Network Camera AXIS P1265 Network Camera AXIS P1275 Network Camera User Manual...
-
Page 2: Table Of Contents
AXIS P12 Series Table of Contents About this manual ......... . -
Page 3: About This Manual
AXIS P12 Series About this manual About this manual This user manual describes multiple products. Some of the instructions may not be relevant for your product. -
Page 4: Product Overview
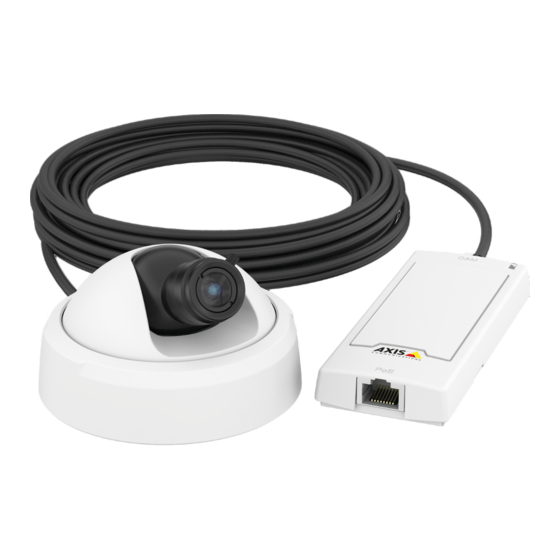
AXIS P12 Series Product overview Product overview AXIS P12 Mk II Main Unit Status LED Control button RJ12 connector Network connector (PoE) SD card slot (microSD card) Connect sensor units When you connect a sensor unit to a main unit, we recommend that you make the connection before you power up the main unit. If you disconnect a sensor unit and connect a different one, it may be necessary to restart the main unit. - Page 5 AXIS P12 Series Product overview Brown White/brown Not used Not used White/blue Blue NOTICE TICE TICE Make sure that the wires stay in the correct order and that the cable shield makes good contact with the connector shield. 5. Insert the wires all the way into a shielded 6P6C RJ12 connector.
-
Page 6: Find The Device On The Network
Find the device on the network Find the device on the network To find Axis devices on the network and assign them IP addresses in Windows®, use AXIS IP Utility or AXIS Device Manager. Both applications are free and can be downloaded from axis.com/support. -
Page 7: Webpage Overview
AXIS P12 Series Find the device on the network Webpage overview Live view control bar Live view Product name User information, color themes, and help Video control bar Settings toggle... - Page 8 AXIS P12 Series Find the device on the network Settings tabs...
-
Page 9: Additional Settings
Which capture mode to choose depends on the requirements of frame rate and resolution for the specific surveillance setup. For specifications about available capture modes, see the product’s datasheet. To find the latest version of the datasheet, go to axis.com. - Page 10 Note WDR may cause artifacts in the image. Find out more about WDR and how to use it at axis.com/web-articles/wdr. Monitor long and narrow areas Use corridor format to better utilize the full field of view in a long and narrow area, for example a staircase, hallway, road, or tunnel.
- Page 11 Additional settings 1. Depending on your device, turn the camera or the 3-axis lens in the camera 90° or 270°. 2. If the device doesn’t rotate the view automatically, log in to the webpage and go to Settings > System > Orientation.
-
Page 12: Privacy Masks
This example explains how to display the text “Motion detected” when the device detects motion: Make sure that AXIS Video Motion Detection is running: 1. Go to Settings > Apps > AXIS Video Motion Detection. 2. Start the application if it is not already running. -
Page 13: Streaming And Storage
AXIS P12 Series Additional settings 14. Click Save. Streaming and storage Bitrate control With bitrate control, you can manage the bandwidth consumption of your video stream. Variable bitrate (VBR) With variable bitrate, the bandwidth consumption varies based on the level of activity in the scene. The more activity in the scene, the more bandwidth you need. - Page 14 H.264 or MPEG-4 Part 10/AVC Note H.264 is a licensed technology. The Axis product includes one H.264 viewing client license. To install additional unlicensed copies of the client is prohibited. To purchase additional licenses, contact your Axis reseller.
- Page 15 AXIS P12 Series Additional settings H.264 can, without compromising image quality, reduce the size of a digital video file by more than 80% compared to the Motion JPEG format and by as much as 50% compared to the MPEG-4 standard. This means that less network bandwidth and storage space are required for a video file.
-
Page 16: Events
1. Go to Settings > System > Events and add a rule. 2. Type a name for the rule. 3. In the list of conditions, under Application, select AXIS Video Motion Detection (VMD). 4. In the list of actions, under Recordings, select Record video while the rule is active. -
Page 17: Applications
The counter is embedded in the camera which means you do not need a dedicated computer to run the application. AXIS People Counter is intended for retail environments, like stores or shopping malls, or other environments where you want to... -
Page 18: Troubleshooting
AXIS P12 Series Troubleshooting Troubleshooting If you can’t find what you’re looking for here, try the troubleshooting section at axis.com/support. Reset to factory default settings Important Reset to factory default should be used with caution. A reset to factory default resets all settings, including the IP address, to the factory default values. -
Page 19: Technical Issues, Clues And Solutions
Axis device. Check all cabling and reinstall the device. Possible IP address conflict The static IP address in the Axis device is used before the DHCP server sets a dynamic address. with another device on the... -
Page 20: Performance Considerations
To access the device externally, we recommend using one of the following applications for Windows • AXIS Companion: free of charge, ideal for small systems with basic surveillance needs. • AXIS Camera Station: 30-day trial version free of charge, ideal for small to mid-size systems. For instructions and download, go to axis.com/products/axis-companion. -
Page 21: Contact Support
AXIS P12 Series Troubleshooting • Running multiple AXIS Camera Application Platform (ACAP) applications simultaneously may affect the frame rate and the general performance. Contact support Contact support at axis.com/support. -
Page 22: Specifications
AXIS P12 Series Specifications Specifications To find the latest version of the product’s datasheet, go to the product page at axis.com and locate Support & Documentation. LED indicators Color Indication Status Green Steady green for normal operation. Amber Steady during startup. Flashes during firmware upgrade or reset to factory default. - Page 23 User Manual Ver. M5.3 AXIS P12 Series Date: February 2020 © Axis Communications AB, 2018 - 2020 Part No. T10124519...
Need help?
Do you have a question about the P1275 and is the answer not in the manual?
Questions and answers