Advertisement
Quick Links
Advertisement

Subscribe to Our Youtube Channel
Related Manuals for Residentia DWI62CS


Summary of Contents for Residentia DWI62CS
- Page 1 User Manual\ Integrated Dishwasher\ DWI6CS...
- Page 2 At Residentia Group, we are customer obsessed and our Support Team are there to ensure you get the most out of your appliance. Should you want to learn more...
-
Page 3: Table Of Contents
Residentia\User Manual Contents\Page Safety instructions\04 Your Dishwasher\06 Installation Instructions\07 Operating Your Dishwasher\11 Cleaning & Maintenance\18 Troubleshooting & Technical Data\21 Warranty Information\24 Purchase Details\26 Receipt\27... - Page 4 Residentia\04 Safety Instructions\ This dishwasher is intended to be used in domestic Warning environments only, including: Improper connection of the equipment-grounding conductor can result in the risk of an electric shock. Check — household kitchen; with a qualified electrician or service representative if you —...
- Page 5 User Manual\05 Instructions\ \Safety — This appliance is not intended for use by persons Unpacking (including children with reduced physical, sensory During transportation, protective packaging was used or mental capabilities, or lack of experience and to protect the appliance against any damage. After knowledge, unless they have been given supervision unpacking, please dispose of all elements of packaging or instruction concerning use of the appliance by a...
-
Page 6: Your Dishwasher\06
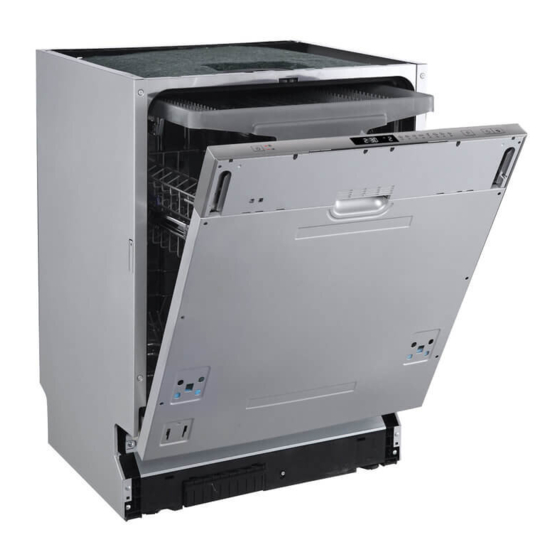
Residentia\06 Your Dishwasher\ Specifications Top Spray Arm 2 Cutlery Rack 3 Upper Basket Inner Pipe 5 Lower Basket 6 Dispenser Cup Shelf 8 Spray Arms 9 Filter assembly 10 Inlet pipe connector 11 Drain Pipe 12 Adjuster MODEL PRODUCT DIMENSIONS (W×D×H) -
Page 7: Instructions\04
User Manual\07 Installation Instructions\ It’s important to carefully read the following installation instructions before beginning the installation of your dishwasher. Important! The installation of the pipes and electrical outlets should be completed by suitably licensed and qualified persons. Positioning The installation position of the dishwasher should be near the existing inlet, drainage wastepipe and power outlet. -
Page 8: Installation Instructions\07
\Installation Aesthetic panel Given your Residentia dishwasher is fully integrated, you need to have a door panel made (normally to match your existing kitchen cabinetry) to finish the front of your dishwasher with. The figure below provides the dimensions and specifications for your panel. - Page 9 User Manual\09 Instructions\ \Installation Tension adjustment of door spring The door springs are set at the factory to the proper tension for the outer door. Once you have installed your aesthic panel, you will most likely need to adjust the door spring tension to allow for the additional weight. —...
- Page 10 Residentia\10 Instructions\ \Installation Dishwasher installation steps Now that your aestheic panel has been fitted to the outer door (1) and your door spring tension (2) has been adjusted (both steps previously outlined within this user manual), you can now proceed with the installation of your dishwasher.
- Page 11 User Manual\11 Operating Your Dishwasher\ Quick operation guide...
- Page 12 Residentia\12 \Operating Your Dishwasher\ Control Panel 1. Delay Button: Use this button to set the delayed washing start time. 2. Delay Window: Displays the delayed start time (1-24 hours) and fault codes. 3. Option Button: Use this button to select an additional option to that of your washing program (i.e.
- Page 13 User Manual\13 \Operating Your Dishwasher\ — To open the dispenser, turn the cap to the "open" arrow, anti-clockwise, and lift out. (1) — Pour the rinse aid into the dispenser, being careful not to overfill. (2) — Replace the cap by inserting it aligned with the "open" arrow and turn clockwise.
- Page 14 Residentia\14 \Operating Your Dishwasher\ Detergents Detergents with its chemical ingredients are necessary to remove dirt, crush dirt and transport it out of the dishwasher. Most of the commercial quality detergents are suitable for this purpose. — If the lid is closed, press the release button and the lid will spring open.
- Page 15 User Manual\15 \Operating Your Dishwasher\ Loading the dishwasher — Only use utensils and dishes that are identified as dishwasher safe or proof. — To prevent damage to your dishes and glassware, do not remove them from the dishwasher immediately after the program has ended. Items that are not suitable for the dishwasher: —...
- Page 16 Residentia\16 \Operating Your Dishwasher\ Adjusting the upper basket The height of the upper basket can be adjusted in order to create more space for large dishes both for the upper and lower basket racks. The height of the upper basket rack can be adjusted by lifting up the basket for the upper...
-
Page 17: Operating Your
User Manual\17 \Operating Your Dishwasher\ Cutlery basket Cutlery should be placed in the cutlery rack separately from each other in the appropriate positions, and do make sure the utensils do not nest together. Starting a wash cycle — Load the cutlery and dish basket racks. —... - Page 18 Residentia\18\Operating Your Dishwasher\ Starting a washing program...
- Page 19 User Manual\19 Cleaning & Maintenance\ Filtering system The filter prevents larger remnants of food or other objects from getting inside the pump. The residues may block the filter, in this case they must be removed. The filter system consists of a coarse filter, a flat (main filter) and a microfilter (fine filter).
-
Page 20: Cleaning & Maintenance\18
Residentia\20 \Cleaning & Maintenance\ Caring for the dishwasher — The control panel of the dishwasher can be cleaned using a slightly dampened cloth. After cleaning, ensure it is dryed thoroughly. — To clean the internal edge of the door, you should only use a soft, damp cloth with warm water. -
Page 21: Troubleshooting & Technical
— Switch off the dishwasher at the power outlet and remove the plug. — Isolate the water supply from the dishwasher. — Call the Residentia Support Team on 1300 11 HELP (4357). Troubleshooting Some minor faults can be fixed by referring to the instructions given below. - Page 22 Residentia\22\Troubleshooting & Technical Data\...
- Page 23 User Manual\23 \Troubleshooting & Technical Data\ Error codes When some malfunctions occur, the dishwasher may display some error codes to warn you of an issue. Technical data Electrical details Rated Voltage: 220 - 240 Volts, 50 Hz Capacity: 14 Place Settings Water Pressure: 0.04-1.0 MPa...
-
Page 24: Warranty
This document sets out the terms and conditions of the in the ACL; product warranties for Residentia Group Appliances. It is ‘ACL’ means Trade Practices Amendment an important document. Please keep it with your proof of (Australian Consumer Law) Act (No.2) 2010;... - Page 25 Appliance. transportation and delivery of the Appliance to and from Residentia Group or its ASR, in all For Appliances and services provided by Residentia instances, unless the Appliance is transported...
- Page 26 Residentia\26 Purchase Details\ For your records, please record details of your purchase below and staple your receipt on the opposite page. Store details Store name Address Telephone Purchase date Product details Model no. Serial no.* * Note. Your serial number can be found on the inside panel of the dishwasher.
- Page 27 User Manual\27 Receipt\...
- Page 28 Model Code\DWI6CS...
Need help?
Do you have a question about the DWI62CS and is the answer not in the manual?
Questions and answers