Table of Contents
Advertisement
Available languages
Available languages
Quick Links
SEC.
가
WORK
BRAND
LG
87
<FRONT>
가
150
5
4
3
2
1
바코드 변경
EAGJB00574
REV. NO.
REVISION DESCRIPTION
REF. NO.
기호
변경 사항
시방 번호
나
다
PRINTING DEGREE
MODEL
P/NO.
WTT02TLXMN
MFL69962087
<BACK>
가
나
P/NO. 다
150
2019/11/26
오 유 석
이 창 훈
DATE
PREPARED
APPROVED
년/월/일
시방자
승인자
MATERIAL AND PRINTING DESCRIPTION
LG MODEL 명
1
SNOW WHITE 80g OFFSET 인쇄
F8K5XNK4N
<< 주기 >>
1. 재질, 인쇄방법, 인쇄도수, 외곽치수등은 작업표에 준한다.
2. 인쇄내용, 문자크기 및 형상, 선의 굵기 등은 설계에서 제시된 FILM에 준함.
3. 외곽치수는 절단후 치수임.
4. 양산전에 설계 한도를 득할 것.
5. 본 부품에 금지물질이 포함되지 않도록 하고, 상세내용은 LG(63)-A-5501-34를 만족할 것
<< NOTES >>
1. Material, printing and exterier size are refer to work tables.
2. Printing, text size and line are based on LG design film.
3. Exterier size on the drawing is cutting line.
4. Before product controlled by criteria sample.
5. The part should not contain prohibited substances(Pb,Cd,Hg,Cr+6,PBB,PBDE) and details
should comply with LG standard of LG(63)-A-5501-34
TRIG.
MODELING
DESIGNED
오 유 석
19.11.14
LG 전자
LG Electronics Inc.
SUFFIX
LANGUAGE
ENG/ARABIC
ASSGNAG
N
UNIT
mm
SCALE
MANUAL,OWNER'S
S
T
I
REVIEWED
CHECKED
APPROVED
T
이 갑 선
이 창 훈
홍 순 창
L
W-MODULE
E
19.11.14
19.11.14
19.11.14
RELATED DWG.
(주)
MFL69482534
DWG.
No.
RELEASING THIS DRAWING
WITHOUT PERMISSION LG
Electronics SHOULD BE
ACCUSED ACCORDING TO THE
LAWS AND COMPANY RULES.
이 도면은 LG전자의 자산으로 불법
유출시 관계법과 회사규정에 의해 처벌됨.
PAGE
REMARK
W-MODULE
92
DR COMPLETED
PDF
도면 DR 완료
ILLUSTRATOR
완료일 :
1/1
Advertisement
Table of Contents

Subscribe to Our Youtube Channel
Related Manuals for LG WTT02TLXMN


Summary of Contents for LG WTT02TLXMN
- Page 1 1. Material, printing and exterier size are refer to work tables. P/NO. 다 2. Printing, text size and line are based on LG design film. 3. Exterier size on the drawing is cutting line. 4. Before product controlled by criteria sample.
- Page 2 OWNER'S MANUAL WASHING MACHINE Read this owner’s manual thoroughly before operating the appliance and keep it handy for reference at all times. AR العربية ENGLISH WTT02TLXMN www.lg.com Copyright © 2019 LG Electronics Inc. All Rights Reserved...
-
Page 4: Table Of Contents
TABLE OF CONTENTS This manual may contain images or content different from the model you purchased. This manual is subject to revision by the manufacturer. SAFETY INSTRUCTIONS ............4 IMPORTANT SAFETY INSTRUCTIONS ............ 4 INSTALLATION ..............10 Parts ......................10 Accessories ....................11 Specifications ....................11 Installation Place Requirements ............... -
Page 5: Safety Instructions
SAFETY INSTRUCTIONS The following safety guidelines are intended to prevent unforeseen risks or damage from unsafe or incorrect operation of the appliance. The guidelines are separated into ‘WARNING’ and ‘CAUTION’ as described below. This symbol is displayed to indicate matters and operations that can cause risk. - Page 6 Installation •Never attempt to operate the appliance if it is damaged, malfunctioning, partially disassembled, or has missing or broken parts, including a damaged cord or plug. •This appliance should only be installed and transported by two or more people holding the appliance securely. •Do not install the appliance in a damp and dusty place.
- Page 7 •If the power cord is damaged or the hole of the socket outlet is loose, do not use the power cord and contact an authorized service centre. •This appliance must not be installed behind a lockable door, a sliding door or a door with a hinge on the opposite side to that of the appliance, in such a way that a full opening of the appliance door is restricted.
- Page 8 Improper use can cause fire or explosion. •In case of flood, disconnect the power plug and contact the LG Electronics customer information centre. •Do not push down the drawer excessively, when the appliance drawer is open.
- Page 9 •Do not touch the door during a high temperature programme. •Do not use flammable gas and combustible substances (benzene, gasoline, thinner, petroleum, alcohol, etc.) near the appliance. •If the drain hose or inlet hose is frozen during winter, use it only after thawing.
- Page 10 Maintenance •Securely plug the power plug in the socket outlet after completely removing any moisture and dust. •Disconnect the power cord before cleaning the appliance. •Never unplug the appliance by pulling on the power cable. Always grip the power plug firmly and pull straight out from the socket outlet.
-
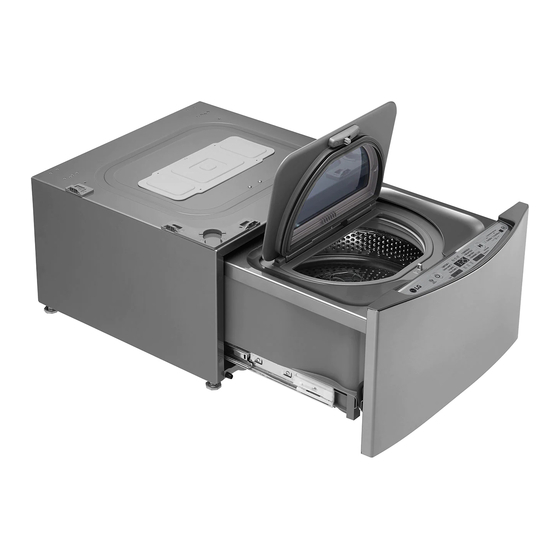
Page 11: Installation
INSTALLATION Parts Door Water Supply Hose Drum Power Plug Control Panel Water Drain Hose Drawer Leveling Feet... -
Page 12: Accessories
Accessories Water supply hose Connecting Water drain hose Water supply hose Water drain hose (for cold water) supply hose connector connector Anti-slip sheets Detergent Brackets (front) Brackets (back) Spanner (2 EA) measuring (2 EA) (2 EA) * Screws Cable ties Band clamps Remote control Type A (40 EA) -
Page 13: Installation Place Requirements
Installation Place • Do not install the appliance in rooms where freezing temperatures may occur. Frozen Requirements hoses may burst under pressure. The reliability of the electronic control unit may be Location impaired at temperatures below freezing point. • Ensure that when the appliance is installed, it 135 cm is easily accessible for an engineer in the 123 cm... -
Page 14: Stacking Mini Washer
Type 1. The bottom part of the Main Stacking Mini Washer Washer is silver in color. • First assemble the stacking holder using 2 type A screws included in the accessory box of the Mini Washer, then each bracket using 7 type A screws included in the Brackets (front) accessory box of the Mini Washer. - Page 15 Place Main Washer on top of Mini Washer. Pull and save the foam block for future use. • If the washing machine must be moved in • Make sure the 4 legs are totally locked the future, the foam block will help prevent and the holes of Mini Washer align with damage to the washing machine during the holes of Main Washer.
-
Page 16: Connecting The Supply Hose
Connecting the Supply Hose Connecting Hose to Water Tap • Water supply pressure must be between 0.1 Connecting Screw-Type Hose to Tap MPa and 0.8 MPa (1.0‒8.0 kgf/cm with Thread • Do not overtighten the water supply hose. Screw the hose connector onto the water •... - Page 17 Push the adapter onto the end of the tap so Remove the guide plate if the tap is too that the rubber seal forms a watertight large to fit the adapter. connection. Tighten the four fixing screws. Guide plate Push the supply hose vertically upwards so that the rubber seal within the hose can Push the adapter onto the end of the tap so adhere completely to the tap and then...
- Page 18 Connecting Hose to Two Washing Connect the additionally provided water supply hose of Main Washer to the water Machines supply hose connector and water tap. Water supply hose Connect the water supply hose connector to connector the water supply hose of Main Washer. Open the accessory package for Mini Washer installation.
-
Page 19: Installing The Drain Hose
Installing the Drain Hose Using the Drain Hose Connector • The drain hose should not be placed higher Connect the drain hose of Main Washer than 100 cm above the floor. Water in the and Mini Washer to the drain connector. appliance may not drain or may drain slowly. -
Page 20: Leveling The Appliance
• If Mini Washer is installed on a raised platform, it must be securely fastened in order NOTE to eliminate the risk of falling off. • You can obtain anti-slip sheets from the LG Service Centre. -
Page 21: Operation
OPERATION Using the Appliance Choose the desired washing cycle. • Press the cycle button repeatedly until the desired cycle is selected. Sort laundry and load items. • Sort laundry by fabric type, soil level, colour and load size as needed. Open the door and load items into the washing machine. -
Page 22: Sorting Laundry
Sorting Laundry Caring before loading. • Do not wash 'memory wire' on female Look for a care label on your clothes. inner wear (such as a brassiere) as it may damage other clothes or the washing • This will tell you about the fabric content machine and create noise. -
Page 23: Closing The Door And Drawer
Provide • Forcing the drawer or the door to open can the power again or contact the LG service cause part damages and safety problems. centre. • Closing the drawer before having closed the •... -
Page 24: Adding Cleaning Products
Adding Cleaning Products Adding Detergent Measure the detergent with the detergent Detergent Dosage dispenser and pour it into the tub. • Detergent should be used according to the instruction of the detergent manufacturer and selected according to type, colour, soiling of the fabric and washing temperature. - Page 25 Adding Softeners Adding Water Softener A water softener, such as anti-limescale can be used to cut down on the use of detergent in Adding Fabric Softener areas with high water hardness level. CASE 1. When the machine chimes: • Dispense according to the amount specified Press Start/Pause to pause the cycle.
-
Page 26: Control Panel
Control Panel Power Button Start/Pause Button • Press the Power button to turn the • This Start/Pause button is used to start washing machine on. the wash cycle or pause the wash cycle. • If a temporary stop of the wash cycle is needed, press the Start/Pause button. -
Page 27: Programme Table
Programme Table Washing Programme Maximum Programme Description Note Load Use this programme to • To change the setting during wash lightly soiled normal Light Soil washing, change the setting after 2.0 kg items, except delicate pressing Start/Pause button. fabrics such as wool or silk. Use this programme to wash delicate items such as lingerie or sheer and... -
Page 28: Option Programme
Option Programme Child Lock Use this option to disable the controls. This Spin Only feature can prevent children from changing cycles or operating the appliance. Use this option to spin-dry. Locking the Control Panel Tub Clean Press and hold the Tub Clean and Extra Rinse button at the same time for three Use this option to keep the drum clean. -
Page 29: Smart Functions
• To verify the Wi-Fi connection, check that Wi-Fi icon on the control panel is lit. Installing SmartThinQ • LG SmartThinQ is not responsible for any network connection problems or any faults, Search for the LG SmartThinQ application from malfunctions, or errors caused by network the Google Play Store or Apple App Store on a connection. - Page 30 LG Electronics customer • Once the Remote Start mode is enabled, you information centre when the appliance can start a cycle from the LG SmartThinQ malfunctions or fails. smartphone application. If the cycle is not Smart Diagnosis™ can not be activated unless started, the machine will wait to start the cycle the appliance is connected to power.
-
Page 31: Using Smart Diagnosis
Customer Information Centre transmitted for analysis. Use this function if you need an accurate diagnosis by an LG Electronics customer NOTE information center when the appliance • The Smart Diagnosis™ function depends on malfunctions or fails. -
Page 32: Maintenance
MAINTENANCE Cleaning the Interior WARNING • Unplug the washing machine before cleaning • Use a towel or soft cloth to wipe around the to avoid the risk of electric shock. Failure to washing machine door opening and door follow this warning may result in serious injury, glass. -
Page 33: Cleaning The Drum
Cleaning the Drum Cleaning the Water Inlet Filter Use the Tub Clean option to keep the drum • Turn off the stopclock if the washing machine clean. is to be left for any length of time (e.g. holiday), especially if there is no floor drain Press the Power button. -
Page 34: Caution On Freezing During Winter
Caution on Freezing During How to Handle Freezing Winter Step 1. When the Door is Frozen • When frozen, the product does not operate • Thaw out the door using a hot water cloth. normally. Make sure to install the product where it will not freeze during winter. - Page 35 Step 3. When the Drain Pump is Frozen icon may blink on the display when • drain pump problems occur, take the following measures. Pour 15 ℓ warm water below 50–60 °C in the drum until washing machine wing nuts are immersed and wait for an hour.
-
Page 36: Troubleshooting
TROUBLESHOOTING The appliance is equipped with an automatic error-monitoring system to detect and diagnose problems at an early stage. If the appliance does not function properly or does not function at all, check the following before you call for service: Diagnosing Problems Symptoms Reason... - Page 37 Symptoms Reason Solution • Always wash dark colors separately from light colors and whites to prevent Clothes were not properly Staining discoloration. sorted. • Never wash heavily soiled items washed with lightly soiled items. Supply hose connection is • Check hoses and drain hose connectors loose at the tap, washing for leaks, cracks and splits.
- Page 38 Symptoms Reason Solution Control panel has powered • This is normal. Press the Power button off due to inactivity. to turn the washing machine on. Washing machine is • Make sure cord is plugged securely into unplugged. a working outlet. Water supply is turned off.
- Page 39 Symptoms Reason Solution • Make sure the inlet filters on the fill Filter clogged. valves are not clogged. Refer to the filter cleaning instructions. Supply hoses may be kinked. • Check that supply hoses are not kinked or clogged. • Make sure that the cold water tap is Insufficient water supply.
-
Page 40: Error Messages
Error Messages Symptoms Reason Solution • Close the drawer and press Start/Pause button to start the cycle. Drawer is not closed • If the drawer is closed and the drawer properly. lock error message is displayed, call for service. • Open the drawer and make sure the latch area is free of clothing or other obstructions. - Page 41 • The stacking switch will not operate Stacking switch is not properly if the unit is stacked under a working properly. non-LG appliance, or an LG appliance manufactured before 2017. • Thaw out the supply hose using a hot Drain hose, supply hose or water cloth.
- Page 42 How to read Serial Number. :There is attached a Serial Number label on back side of this product. Example) : When you need to change frequency of washing machine ( 60Hz 50Hz), You must change following parts list. * DRAIN PUMP ASSY.
- Page 43 Memo...
- Page 44 Memo...
- Page 45 Memo...
- Page 46 Memo...
- Page 47 Memo...
- Page 48 مذكرة...
- Page 49 مذكرة...
- Page 50 مذكرة...
- Page 51 مذكرة...
- Page 52 مذكرة...
- Page 54 .رئيسية لن يعمل مفتاح التكديس بشكل سليم في حالة وضع الوحدة • تم تصنيعهLG ، أو جهازLG تحت جهاز ليس من أجهزة .ال يعمل مفتاح الوحدة بشكل سليم .٢٠١٧ قبل عام قم بإذابة الثلج من خرطوم اإلمداد باستخدام قطعة قماش...
- Page 55 رسائل الخطأ الحل السبب األعراض أغلق الدرج واضغط على زر التشغيل/اإليقاف المؤقت • .لبدء الدورة لم يتم إغالق الدرج بشكل صحيح في حالة إغالق الدرج وعرض رسالة الخطأ الخاصة بقفل • .الدرج، يرجى االتصال بالخدمة افتح الدرج وتأكد من عدم وجود مالبس أو عوائق أخرى •...
- Page 56 الحل السبب األعراض تأكد من أن فالتر اإلدخال الموجودة عند صمامات الملء • .الفلتر مسدود .غير مسدودة. راجع إرشادات تنظيف الفلتر .ربما تكون خراطيم اإلمداد ملتوية .تأكد من عدم التواء أو انسداد خراطيم اإلمداد • .تأكد من أن صنبور المياه الباردة قيد التشغيل طوال الوقت .
- Page 57 الحل السبب األعراض تم إيقاف تشغيل لوحة التحكم بسبب التوقف .هذا أمر طبيعي، اضغط على الزر الطاقة لتشغيل الغسالة • .عن التشغيل .تأكد من توصيل السلك بأمان في مقبس يعمل .تم فصل الطاقة عن الغسالة • .افتح صنبور المياه الباردة بالكامل .تم...
- Page 58 الحل السبب األعراض اغسل دو م ً ا المالبس ذات األلوان الغامقة بشكل منفصل عن • .المالبس ذات األلوان الفاتحة والبيضاء لتجنب تغير اللون .لم يتم فرز المالبس بطريقة صحيحة البقع ال تقم أب د ًا بغسل األغراض شديدة االتساخ مع األغراض •...
- Page 59 استكشاف األعطال وإصالحها ،تم تزويد الجهاز بنظام رصد الخطأ آل ي ً ا لكشف المشكالت وتشخيصها في مرحلة مبكرة. وإذا لم يعمل الجهاز بشكل صحيح أو لم يعمل على اإلطالق :فتحقق من التالي قبل االتصال بالخدمة تشخيص المشكالت الحل السبب األعراض...
- Page 60 الخطوة ٣. عند تجمد مضخة التصريف على الشاشة عند حدوث مشاكل قد يومض رمز • .في مضخة التصريف، لذا يرجى اتخاذ اإلجراءات التالية ١ اسكب ٥١ لتر ً ا من الماء الدافئ الذي تبلغ درجة حرارته من ٠٥ إلى ٠٦ درجة مئوية داخل الحلة حتى يتم إغراق الصامولة .المجنحة...
- Page 61 توخ الحذر من التجمد في أثناء الشتاء كيفية التعامل مع التجمد في حالة التجمد، ال يعمل المنتج بشكل طبيعي. وتأكد من تثبيت • الخطوة ١. عند تجمد الباب .المنتج في مكان لن يتجمد فيه في أثناء الشتاء قم بإذابة الثلج من على الباب باستخدام قطعة قماش مبللة بالماء •...
- Page 62 تنظيف فلتر إدخال الماء تنظيف حلة الغسيل أغلق المحبس إذا كان سيتم ترك الغسالة ألي فترة من الوقت .استخدم خيار تنظيف الحوض للحفاظ على نظافة الحلة • (على سبيل المثال عطلة)، وخصو ص ً ا عند عدم وجود صرف في ١...
- Page 63 الصيانة تنظيف داخلي تحذير استخدم فوطة أو قطعة قماش ناعمة لمسح المنطقة المحيطة بفتحة افصل الغسالة قبل التنظيف لتجنب خطر التعرض لصدمة • • .باب الغسالة وزجاج الباب كهربائية. قد يؤدي عدم اتباع هذا التحذير إلى التعرض إلى إصابة خطيرة، أو نشوب حريق، أو التعرض لصدمة كهربائية، أو أزل...
- Page 64 استخدم هذه الوظيفة إذا كنت بحاجة لتشخيص دقيق عن طريق مركز على جودة المكالمةSmart Diagnosis™ تعتمد وظيفة • عندما تحدث أعطال أوLG Electronics معلومات العمالء في شركة .المحلية فشل بالجهاز. استخدم هذه الوظيفة فقط لالتصال بممثل الخدمة، ليس أثناء...
- Page 65 .الدورة للتعرف على الوقت المتبقي للدورة .وإشعارات إخالء المسؤولية وإشعارات حقوق النشر للتنزيل أي ض ً ا التعليمات البرمجية المصدر علىLG Electronics ستوفر :الستخدام التشغيل عن ب ُ عد قرص مضغوط بتكلفة تغطي هذا التوزيع (مثل تكلفة الوسائط والشحن...
- Page 66 توفر هذه الوظيفة معلومات مفيدة حول تشخيص مشكالت الجهاز وحلها .حسب نمط االستخدام اإلعدادات .تتوفر وظائف مختلفة التنبيهات قم بتشغيل "التنبيهات" الستالم اإلشعارات الخاصة بحالة الجهاز. يتم " متوق ف ً اLG SmartThinQ" تشغيل اإلشعارات حتى إذا كان تطبيق .عن التشغيل ٢٨...
- Page 67 خيارات البرامج ) (القفل ضد عبث األطفالChild Lock استخدم هذا الخيار لتعطيل أدوات التحكم. يمكن أن يمنع هذا الخيار ) (دوران فقطSpin Only .األطفال من تغيير الدورات أو تشغيل الجهاز .استخدم هذا الخيار للمجفف قفل لوحة التحكم ١ Extra Rinse وTub Clean اضغط باستمرار على زر )...
- Page 68 جدول البرامج برنامج الغسيل الحد األقصى مالحظة الوصف البرنامج للحمولة استخدم هذا البرنامج لغسل المالبس قليلة Light Soil لتغيير اإلعداد أثناء الغسيل، غ ي ّر اإلعداد بعد • ٠,٢ كجم االتساخ، ما عدا األقمشة الناعمة مثل .الضغط على زر التشغيل/اإليقاف المؤقت )(خفيف...
- Page 69 لوحة التحكم زر بدء/إيقاف مؤقت زر الطاقة ي ُ ستخدم هذا الزر بدء/إيقاف مؤقت لبدء دورة الغسيل أو .اضغط فوق زر الطاقة لتشغيل الغسالة • • .إيقافها مؤق ت ً ا في حالة الحاجة إلى إيقاف دورة الغسيل مؤق ت ً ا، اضغط على •...
- Page 70 إضافة المواد المنعمة إضافة منقي الماء ي ُ مكن استخدام منقي الماء مثل مقاوم الرواسب الكلسية، للحد من .استخدام المنظفات في المناطق الفقيرة بالماء إضافة منعم القماش ً ويتم التوزيع وف ق ً ا للكمية المحددة على العبوة. يتعين عليك أو ال •...
- Page 71 إضافة منتجات التنظيف إضافة المنظف .قم بمعايرة المنظف باستخدام درج توزيع المنظف واسكبه في الحوض مقدار المنظف ،يجب استخدام المنظف وف ق ً ا لتعليمات الشركة المصنعة للمنظف • واختيارها وف ق ً ا لنوع األقمشة، ولونها، ومدى اتساخها، ودرجة .حرارة...
- Page 72 إذا حدث انقطا ع ً ا للتيار الكهربي أثناء عملية تشغيل المنتج، ال • تنبيه يمكن فتح الباب. زو ّ د الطاقة مرة أخرى أو اتصل بمركز خدمة .LG شركة احرص على تجنب انحشار يدك بين الباب والغسالة، حيث يمكن • .أن يعرضك ذلك لإلصابة...
- Page 73 ٣ فرز الغسيل .العناية قبل وضع الحمولة ال تقم بغسل المالبس النسائية الداخلية التي تحتوي على • ١ .ابحث عن ملصق العناية الموجود على مالبسك "سلك معدني" (مثل حمالة الصدر) حيث قد تؤدي إلى إتالف .المالبس األخرى أو الغسالة وقد يحدث صو ت ً ا سيوضح...
- Page 74 التشغيل ف ٥ استخدام الجهاز .اختيار دورة الغسيل المطلوبة ١ اضغط زر اختيار الدورات بشكل متكرر حتى يتم تحديد • .الدورة المطلوبة ١ .افرز الغسيل وضع المالبس ،افرز الغسيل حسب نوع النسيج، ومستوى األوساخ، واللون • وحجم الحمولة حسب الحاجة. ثم افتح الباب وضع المالبس .داخل...
- Page 75 ضبط مستوى الجهاز )استخدام شرائح مانعة لالنزالق (عنصر اختياري عند تركيب الجهاز على سطح ٍ زلق، قد تتحرك الغسالة نتيجة لالهتزاز إذا كانت األرضية غير مستوية، فأدر األقدام القابلة للضبط حسب الحاجة الشديد. ويمكن أن تؤدي التسوية غير الصحيحة إلى حدوث عطل من (ال...
- Page 76 تركيب خرطوم التصريف استخدام موصل خرطوم التصريف ١ ال يجب وضع خرطوم التصريف على ارتفاع أعلى من ٠٠١ سم صل خرطوم التصريف الخاص بالغسالة الرئيسية والغسالة • عن األرض. قد يتعذر تصريف الماء الموجود في الجهاز أو يتم .الصغيرة بموصل التصريف .تصريفه...
- Page 77 ٣ توصيل الخرطوم بالغسالتين ص ِ ل موصل خرطوم اإلمداد ال م ُ ق َ دم اإلضافي الخاص بالغسالة .الرئيسية بموصل خرطوم اإلمداد وصنبور المياه ١ ص ِ ل موصل خرطوم اإلمداد بخرطوم اإلمداد الخاص بالغسالة موصل خرطوم إمداد الماء .الصغيرة.
- Page 78 ٢ ٣ أزل لوحة التوجيه إذا كان الصنبور كبير ً ا ج د ًا حتى يالئم ادفع المحول إلى طرف الصنبور بحيث تشكل الحشية المطاطية .المحول .وصلة منيعة للماء. وأحكم ربط مسامير التثبيت األربعة لوحة التوجيه ٤ ادفع خرطوم اإلمداد بشكل عمودي ألعلى بحيث يمكن للسدادة المطاطية...
- Page 79 توصيل خرطوم اإلمداد توصيل الخرطوم بصنبور الماء ٨.٠يجب أن يكون ضغط إمداد الماء ما بين ١.٠ ميجا باسكال و • توصيل الخرطوم اللولبي بالصنبور المزود بأسنان .)٢ميجا باسكال (٠.١‒٠.٨ كجم ثقلي/سم .ثبت موصل الخرطوم بصنبور إمداد الماء .ال ت ُ فرط في إحكام غلق خرطوم إمداد المياه •...
- Page 80 ٣ .ضع الغسالة الرئيسية على الجزء العلوي من الغسالة الصغيرة .انزع مواد التغليف واحتفظ بها لالستفادة منها في المستقبل تأكد من أن األقدام األربعة مقفلة بإحكام وأن فتحات الغسالة إذا اقتضى األمر نقل الغسالة في المستقبل، فستساعدك مواد • • .الصغيرة...
- Page 81 رص ّ الغسالة الصغيرة .النوع ١. الجزء السفلي من الغسالة الرئيسية لونه فضي في البداية، قم بتجميع حامل التكديس باستخدام ٢ من البراغي • ، الموجودة في صندوق كماليات الغسالة الصغيرةA من النوع A ثم قم بتركيب كل دعامة باستخدام ٧ براغي من النوع .والموجودة...
- Page 82 تركيب مكان التركيب ال تركب الجهاز في غرف يمكن أن تصل درجة حرارتها إلى • .التجمد، حيث يمكن أن تنفجر الخراطيم المتجمدة تحت الضغط يمكن أن تقل كفاءة وحدة التحكم اإللكترونية في ظل درجات الموقع .الحرارة األقل من درجة التجمد تأكد...
- Page 83 الملحقات موصل خرطوم موصل خرطوم خرطوم تصريف الماء توصيل خرطوم إمداد الماء تصريف الماء إمداد الماء خرطوم اإلمداد )(خاص بالماء البارد مفتاح ربط )دعامتان (خلفيتان )دعامتان (أماميتان كوب عيار شراشف مضادة لالنزالق )(٢ عدد )(٢ عدد المنظف )(٢ عدد * براغي جهاز...
- Page 84 التركيب األجزاء خرطوم إمداد الماء باب قابس الطاقة الحوض خرطوم تصريف الماء لوحة التحكم أقدام التسوية درج ١٠...
- Page 85 الصيانة .أدخل قابس الطاقة بإحكام في مقبس الخرج بعد إزالة أي رطوبة أو غبار بشكل كامل • .افصل سلك الطاقة قبل تنظيف الجهاز • احرص دائ م ً ا على عدم فصل الطاقة عن الجهاز من خالل شد كابل الطاقة. وإلخراج قابس •...
- Page 86 .يجب عدم لمس الباب أثناء البرامج ذات درجة الحرارة المرتفعة • ال تستخدم غاز ً ا قاب ال ً لالشتعال أو مواد قابلة لالحتراق (البنزين، والجازولين، وسائل تخفيف • .الدهان "التنر"، والمواد البترولية، والكحول، وما إلى ذلك) بالقرب من الجهاز ال...
- Page 87 ،المتفجرة أو القابلة لالحتراق (مثل الشمع، والبنزين، والطالء، والجازولين، ومزيل الشحوم .).ومذيبات التنظيف الجاف، والكيروسين، والزيوت النباتية، وزيوت الطهي، وما إلى ذلك .حيث يمكن أن يتسبب االستخدام غير السليم في نشوب حريق أو وقوع انفجار لمعلوماتLG Electronics في حال حدوث فيضان، افصل مقبس الطاقة واتصل بمركز • .العمالء...
- Page 88 في حالة تلف سلك الطاقة أو ارتخاء فتحة المقبس، ال تستخدم سلك الطاقة واتصل بمركز خدمة • .معتمد يجب عدم تركيب هذا الجهاز خلف باب قابل للقفل، أو باب منزلق، أو باب مزود بمفصلة على • .الجانب المقابل للجهاز، حيث يؤدي هذا إلى إعاقة فتح باب الجهاز بالكامل يجب...
- Page 89 التركيب ال تحاول أب د ًا تشغيل هذا الجهاز إذا كان تال ف ً ا، أو به عطل، أو مفك ك ً ا بشكل جزئي، أو به أجزاء • .مفقودة أو محطمة، بما في ذلك سلك أو قابس تالف .يجب أن يتم تثبيت هذا الجهاز ونقله من قبل شخصين أو أكثر يحملون الجهاز بأمان •...
- Page 90 إرشادات السالمة يتمثل الغرض من إرشادات السالمة التالية في الحيلولة دون وقوع المخاطر غير المتوقعة أو .األضرار الناجمة عن التشغيل غير اآلمن أو غير الصحيح للمنتج .يتم تقسيم اإلرشادات إلى "تحذير" و"تنبيه" على النحو الموضح أدناه يتم عرض هذا الرمز لإلشارة إلى األمور وعمليات التشغيل التي يمكن أن تسبب مخاطر،...
- Page 91 جدول المحتويات قد يحتوي هذا الدليل على صور أو محتوى يختلف عن .الطراز الذي قمت بشرائه .يخضع هذا الدليل للمراجعة من الشركة المص ن ّ عة ٤................إرشادات السالمة ٤ ..................إرشادات السالمة الهامة ١٠ ..................التركيب ١٠ ......................األجزاء ١١ ......................الملحقات ١١...
- Page 93 قبل البدء في تركيب الجهاز، اقرأ هذه التعليمات بعناية. حيث سيبسط ذلك عملية التركيب ويضمن تركيب الجهاز بشكل صحيح وآمن. واحتفظ بهذه التعليمات بالقرب من المنتج بعد .التركيب للرجوع إليها في المستقبل AR العربية ENGLISH WTT02TLXMN www.lg.com MFL69962087 .إل جي لاللكترونيات. كل الحقوق محفوظة حقوق النشر...
Need help?
Do you have a question about the WTT02TLXMN and is the answer not in the manual?
Questions and answers