Table of Contents
Advertisement
Quick Links
Advertisement
Table of Contents
Troubleshooting

Subscribe to Our Youtube Channel
Related Manuals for Newland NLS-N7L


Summary of Contents for Newland NLS-N7L
- Page 1 NLS-N7L (Android 9) Portable Data Collector User Guide...
- Page 2 The information contained herein is subject to change without prior notice. The products depicted in this manual may include software copyrighted by Newland Auto-ID Tech. Co., Ltd or third party. The user, corporation or individual, shall not duplicate, in whole or in part, distribute, modify, decompile, disassemble, decode, reverse engineer, rent, transfer or sublicense such software without prior written consent from the copyright holders.
- Page 3 Revision History Version Description Date Initial Release(N7LL-2020-10-30_20-19-10-N7LL-X_V5.00.003) V1.0.0 2020-12-8...
-
Page 4: Table Of Contents
Contents Chapter 1 About This Guide ..............................1 Introduction ................................1 Chapter Descriptions ..............................1 More Information ............................... 1 Chapter 2 Getting Started ..............................2 Introduction ................................2 Unpacking ................................2 Accessories (Optional) .............................. 2 Safety Guidelines ..............................3 Getting Started ................................4 The N7L ................................ - Page 5 SIM Card and Mobile Network(Not for WI-FI version) ................... 24 Display ................................... 27 Apps & Notifications ..............................28 Battery Protect ................................ 29 GPS ..................................30 Screen lock ................................31 Language & Input Method ............................32 Date & Time ................................33 Restoring Factory Settings ............................
- Page 6 Stacking Heavy Objects........................... 53 Electronic Device ............................54 Hospital ................................54 Area with inflammables and Explosives ......................54 Traffic Safety ..............................54 Storage Environment ............................55 Operating Environment ............................ 55 Cleaning and Maintenance ..........................55 Battery Safety Guidelines ..........................56 Repair ................................
-
Page 7: Chapter 1 About This Guide
Chapter 1 About This Guide Introduction This guide provides instructions for programming and operating the NLS-N7L portable data collector of android 9 version (hereinafter referred to as “the N7L” or “the terminal”). Chapter Descriptions Chapter 1 About This Guide Provides general description of this manual. -
Page 8: Chapter 2 Getting Started
N7L for the first time. Unpacking Carefully remove all protective material from the pack and verify that the followings were received: 1 x NLS-N7L main unit 1 x USB cable 1 x AC adapter for the N7L ... -
Page 9: Safety Guidelines
Safety Guidelines Before using the terminal, please read the safety instructions carefully to ensure proper use of the terminal. For more detailed information, please refer to Chapter 9. Do not switch the terminal on when use is Do not place the terminal or its accessories prohibited or when it may cause interference in containers with a strong electromagnetic or danger. -
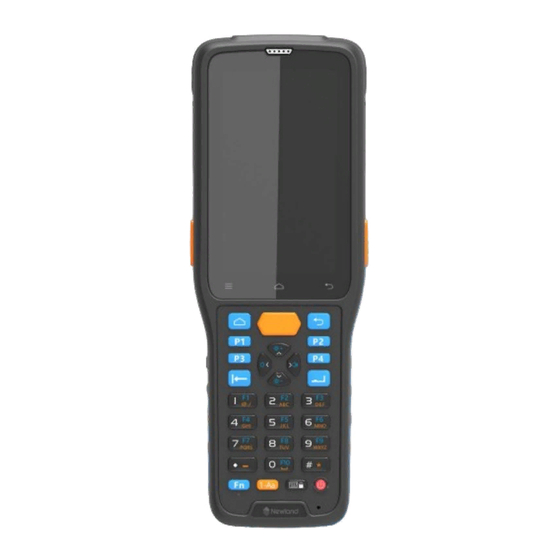
Page 10: Getting Started
Getting Started The N7L Up/Down/Left/Right Key Scan Key Home Key Delete Key Numeric Keys Function Switch Key Input Method Switch Key Cradle Connector Virtual Keyboard/Screen Lock Key Power Key USB Port Left Scan Key Enter Key User-defined Key... - Page 11 Return Key Right Scan Key SIM/TF Card Charging LED Earpiece Scan Window Speaker Battery Cover Latch Flashlight...
-
Page 12: Installing The Battery
Installing the Battery Install Battery Step 1: Slide the battery cover latch to the unlock position and remove the cover. Step 2: Insert the battery as indicated into the battery compartment, with its metal contacts facing down and lining up with the metal contacts on the inside of the terminal. -
Page 13: Removing The Battery
Removing the Battery Remove Battery Step 1: Hold down the Power key for 2 seconds and then tap “Power off” to turn off the terminal. Slide the battery cover latch to the unlock position and remove the cover. Step 2: Remove the battery. -
Page 14: Charging The Battery
Charging the Battery Connect the N7L to a power outlet using the included AC adapter or USB cable. Note: 1. When the terminal battery is running low (at 15%), the battery icon in the notification bar at the top of the screen starts flashing;... -
Page 15: Installing The Tf Card/Sim Card (Not For Wi-Fi Version)
Installing the TF Card/SIM Card (Not for Wi-Fi Version) Card Slot 2 Card Slot 1 Step 1: Open the cover of SIM/TF card slot and pull the tray out from the slot. Step 2: Insert the SIM/TF card into the corresponding slot on the tray, with its metal contacts facing down. Then gently push the tray into the slot until it locks in place. -
Page 16: Chapter 3 Basics
Chapter 3 Basics Introduction This chapter provides the basics of setting and using the N7L. Power Key After installing the SIM card and battery and having the N7L fully charged, you may switch the terminal on. Switch the N7L on: Hold down the Power Key for around 3 seconds until the Android logo is displayed. Note that the initialization is going to take some time before the N7L displays the Home screen. -
Page 17: Home Screen
Home Screen View another Home screen: Swipe left or right. Go to the Home screen: Press the Home key on the front panel of the terminal. Open an app: Tap the app icon. View all apps/Open apps list: Swipe Home screen from bottom to top with one finger in one smooth motion to view all the app. -
Page 18: Status Icons
Status Icons The icons in the notification bar at the top of the screen give information about the N7L. Status Icon Description Status Icon Description Signal strength Turn on Mobile Network Battery Status Call in the progress Data Transfer Mode Airplane Mode on Bluetooth on Uploading... -
Page 19: Notification Bar
Notification Bar View the Notification Bar: Swipe Home screen from top to bottom with one finger in one smooth motion to display the notification bar. It is combined by shortcut list and USB options. USB options: Tap to turn on/off USB debugging, or set USB preference here. Shortcut list: Tap to turn on /off functions like Wi-Fi, Bluetooth, and Flashlight, etc. -
Page 20: Transferring Files Between The Terminal And Pc
->“System”-> “About phone”, then tap “Build number” 4 times. ->Tap “ ” to return to the Settings menu. Tap “Developer options”, turn “USB debugging” on and then tap “OK”. 2. Open the Device Manager on your PC->find Portable Device and double-click “NLS-N7L”. Click on the “Driver” tab then “Update Driver”. - Page 21 3. Click on “Browse my computer for device software” then “Let me pick from a list of device drivers on my computer”. Select “MTP USB Device” from the list and then click on “Next”. Wait for the installation to complete. Then click “Close”.
-
Page 22: Installing App
Installing App Use one of the following methods to install a new app on the N7L: 1. Download an APK file from online app store and install it. 2. Download software package onto a Micro SD card or PC and copy it to your terminal. Then install it with File Manager. 3. -
Page 23: Uninstalling App
Uninstalling App Use one of the following methods to uninstall an app on the terminal: Method 1: Connect the terminal to PC with the supplied USB cable. Uninstall an app using a mobile assistant (such as Baidu Mobile Assistant) installed on the PC. Method 2: Swipe Home screen from bottom to top with one finger in one smooth motion to view all the app. -
Page 24: Chapter 4 Scanning Barcodes
Chapter 4 Scanning Barcodes Introduction This chapter includes scanning tips and instructions for setting up the scanner. Scanning 1D Barcode Adjust the scan angle or the distance between the N7L and the target barcode to ensure the length of laser beam is roughly 8mm greater than that of the barcode, as shown below. -
Page 25: Scanning 2D Barcode
Scanning 2D Barcode Adjust the scan angle and the distance between the N7L and the target barcode to make them fall into the following ranges: 1. Point the N7L’s focus lamp at the center of the barcode. 2. Move the N7L until you find the appropriate scan distance. 3. -
Page 26: Chapter 5 Settings
Chapter 5 Settings Introduction This chapter provides introductions about how to set the functionalities like Wi-Fi, Bluetooth, Time, Language, Display, Apps, Reset, and System Upgrade, etc. in the settings app... -
Page 27: Wi-Fi Settings
Wi-Fi Settings Join a Wi-Fi network: 1. Tap the app icon then “Network & Internet” -> “Wi-Fi”, and turn Wi-Fi on to find available Wi-Fi networks. If Wi-Fi is already ON, then the terminal will automatically scan for available networks. 2. - Page 28 IP Settings To set the IP, follow the first two steps of joining a Wi-Fi network, tap “Advanced options” then “DHCP”, and select the desired option.
-
Page 29: Bluetooth
Bluetooth You can set up a Bluetooth connection between the N7L and other Bluetooth devices, such as PC, mobile phone. Note that Bluetooth connection works better if there are no obstacles between them. Before you can use a Bluetooth device with the N7L, you must first pair them. 1. -
Page 30: Sim Card And Mobile Network(Not For Wi-Fi Version
SIM Card and Mobile Network(Not for WI-FI version) The N7L can also use 4G network to connect to the internet. To establish 4G connection, you must have a SIM card installed in your N7L. On the N7L, both SIM slot 1 and SIM slot 2 support 4G networks. When two SIM cards are installed, you will be asked to select which SIM card to use for data connection. - Page 31 Turn on cellular network: Swipe from top to bottom on the home screen and it will display the drop-down mean, Find and tap it to turn Cellular data on. Or Go to Settings-> “Network & Internet” ->“Mobile network” -> turn on “Mobile data”.
- Page 32 APN Settings: If you cannot connect to the internet when using your terminal’s cellular data, you may need to change your APN settings on the N7L to fix it: Go to Settings-> “Network & Internet” -> “Mobile network” -> “Advanced” -> “Access Point Names”. in the top right corner of the screen or tap the carrier of your SIM card on the screen.
-
Page 33: Display
Display and then “Display”, and set the brightness level, night light, wallpaper, and other parameters on the Tap the app icon screen shown below as per your needs. -
Page 34: Apps & Notifications
Apps & Notifications and then “Apps & notifications”, and set the force stop/uninstall/clear storage/clear cache, and other Tap the app icon parameters on the screen shown below as per your needs. -
Page 35: Battery Protect
Battery Protect Battery Protect (Option for N7L with backup battery): When turning on this function, system will enter sleep mode and use battery backup if you remove back cover, and you can change main battery safely without worrying about losing data. After you finish change battery and close the back cover, system return to normal mode. -
Page 36: Gps
Tap the app icon then “Security & location” -> “Location”, and then turn Location on. Then you can use a third-party app to obtain location information. -
Page 37: Screen Lock
Screen lock Tap the app icon then “Security” -> “Screen Lock”, and choose none/swipe/pattern/pin/password for screen lock per your needs. -
Page 38: Language & Input Method
Language & Input Method Tap the app icon -> “System” -> “Languages & input”. Then set the language and input method as per your needs. -
Page 39: Date & Time
Date & Time and then “System” -> “Date & time”, and set the date and time on the screen Set the date and time: Tap the app icon shown below as per your needs. Note:If need manually set the date& time, you should turn off the “Use network-provided time” first. -
Page 40: Restoring Factory Settings
Restoring Factory Settings ->“System” -> “Advanced” -> “Reset options” -> “Erase all data (factory reset)” -> “erase all data” Tap the app icon After this operation, the terminal will be reset to factory defaults and all the personal data on the internal storage, such as music and photos, will be deleted. -
Page 41: Key Map
Key Map This app allows you to remap the keys on the terminal to function as a different key or to make them into shortcuts to launch an application. Start the Key map app: Tap the quick setting app icon on the Home screen Remap a key to another key(or app): After starting the Key map app, select the key you want to remap, and then tap “keys”... -
Page 42: Chapter 6 System Security
Chapter 6 System Security This chapter includes instructions for configuring system security settings, including ADB PUSH on, Camera on, Aa Enable, etc. It is advised that only administrators should be allowed to modify these settings. Open System Security Settings . Tap “SPEED DIAL” and then use the on-screen keypad to enter the password On the home screen, tap the app icon (Please contact the technical support to obtain the password) to open the System Security Setting screen. - Page 43 Security setting This setting is used to manage/control: 1. ADB PUSH/PULL: When disabled, you cannot use the push/pull command to copy files to/from the N7L. 2. Camera on: The setting is used to enable or disable camera feature. 3. Aa Enable: When enabled, you can activate the function of keys in orange font 4.
-
Page 44: Chapter 7 Scanning And Nfc
Chapter 7 Scanning and NFC Introduction This chapter provides introductions about how to programming scanner. Programming Scanner Tap the quick setting app icon on the Home screen then . Then configure the scanner parameters as per your actual needs. -
Page 45: Enable Scan
Enable Scan Check or uncheck the “Enable scan” item to enable or disable the scanning feature of the N7L. -
Page 46: Output Mode
Output Mode The N7L provides three output modes: Simulate keystroke, Output via API and Fill in EditText directly. 1. Simulate keystroke: Output scanned data to keyboard buffer to simulate keyboard input. Character interval (ms): A character interval of 0-100 milliseconds may be placed between the transmissions of each character of scanned data. -
Page 47: Scan Mode
Scan Mode The N7L provides the following four scan modes: 1. Level mode: Press and hold the scan trigger to start a decode session which continues until the trigger is released. 2. Continuous mode: Press the scan trigger to continuously read barcodes. To suspend or resume scan operation, simply press the scan trigger. -
Page 48: Scan Trigger
Scan Trigger The three scan keys on the terminal and the trigger on the pistol grip can all serve as scan trigger. Enable or disable them as per your actual needs. 1. SCAN key: Use the Scan key on the front panel of the terminal as scan trigger. 2. -
Page 49: Prefix & Suffix
Prefix & Suffix To set the prefix/suffix, enter the hexadecimal value of a desired prefix/suffix and then tap “OK”. For example, if you want to add a Line Feed character after each barcode, set the suffix to “0A”; if you want to add a Carriage Return character after each barcode, set the suffix to “0D”. -
Page 50: Good Read Indicator
Good Read Indicator The terminal can use sound/vibration/LED to indicate a good read. Choose one or more options as per your actual needs. 1. Sound: The N7L issues a short beep to indicate a good read. 2. Vibrating: The N7L vibrates to indicate a good read. 3. -
Page 51: Encoding
Encoding Choose a character encoding to interpret barcode data. 1. AUTO: The terminal determines automatically if the target barcode uses UTF-8, GBK, ISO-8859-1or windows-1251 encoding. If the terminal produces wrong output, you may need to choose or enter a specific character encoding. 2. -
Page 52: Data Edit
Data Edit This feature allows you to edit barcode data with a script. You can take the “barcodeEdit.js ” script as a reference to make your version. Tap “load script” and then select the desired script file on the terminal, or scan the 2D barcode that contains a script, to load the script. -
Page 53: Symbologies
Symbologies Note that supported symbologies depend on the scan engine integrated in the terminal. Here we will take CM60 for example. 1D code: Enable or disable 1D symbologies and set other barcode parameters. 2D code: Enable or disable 2D symbologies and set other barcode parameters. Advanced: The features listed here are designed to improve the scanning performance and energy efficiency of the terminal. - Page 54 OCR Enable: Select this checkbox when reading passports (compliant with ICAODoc9303 standards, TD1/TD2/TD3 supported).
-
Page 55: Nfc (Optional)
NFC (Optional) To enable the NFC feature, tap the app icon -> “Connected devices” -> “Connection preferences” -> turn on “NFC”. Then you can install an NFC writer on the N7L to read and write NFC tags. Note: The best NFC reading area of N7L is on the back of its battery cover. Back cover with NFC reader... -
Page 56: Chapter 8 System Update
Chapter 8 System Update Introduction This chapter introduces two methods to update the system software of the terminal: Online update and local update. Online Update ->“CHECK FOR UPDATES”. Update the system online: Tap system updates icon Note: The device should connect to the network first. -
Page 57: Local Update
Local Update Zip File to the N7L Drive 1. Connect the terminal to PC with the included USB cable. Swipe from top to bottom with one finger in one smooth motion to open the notification bar. Tap “USB for file transfer”. Then Select “Transfer files”. The file name may be different based on each version. -
Page 59: Chapter 9 Maintenance & Troubleshooting
Drop Damage If the terminal is damaged due to a drop from high place, immediately cut off the power and contact your dealer or Newland customer service center. LCD Screen Do not press against or strike the LCD screen. -
Page 60: Electronic Device
Electronic Device Switch off the terminal near high-precision electronic devices. The terminal may affect the performance of these devices. Such devices include hearing aids, pacemakers, fire alarm systems, automatic gates, and other automatic control devices. If you are using an electronic medical device, consult the device manufacturer to confirm whether the radio wave affects the operation of this device. -
Page 61: Storage Environment
Storage Environment Do not place magnetic storage media such as magnetic cards and floppy disks near the terminal. Radiation from the terminal may erase the information stored on them. Do not put the terminal, battery, or charger in containers with a strong electromagnetic field, such as an induction cooker and a microwave oven. -
Page 62: Battery Safety Guidelines
If the terminal is subjected to drop damage or water damage, or its LCD screen is broken and leaking fluid, immediately cut off the power, and contact your dealer or Newland customer service center. Do not attempt to disassemble the terminal or its accessories yourself. Only authorized repair stations are allowed to... -
Page 63: Troubleshooting
Troubleshooting Problem Possible Cause & Solution Type Description 1. Ensure the terminal is switched on. 2. If the terminal is in sleep mode, press the Power key to wake it up. 3. Check the battery level. If the battery is depleted, recharge it. No display 4. - Page 64 Unresponsive touch screen This problem may be due to loose connection between touch panel and mainboard or a faulty touch panel. Please contact the after-sales service center to arrange a repair. Touch 1. Check if this problem is due to a slow system that is caused by third-party screen Touch screen randomly app(s).
-
Page 65: Chapter 10 System Customization And Software Development
Chapter 10 System Customization and Software Development Introduction This chapter provides information about some common customization requests for the N7L. System Customization We welcome N7L customization requests, including: 1. Redefine keys 2. Customize boot/shutdown animations 3. Preinstall business apps 4. Disable notification bar pull-down 5. - Page 66 Newland Auto-ID Tech. Co., Ltd. (Headquarter) Add: No.1, Rujiang West Rd., Mawei, Fuzhou, Fujian 350001, China Tel: +86 (0) 591 8397 9500 Fax: +86 (0) 591 8397 9216 E-mail: info@nlscan.com Web: www.newlandaidc.com Newland APAC Newland Taiwan Inc. Add: Biz. Center Best-one, Jang-eun Medical Plaza 6F, Bojeong-dong 1261-4, Kihung-gu, Yongin-City, Kyunggi-do, South Korea Add: 7F-6, No.
Need help?
Do you have a question about the NLS-N7L and is the answer not in the manual?
Questions and answers