Table of Contents
Advertisement
Quick Links
Advertisement
Table of Contents

Subscribe to Our Youtube Channel
Related Manuals for Azumi A40Style Plus


Summary of Contents for Azumi A40Style Plus
- Page 1 A40Style Plus User Manual...
- Page 2 Warnings Not following these simple guidelines may be dangerous or illegal. Read the complete user guide for further information. TURN ON SAFELY Do not turn on the phone when wireless phone is prohibited or when it may cause interference or danger. ROAD SAFETY Obey all road safety laws.
- Page 3 TURN OFF WHEN REFUELING Do not use the phone at/near refueling stations. Do not use near fuel or chemicals. USE SENSIBLY Only qualified personnel may install or repair this product. ENHANCEMENTS AND BATTERIES Use only appropriate enhancements and batteries. Do not connect incompatible products.
-
Page 4: Your Phone
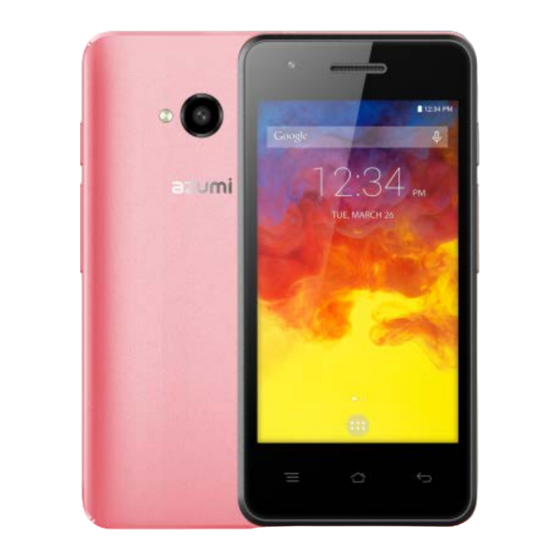
Your Phone The phone appearance is shown as below. The picture is for reference only; your phone may be different. Please take your actual phone as the standard. Front View... -
Page 5: Keypad Descriptions
Back View Keypad Descriptions Description Long press the key to turn on the phone. Power Key In the power on status, press the key to lock keypad and screen; long press the key to show phone options. Press the key to enter option menu. Option Key Press the key to return to standby mode. -
Page 6: Start To Use
Description To adjust incoming call ringtone volume. Volume Keys During a call, playing music, video, or listening to radio, press the keys to adjust volume. Start to Use Install Memory Card and SIM Card When you apply for a network, you will get a plug-in SIM card. SIM (Subscriber Identity Module) card that contains phone number, service projects and can be used to store phone numbers and personal information. - Page 7 Please insert the SIM card according to the mark on the phone. Make sure that the clipped corner of the SIM card and the metallic contacts are facing the correct direction. Slide the SIM card into the slot until it doesn't move up any further. The direction in which the microSD card has to be inserted into the designated slot is shown by an label on the phone.
- Page 8 Attention: Do not bend or scratch SIM card, do not let it contact with static electricity, dust or water. Keep all SIM cards where children cannot reach or touch. Note: Keep the SIM card chip contacts face downward. Make the SIM card fits card slot.
-
Page 9: Charge The Battery
Charge the Battery Before charging, check the battery slot to ensure the battery has been installed correctly. Plug one end of the charger into phone. Connect another end of the charger to the socket. Start charging. It can be charged whether power on or power off. -
Page 10: Turn On/Off The Phone
Turn on/off the Phone Hold down the power button to turn the phone Hold down the power button, then touch Power off to turn the phone off... -
Page 11: Use Touch Screen
Use Touch Screen Press: Use finger to press the desired option to confirm selection or start an application. Slide: Slide the finger on screen horizontally or vertically. For example, slide the screen in standby mode or main menu horizontally to change menu page. -
Page 12: Status Bar
Status Bar The status bar shows your phone’s status and notifications. (Notifications are described on the next page.) Notification icons Status icons Status icons The following status icons may appear on your screen: Icon Statement Icon Statement Headset is Network inserted signal level Indicates... -
Page 13: Make A Call
Alarm is USB is activated connected Make a Call In standby mode or in main menu, press the dial icon enter dial panel, press numbers on screen to enter phone number. Press dial icon at bottom and select SIM card to dial the number. -
Page 14: Answer A Call
You need to unlock the phone if the keypad and screen is locked. You can make calls through call log, contacts, and messages. During a call, press Volume Keys to adjust the volume. Your phone supports intelligent dial. When input ... -
Page 15: Input Number
Press the on-screen keypad to enter corresponding letters. Input Number Press “?123”, you can input numbers directly by press the number icons. Long press the letter icons with number, or after long press, slide finger to the numbers to input. Input Symbol Press “?123”... - Page 16 1. Browser You can use your phone to access Wireless Application Protocol (WAP) sites and use WAP-based services. To browse WAP pages, you must subscribe to the data service from your service provider and configure your phone's relevant settings. Select the website list on screen or input URL in address bar to visit. 2.
- Page 17 records. Press the icons on screen or Option Key to set parameters of the camera or recorder. 7. Clock In the clock interface, you can check time and date. Press the alarm icon, you can add new alarm clock or turn on/off existed alarm clocks.
-
Page 18: File Manager
Check Emails In the Inbox, select the email you want to check to enter. Press the icons at bottom to delete, reply, add to favorite. Compose and Send Email In the Inbox, press new mail icon to create new email. Input receiver email address, subject, and content, and then press send icon to send the email. -
Page 19: Google Service
11. FM Radio Select FM Radio in the main menu and plug earphone to enter. Press Power icon to turn on/off the radio. Press setting icon and select Search, the phone will search available channels and save in the list. Press the icons on screen to operate the FM radio. - Page 20 Press to input message content. If you want to send picture or video file, press + to add pictures, videos and audio. The message will shift to multimedia message automatically. Press send icon and select SIM card to send the message. 15.
- Page 21 Delete Contact Select one or more contacts, then press OK to delete all selected contacts. Contacts to Display Select All contacts, contacts on SIM card, Phone, or Customize the contacts to display. Import/Export Copy the contacts from SIM cards, phone, phone storage or SD card, and then select location to copy.
- Page 22 In this menu, you can select and set SIM management, WLAN, Bluetooth, Data usage, under More... - Airplane mode, VPN, Tethering & portable hotspot, Mobile networks, and USB Internet. WLAN You can connect to a wireless LAN (WLAN), use it to access and download with high speed.
- Page 23 Select and set Language, keyboard & input methods, speech, and mouse/trackpad. Backup & Reset In this menu, select Factory data reset and then select Reset phone to clear all data in the phone memory. Select DRM reset to delete all DRM licenses.
-
Page 24: Sound Recorder
20. Sound Recorder The phone supports sound record function, recorded files will be saved with different quality. 21. ToDo In this menu, you can check to-do items or done items. Press + or Tap to add new ToDo to add new item. When finish the item, press DONE to save. - Page 25 • Use the battery only for its intended purpose. Never use any charger or battery that is damaged. Do not short-circuit the battery. Accidental short-circuiting can occur when a metallic object such as a coin, clip, or pen causes direct connection of the positive (+) and negative (-) terminals of the battery.
- Page 26 • Do not attempt to open the device other than as instructed in this guide. • Do not drop, knock, or shake the device. Rough handling can break internal circuit boards and fine mechanics. • Do not use harsh chemicals, cleaning solvents, or strong detergents to clean the device.
- Page 27 FCC Statement 1. This device complies with Part 15 of the FCC Rules. Operation is subject to the following two conditions: (1) This device may not cause harmful interference. (2) This device must accept any interference received, including interference that may cause undesired operation. 2.
- Page 28 SAR Information Statement Your wireless phone is a radio transmitter and receiver. It is designed and manufactured not to exceed the emission limits for exposure to radiofrequency (RF) energy set by the Federal Communications Commission of the U.S. Government. These limits are part of comprehensive guidelines and establish permitted levels of RF energy for the general population.
- Page 29 certified to the FCC that it does not exceed the limit established by the government adopted requirement for safe exposure. The tests are performed in positions and locations (e.g., at the ear and worn on the body) as required by the FCC for each model. The highest SAR value for this model phone when tested for use at the ear is 1.034W/Kg...
- Page 30 watts/kg (W/kg) averaged over one gram of tissue. The standard incorporates a sub-stantial margin of safety to give additional protection for the public and to account for any variations in measurements. Body-worn Operation This device was tested for typical body-worn operations. To comply with RF exposure requirements, a minimum separation distance of 10mm...
Need help?
Do you have a question about the A40Style Plus and is the answer not in the manual?
Questions and answers