Table of Contents
Advertisement
Quick Links
Advertisement
Table of Contents

Related Manuals for Pro-Line Boats VS-D4

Summary of Contents for Pro-Line Boats VS-D4
- Page 1 CHAMBER VACUUM SEALER DOMESTIC VS-D4 User Manual...
- Page 2 Congratulations on your purchase of a Pro-line Chamber Vacuum Sealer. Note: Please read through the instructions carefully before using or installing the product and ensure that the manual is kept in a safe place for future reference. The system must be properly installed and located in accordance with the installation instructions before it is used. During the set up of this product if you have any questions, comments or issues DO NOT RETURN TO STORE.
- Page 3 OPERATION CONDITIONS & SAFETY PRECAUTIONS • All components need to be installed in accordance with the • To protect against risk electric shock and personal injury, user manual instructions for correct performance of unit. do not immerse cord, plugs, or appliance in water or other liquids.
- Page 4 System Specifications Vacuum Sealer Chamber microwave or simmer. Model Code VS-D4 • Keep the Vacuum Sealer bags away from babies and children to eliminate a choking and suffocation hazard. Product Dimensions W 345 X L 285 X H 225 •...
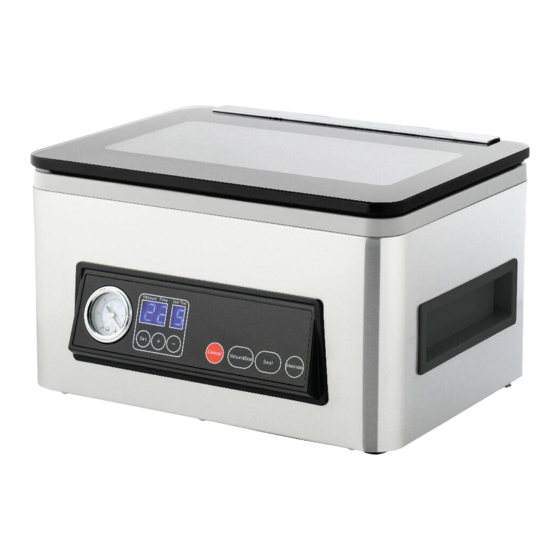
- Page 5 VACUUM SEALER PARTS IDENTIFICATION 1. Control panel 2. Gasket 3. Sealing Strip 4. Sealing Profile 5. Bag Holder 6. Air Intake 7. Power Switch (at rear) 8. Carry Handles INSTALLATION AND OPERATING INSTRUCTIONS 5...
-
Page 6: Control Panel
CONTROL PANEL 1. Vacuum & Seal 2. Manual Seal 3. Vacuum Time Screen 4. Seal Time Screen 5. Set Time 6. Increase Time 7. Decrease Time 8. Cancel 9. Marinate 10. Vacuum Pressure Gauge 6 INSTALLATION AND OPERATING INSTRUCTIONS... -
Page 7: Control Panel Description
CONTROL PANEL DESCRIPTION Ref Description Ref Description Set Time: Vacuum & Seal Press to set the vacuum time and or sealing times and to scroll In stand-by mode, pressing this button starts the automatic vacuum between Vacuum Time Screen and Seal Time Screen. operation then automatically seals the bag when vacuum is complete. - Page 8 OPERATING INSTRUCTIONS Fig 1 STORING FOOD IN VACUUM BAGS 1. Fully unwind the power cord and connect to power outlet. 2. Switch the Vacuum Sealer Chamber machine on via rear power switch. 3. Place items for storage into a bag. Clean and straighten the open end of the bag.
- Page 9 Note: Ensure no items or food is covering the sealing profile and WARNING: BURN HAZARD – Sealing Profile may be hot after that the bag has no wrinkles as it will inhibit the seal. sealing, allow to cool. 6. Push down the bag holder making sure the entire opening of 10.
- Page 10 USING THE MANUAL SEAL BUTTON TO MAKE A BAG WARNING: BURN HAZARD – Sealing Profile may be hot after 1. Cut the length you require for a bag from the roll, ensuring sealing, allow to cool. the cut is straight. Note: For best sealing results do not seal one bag after another 2.
- Page 11 MARINATE USING A BAG Fig 1 1. Fully unwind the power cord and connect to power outlet. 2. Switch the Vacuum Sealer Chamber machine on via rear power switch. 3. Place items to be marinated and marinate into a bag. Clean and straighten the open end of the bag.
- Page 12 VACUUM USING CANISTER Fig 1 1. Place the food and marinade into the Canister. 2. Secure the lid onto the Canister. Note: Leave at least 2cm from the top 3. Connect one end of the Vacuum Seal Hose to the Air Intake and the other end to the Canister Lid.
-
Page 13: Hints For Best Vacuuming Performance
HINTS FOR BEST VACUUMING PERFORMANCE FOOD STORAGE/PRESERVATION GUIDELINES 1. Do not overload the bag; leave enough space at the open end The Vacuum Sealer will change the way you purchase of the bag so that the bag can be easily placed over the Sealing and store food. - Page 14 VACUUM TIME SET-UP GUIDE SEALING TIME SET-UP GUIDE Touch the Vacuum “+” and “-” to increase or decrease vacuum Touch the Seal “+” and “-” to increase or decrease vacuum time. time. To determine suitable vacuum time for different foods and The thickness and materials of a bag, temperature and food types itmes, refer to the table below.
-
Page 15: Food Preservation Chart
FOOD PRESERVATION CHART Conventional Pro-line Freezer Storage Vacuum Sealer Note: Storage preservation chart are estimates only and should be Beef, Pork or Lamb 6 months 2-3 years used as a guide only. The storage life will depend on the original quality of the foods and the integrity of the packages seal. -
Page 16: Hints And Tips
HINTS & TIPS • Before Vacuum Sealing, it is necessary to clean your hands, • VACUUM SEALER Vacuum Bags and Rolls are SIMMER/BOIL and all utensils and surfaces to be used for cutting and safe. Place bag into pot of boiling water with the top of the Vacuum Sealing foods. - Page 17 HINTS & TIPS • Vacuum Sealing POULTRY and whole FISH, for best results • The Marinate Function is a great solution for marinating wash poultry and pat dry with a paper towel. Then place foods meats in minutes, not hours, as Vacuum Sealing opens the between two paper towels inside bag before Vacuum Sealing.
-
Page 18: Cleaning And Maintenance
CLEANING AND MAINTENANCE STORING YOUR VACUUM PRESERVATION SYSTEM It is important to ensure that all parts of your Vacuum Sealer Cleaning Vacuum Bags: sealing system are cleaned on a regular basis. Note: Do not reuse the Vacuum Sealer bags after using with Follow the care and cleaning guidelines below: raw meat, fish or poultry or after the bag has been heated, ie microwave or simmer. -
Page 19: Troubleshooting
TROUBLE SHOOTING BEFORE YOU CALL FOR SERVICE PLEASE REVIEW THE TROUBLE SHOOTING TIPS FIRST. Problem Possible Cause Solution 1. Make sure the power cord is correctly plugged into the electrical 1. Power cord not plugged in. outlet, and in the “on” position. Nothing happens when I 2. - Page 20 Problem Possible Cause Solution 1. Wrinkles, crumbs, grease or liquids may cause leaks along the seal. Reopen bag, wipe the top inside of the bag and smooth it out along the sealing strip before resealing. 1. Bag not sealed properly. 2.
- Page 21 Pro-line Australian 12 Month Repair Conditions of this Warranty: Repair or replacement costs of the product will be covered under warranty or Replacement Australian Warranty 1. This product has been fully installed by Pro-line. in accordance with the user manual Pro-line warrants this appliance to the Goods presented for repair may be installation instructions.
- Page 22 All available from: www.prolineaustralia.com.au/shop PROLINE CONSUMABLES VS-283 VS-23MR VS-110B VS-1525B Pro-line Vacuum Rolls Pro-line Vacuum Rolls Pro-line Vacuum Bags Pro-line Vacuum Bags VS-283 comes in a 3 pack. VS-23MR comes in a 5 pack. VS-110B comes with 110 bags. VS-1525B comes with 100 bags. 3 x 28cm wide and 5.4m long.
- Page 23 All available from: www.prolineaustralia.com.au/shop VS-2030B VS-MB VS-C3 Set of 3, Pro-line Vacuum Bags 2.0L, Marinate Bowl Round Storage Canisters VS-2030B comes with 100 bags. x100 bags 20cm x 30cm Marinate in minutes not hours. Set comes with 3 different storage container capacities: This system encourages the Small 700ml, Medium 1.4L and absorption of marinates into...
- Page 24 Pro-line Australia PO Box 4187 Norwood South LPO South Australia 5067 Email: info@prolineaustralia.com.au Web: www.prolineaustralia.com.au Find us /prolineaustralia /proline_australia /proline_australia...
Need help?
Do you have a question about the VS-D4 and is the answer not in the manual?
Questions and answers