Table of Contents
Advertisement
Quick Links
Advertisement
Table of Contents

Related Manuals for VistaQuest VQ1100


Summary of Contents for VistaQuest VQ1100
- Page 1 User's Manual...
-
Page 2: For Customers In Europe
For customers in North and South America For customers in the USA This device complies with Part 15 of the FCC rules. Operation is subject to e following two conditions: For customers in Canada This Class B digital apparatus meets all requirements of the Canadian Interference-Causing Equipment Regulations. -
Page 3: Table Of Contents
5. Operating The VQ1100 --------------------------------------------------------------- Power consuming -------------------------------------------------------------------- 6. Using Camera's Modes -------------------------------------------------------------- 7. Installing Your VQ1100 Driver and Software -------------------------------- 8. Checking the Connection of Your VQ1100 ---------------------------------- 9. Uninstalling Software ----------------------------------------------------------------- 11. Using the camera in PC Camera Mode ---------------------------------------- 12. -
Page 4: Warnings And Precautions
1. Warnings • When the battery icon is blinking, download the pictures to your computer immediately and change the batteries, otherwise you image will be lost. • Do not use batteries other than those specified for use with the camera. The use of unsuitable batteries may result in the batteries splitting or leaking and causing a fire, injury, or soiling of the battery compartment. -
Page 5: System Requirements
. Color printer for printing color pictures. . For transferring still images, or for videoconference, your computer must have modem and communication software for Internet connection. 3. Package Includes • VQ1100 Digital camera • USB cable • User’s guide • Wrist strap •... -
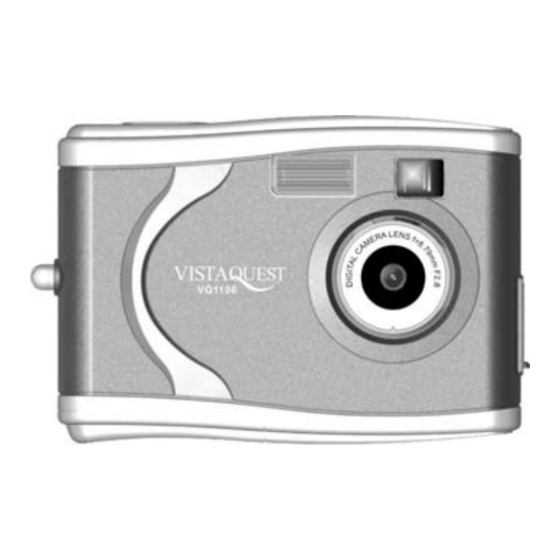
Page 6: Name Of Parts
4. VQ1100 Names of Parts 1. Shutter Button 2. Viewfinder 3. Flash 4. Lens 5. USB Port 6. Indicator Lamp 7. LCD 8. MODE 9. ON/OFF 10. Strap Eyelet 11. Battery Compartment Cover 12. Tripod Socket - 3 -... -
Page 7: Operating The Vq1100
5. Operating The VQ1100 • Open the battery cover and insert batteries. Step 1: Slide open the battery door by lifting the tab on the door. Step 2: Insert three AAA batteries with the polarity as shown: Step 3: Slide close the battery cover. -
Page 8: Power Consuming
• Press and hold the ON/OFF button for 2 second to start the camera. The camera will beep once, indicating that it is ready. The LCD screen will display digits and symbols. • Aim the camera and compose the scene by looking through the viewfinder (2). •... -
Page 9: Using Camera's Modes
LCD. VQ1100 has sixteen modes, which can be selected by pressing the Mode button, Pressing the Mode button to see the features options in the following sequence: •... - Page 10 1. Snapshot Mode: The LCD displays the number of pictures taken. Press the Shutter button to take a picture. The number will automatically increase. 2. Flash Off Mode: Flash never fires. (Default). Press the mode button once and then press the shutter button to confirm. Press the mode button again to select the icon press the shutter button to confirm.
- Page 11 7. SXVGA Mode: Take pictures about 1.3M pixels. Press the mode button three times and then press the shutter button to confirm. Press the mode button again to select the icon SXVGA, and then press the shutter button to confirm. 8.
- Page 12 the video resolution; The capture mode return to single mode automatically when finish recording.] 9. Self-Timer Mode: Press the mode button five times and then press the shutter button to confirm. Press the mode button again to select the icon then press the shutter button to confirm.
- Page 13 13. Delete All Pictures Mode: Press the mode button seven times and then press the shutter button to confirm. Press the mode button again to select the icon and the icon will blink, press the shutter button again to confirm and camera will delete (erase) all stored pictures from the memory.
-
Page 14: Installing Your Vq1100 Driver And Software
7. Installing Your VQ1100 Driver and Software • Installing Driver 1. Turn on the computer. 2. Insert installation CD into the CD-ROM drive and the installation CD menu will appear. 3. When you see the following screen, choose “Camera Driver”. -
Page 15: Checking The Connection Of Your Vq1100
8. Checking the Connection of Your VQ1100 Plug the USB cable to your camera then to the computer's USB Port. WARNING: DON'T using USB cable to connect two computers or two USB ports in one computer at same time. NOTE: Windows 98 SE users: If the first time you connect the USB cable to the computer you see the Insert Disk dialog box “Please insert the disk... -
Page 16: Uninstalling Software
9. Uninstalling Software For Windows 2000/98 SE/Me: • Uninstalling Software 1.Click "Start" on the task bar and choose "Settings". 2.Choose "Control Panel" and double click "Add/Remove Programs". 3.Select the program to be uninstalled: "ArcSoft PhotoImpression 5" or " ArcSoft PhotoImpression 2". 4.Click "Remove Program"... - Page 17 10. Transfer Images with PhotoImpression 5 Follow the instructions below to transfer the pictures using PhotoImpression 5. 1. Connect the DIGITAL CAMERA to your computer. 2. Launch PhotoImpression 5 application: Start → Programs →Arcsoft software suite → PhotoImpression 5. 3. Click “folder”. 4.
-
Page 18: Using The Camera In Pc Camera Mode
11. Using the VQ1100 in PC Camera mode Note: Please install camera drive before you can use the camera in PC-Cam. Setting Up PC-Cam 1.Turn the VQ11001100 power on and connect the camera and the computer use the USB cable. -
Page 19: Arcsoft Photoimpression
12. ArcSoft PhotoImpression 5 Click “Start” “Program” launch PhotoImpression 5 or double click PhotoImpression 5 icon on the desktop and you will see a window as the screenshot above. Select the picture source. For example: 1. Click “Folder” photos from your computer 2. Select the file path. 3. You can start editing them. -
Page 20: Arcsoft Videoimpression
1. Get Photo – Choose how to view or acquire photos. 2. Enhance – Crop, brighten, rotate, resize and modify photos. 3. Create – Add clip art, special effects, frames and more. 4. Project – Make calendars, photo books and greeting cards. 5. - Page 21 remove them, alter audio, etc. Create a Video – Create a new video project. You can retrieve media materials from the device connected or choose media files from system folder. You can choose video materials from your photo album as well. Create a Slide Show –...
- Page 22 1. Media - Select the videos and images that will comprise your final movie or slide show. 2. Edit - Modify video and image color and adjust the duration of each movie component. Only available for video projects. 3. Effects - Add neat special effect transitions between each component, or apply a pre-made theme.
-
Page 23: Internet Video Conferencing
14. Internet Video Conferencing To run a video conference with another person, you and the other person must have the computer station configured with web camera, microphone, speakers, and have access to the Internet. You have to download video conference software, purchased or free, such as basic software like I-phone or Microsoft NetMeeting. -
Page 24: Appendix: Specifications
AVI frame rate is 7.5 fps and in QVGA mode Status LCD USB 1.1 Built-in 8MB SDRAM 3 x AAA1.5V Alkaline Batteries (not included) 88 x 27 x 54mm ArcSoft PhotoImpression 5, VideoImpression 2 ○ 2006 Vistaquest corporation www. vistaquestusa.com - 21 -...
Need help?
Do you have a question about the VQ1100 and is the answer not in the manual?
Questions and answers