Advertisement
Advertisement
Table of Contents

Related Manuals for TECHVIEW QC3764


Summary of Contents for TECHVIEW QC3764
- Page 1 2.4GHz Wireless 7” LCD 720p Surveillance Kit iHomeView User Manual QC-3764...
-
Page 3: Box Contents
Box Contents: 1 x 7” LCD Monitor 1 x 720p Wireless Camera 2 x Mains Power Adaptors 1 x Ethernet Cable 1 x Wireless Antenna 1 x Mounting Hardware... -
Page 4: Product Diagram
Product Diagram: 7” LCD Monitor: Description 7” LCD Touch Screen Wireless Antenna’s Microphone... - Page 5 Description Power/Scan Button Volume Up Volume Down Talk Button SD Card Slot Speaker Power Socket LED Status Indicator Folding Stand Ethernet Port...
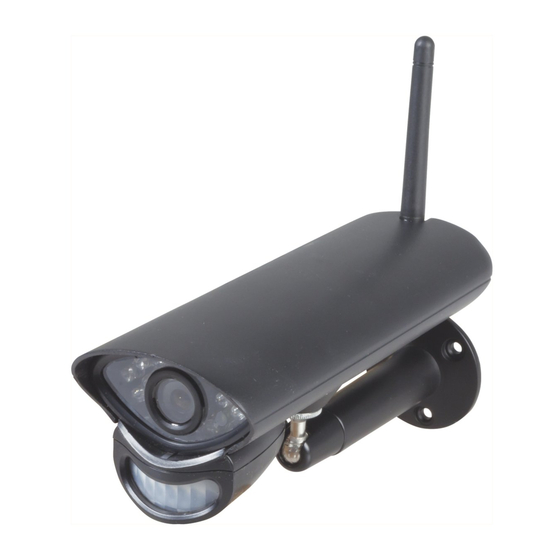
- Page 6 Wireless Camera: Description Weather Shield Camera Lens Wireless Antenna IR LEDs Microphone Motion Detector (PIR) Speaker...
-
Page 7: Installation And Setup
4. Press and hold the power/scan button located on the top of the monitor for 3-4 seconds for the unit to power up. 5. The monitor will display the TECHview startup screen for a few seconds and will transition to live view. -
Page 8: Operation
Operation: Viewing Modes: The live view area displays the live video stream from the cameras, each camera will display its own section of the quad view or can be viewed individually. There are 4 viewing modes That can be displayed as shown below: ... - Page 9 Live Screen Diagram: Different icons are displayed on the monitor screen depending on what is going on with your cameras. This image shown below is an example of what could be on your screen (the video image is removed to make it easier to see the icons). Please see the icons and descriptions listed below: Icon Description...
- Page 10 Time Stamp Current date/time is displayed in day/month/year, second/minute/hour format. SD Card Overwrite Displays if the SD card is allowed to overwrite files when it is full. Network Status Indicators the current network status: Indicator Green - System is connected to the internet and the monitor is connected with remote viewing mode.
- Page 11 Motion Recording Indicates motion detection status. Indicator Blue - Automatic recording OFF. Red - Automatic recording ON. Pop Up Menu Tab Press to access the pop up menu system. Pop Up Menu Tab: This pop up menu tab will display settings for playback recorded files, set alarms, change the brightness and general settings.
- Page 12 2. Days that are highlighted have recorded files. Press the day you want to review and a list of recordings for that day will be displayed as shown below. 3. Press the recorded file you want and it will start playing, with a bar across the bottom of the screen for control.
-
Page 13: General Settings
Press + or – to increase or decrease the alarm volume. Press the pop up menu tab to return to the previous menu. Brightness: This allows you to set each camera’s brightness level. Press the brightness icon which is as shown below: Press + or –... - Page 14 Main Screen Sub-Screen Description This system comes with cameras already paired. Use Pairing to assign these cameras to different Paring channels or to pair additional new cameras to the Camera Setup monitor. ON/OFF Makes the cameras visible to the monitor. Resolution Adjusts the video quality of each camera.
-
Page 15: Camera Setup
Camera Setup: This allows you to pair existing or additional cameras, turn the cameras on or off and adjust the resolution as shown below: Pairing: Your camera is already pre-paired to the monitor on channel 1. When you add a new camera to your system, you have to “pair”... - Page 16 On/Off: When you add a camera to your system, pair up the camera with the monitor and the system will automatically turn it on. 1. Press the switch bar under the camera you want to turn on or off. 2. The switch bar indicator will turn green when the camera is on. It will be greyed out when the camera is off.
-
Page 17: Recording Setup
Recording Setup: This allows you to set the length of time the system will automatically record when the motion trigger records, schedule a set time for recording for set up file overwrite. Duration: You can set how long the camera keeps recording after motion detection is triggered. The options are 15 seconds (Default), 30 seconds, or 1 minute. - Page 18 Press the scheduled recording icon and the overview will display as shown below: Press the modify button in the lower right corner to display the schduled recording setup screen. Select the camera you wish to setup scheduled recording for, if you want more than one camera to record at the same time then select multiple cameras.
-
Page 19: System Settings
Press the left arrow to return to the previous menu. System Settings: You can use these settings to change the date, time, time zone, language, reset to default, format memory card and information as shown below: Date & Time: Press the date &... - Page 20 Time Zone: Time Zone allows you to set the time zone your monitor is in. Your system will know that your request refers to the time zone the monitor is in. The default is GMT + 10 (NSW, ACT); if you are in a different state in Australia or New Zealand then please change the time zone accordingly.
- Page 21 Default Reset Settings: Press the default settings button to reset to original factory default settings. Select yes to restore to original factory default settings. Press ok to confirm resetting the unit. Format SD Card: Formatting the SD card erases all the data stored on the card. (Default is set to No) Press the button to reformat your SD card.
-
Page 22: Network Setup
A progress bar will be displayed on the screen. After formatting is complete format ok message will display. Information: This screen lists the firmware information of the monitor and all cameras paired to it. Press the information button to display this screen. Press the left arrow to return to the previous menu. - Page 23 Advanced Setup: Press the advanced display button to show the DHCP & Static IP options. Press either DHCP or Static IP depending on your requirements. Dynamic IP (DHCP) is the standard network connection which will automatically assign an IP address from your router to your surveillance system. A static IP address is for people who have an option to specify an IP address for their system.
-
Page 24: Motion Detection
Reset Password: The reset password option allows you to reset the iHomeView app password back to default (000000) 1. Press the yes or no button to either reset to default or no to cancel. 2. Press the left arrow key to return to the previous menu. Information: This screen displays the current network information when the system is connected to the internet. - Page 25 Sensitivity: This option allows you to set the camera’s motion detection sensitivity levels to high, low, or off. Press the sensitivity button to access the following menu: Press high, low, or off to set sensitivity. Press the left arrow to return to the previous menu. Mask Area: Use this option to mask off any parts of the viewing area you don’t want to be included for motion detection.
- Page 26 Firmware: Upgrade From SD Card: Press the upgrade from SD card button to upgrade the firmware. To upgrade the firmware through the SD card, select yes on the confirmation screen. A progress screen will be displayed. When the update is complete, the monitor displays Firmware Upgrade Successful and automatically reboots.
- Page 27 Recording Live Video (Monitor): On the live viewing screen, press the red viewing icon for the camera to begin recording. The icon will blink and turn blue while recording. Press it again to stop recording. The icon stops blinking and will turn red. Please Note: You can record from all cameras at the same time.
- Page 28 Select any area of the screen that does not have control icons to bring up the playback progress bar. Press any area again to close it. While playback progress is visible, you can fast forward/ rewind by dragging the playback bar forwards or backwards. Please Note: On the playback progress bar, tap the double arrow to skip forward or backwards about 10 seconds.
- Page 29 Smartphone App Setup: App Name: iHomeView 1. Download the iHomeView app from Google Play or the Apple app store. 2. Make sure your monitor is connected via the Ethernet cable to your modem/router. 3. Open the app up on your Android or Apple smartphone. 4.
- Page 30 6. Located at the rear of the monitor is a QR code which is as shown below: 7. Match the small display window on your smartphone over the QR code as shown below: 8. Once successfully scanned; a UID number should appear in the UID setting. If you are unable to scan the QR code successfully then alternately you can enter the UID number manually which is located below the QR code on the rear of the monitor.
- Page 31 9. It is recommended to change the name of your surveillance system to a preferred name otherwise the default will be iHomeView. 10. Enter the following password and press ok to confirm. Default Password: 000000 11. Your system now should display in the current device list and press on the image. If you switch to 3/4G connection on your smartphone;...
- Page 32 12. Your system should now be showing the live camera view as shown below; the view will change between portrait and landscape depending on the position your smartphone is in. Smartphone App Functions: View Icon: Press to view images already taken Snapshot Icon: Press this to take an image from your smartphone Mute Icon: Press to mute the audio coming from the ...
- Page 33 The app will show you online and quality settings; the quality will list the display the network quality and online will display how many users are accessing the system. Supports up to 4 users at one time. Smartphone App Settings: Press the arrow drop down menu in the device list to display the app settings.
- Page 34 Reconnect: If your surveillance kit has failed to connect to the network; press this to reconnect the system. Edit Device: This allows you to change the current app password by pressing the modify password button (000000 Default). A video setting and alert interval is also listed in these settings. The video setting allows you to change it between VGA and HD quality using low, medium or high (HD).
-
Page 35: Troubleshooting
View Snapshot: Select this option to view the photos you have taken by the snapshot button. Remove Device: Select this option to remove the surveillance system from your phone. Smartphone Push Notifications: If the iHomeView smartphone app is running in the background of your phone; you will receive a push notification to show that someone has triggered the alarm by motion detection. -
Page 36: Specifications
Specifications: Monitor: LCD: 7” Touch Screen Frequency: 2.4GHz Digital Wireless Range: Up to 100m Resolution: 800 x 480 (VGA) Video Compression: MPEG-4 Recording Format: ASF Storage: Up to 128GB SD Network: Ethernet, RJ45 10/100Mbps Battery: 3.7V, 2000mAh Li-Ion Battery Time: Up to 2.5hrs Power: 5VDC, 2A Dimensions: 196(L) x 123(H) x 20(D)mm Camera:... - Page 37 Recording Time: VGA (25fps) 720p (15fps) SD Card Capacity: 2.6 Hrs 10.5 Hrs 1.1 Hrs 3.3 Hrs 5.2 Hrs 21.0 Hrs 2.3 Hrs 6.6 Hrs 10.3 Hrs 42.0 Hrs 4.5 Hrs 13.2 Hrs 20.7 Hrs 83.9 Hrs 9.1 Hrs 26.4 Hrs 16GB 41.4 Hrs 167.8 Hrs...
- Page 38 Distributed by: TechBrands by Electus Distribution Pty. Ltd. 320 Victoria Rd, Rydalmere NSW 2116 Australia Ph: 1300 738 555 Int’l: +61 2 8832 3200 Fax: 1300 738 500 www.techbrands.com...
Need help?
Do you have a question about the QC3764 and is the answer not in the manual?
Questions and answers