Advertisement
Quick Links
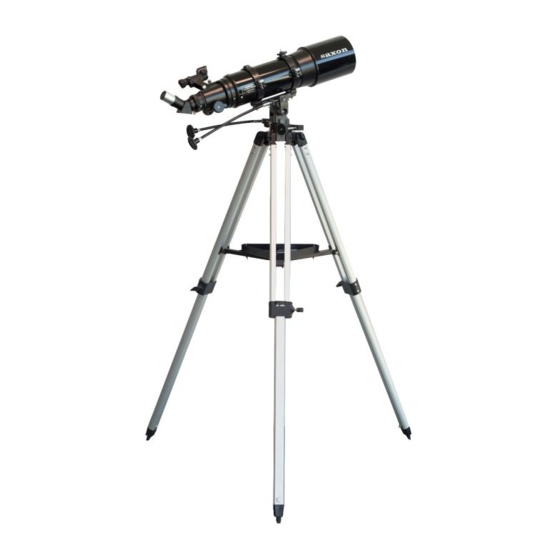
INSTRUCTION MANUAL
Optical Tube: 120mm/600mm
Objective Lens
Dew Cap / Sun Shade
Dust Cap / Mask
(Remove before viewing)
Tube Rings
Tripod Leg
Accessory Tray
Height Adjustment Clamp
FOR 1206AZ3
Alt-Azimuth Mount: AZ3
Piggyback Bracket
Telescope Main Body
Finderscope
Finderscope Bracket
Finderscope Allignment
screw
Focuser
Eyepiece
Diagonal
Focus Knobs
Azimuth Flexible
Control Cable
Altitude Flexible
Control Cable
Advertisement

Related Manuals for Saxon 1206AZ3


Summary of Contents for Saxon 1206AZ3
- Page 1 INSTRUCTION MANUAL FOR 1206AZ3 Alt-Azimuth Mount: AZ3 Optical Tube: 120mm/600mm Objective Lens Piggyback Bracket Telescope Main Body Dew Cap / Sun Shade Finderscope Finderscope Bracket Dust Cap / Mask Finderscope Allignment (Remove before viewing) screw Focuser Eyepiece Tube Rings Diagonal...
- Page 2 TABLE OF CONTENTS Assembling Your Telescope Tripod Set up Telescope Assembly Finderscope Assembly Eyepiece Assembly Alligning the Finderscope Operating Your Telescope Operating the AZ3 Mount Using the Barlow Lens Focusing Pointing Your Telescope Calculating the Magnification (power) Calculating the Field of View Calculating the Exit Pupil Observing the Sky Sky Conditions...
- Page 3 TRIPOD SET UP ASSEMBLING TRIPOD LEGS (Fig. 1) Fig. 1 1) Gently push middle section of each tripod leg at the top so that the pointed foot protrudes below the tripod clamp. 2) Insert tripod lock screws into the thread holes on the side of the tripod clamp without over-tightening.
- Page 4 FINDERSCOPE ASSEMBLY Fig. 7 Locate the finderscope bracket and carefully remove the rubber-o-ring from it. Position the o-ring into groove on the finderscope tube (Fig.7). Fig. 8 Slide the finderscope bracket into the mounting slot and tighten the screw to hold the bracket in place (Fig.8). Loosen the two adjusting screws on the bracket.
- Page 5 OPERATING YOUR TELESCOPE Fig.a Azimuth locking knob This mount has controls for movement in altitude (up-down) and azimuth (left-right). Coarse azimuth movement is controlled by a locking knob located Altitude fine adjustment near the tripod head for left-right rotation. Loosen the knob to make large direction changes then lock it for fine adjustments.
- Page 6 Pointing an altitude-azimuth (alt-az) mounted telescope is relatively easy. With the mount level, you can swivel the telescope around on a plane parallel to your horizon and then tilt it up and down from there (Fig.c). You can think of it as turning your telescope in azimuth until it is facing the horizon below a celestial object and then tilting it up to the object's altitude.
- Page 7 The magnification produced by a telescope is determined by the focal length of the eyepiece that is used with it. To determine a magnification for your telescope, divide its focal length by the focal length of the eyepieces you are going to use. For example, a 10mm focal length eyepiece will give 80X magnification with an 800mm focal length telescope.
- Page 8 OBSERVING THE SKY Sky conditions are usually defined by two atmospheric characteristics, seeing, or the steadiness of the air, and transparency, light scattering due to the amount of water vapour and particulate material in the air. When you observe the Moon and the planets, and they appear as though water is running over them, you probably have bad "seeing"...
- Page 9 SUGGESTED READING Beginner's Guide to Amateur Astronomy: Astrophotography for the Amateur: by Michael Covington (Cambridge University Press, Cambridge, An Owner's Manual for the Night Sky by David J. UK, 2nd edition,1999). Eicher and, Michael Emmerich (Kalmbach Publishing Co., Books Division, Waukesha, WI, 1993). Splendors of the Universe: A Practical Guide to Photographing the Night Sky by Terence Dickinson NightWatch: A Practical Guide to Viewing the...
Need help?
Do you have a question about the 1206AZ3 and is the answer not in the manual?
Questions and answers