Table of Contents
Advertisement
Quick Links
Advertisement
Table of Contents

Subscribe to Our Youtube Channel
Related Manuals for Novatel SA 2100


Summary of Contents for Novatel SA 2100
- Page 1 SA2100UG001 SA 2100 User Guide Version: Draft 29 October, 2013...
- Page 2 New Materials. The user of such New Materials assumes all risk (known or unknown) of such use. Novatel Wireless reserves all rights in such New Materials. The user shall have only a revocable and limited license to use such New Materials in connection with the products for which they are intended.
- Page 3 Copyright © 2013 Novatel Wireless. All rights reserved. Complying with all applicable copyright laws is the responsibility of the user. Without limiting the rights under copyright, no part of this document may be reproduced, stored in or introduced into a retrieval system, or transmitted in any form or by any means (electronic, mechanical, photocopying, recording or otherwise), or for any purpose, without the express written permission of Novatel Wireless.
- Page 4 Warranty Information This warranty applies to (a) products sold directly by Novatel Wireless M2M, unless a different warranty is specified in a written agreement between Novatel Wireless M2M and the purchaser; and (b) products sold to end users through a distributor authorized by Novatel...
- Page 5 (iii) caused by use of any materials not supplied by Novatel Wireless M2M, or by use of the product other than in accordance with its documentation, or (iv) the result of electrostatic discharge, electrical surge, fire, flood or similar causes.
- Page 6 NOVATEL WIRELESS'S SOLE RESPONSIBILITY AND PURCHASER'S SOLE REMEDY UNDER THIS LIMITED WARRANTY SHALL BE FOR NOVATEL WIRELESS TO REPAIR OR REPLACE THE PRODUCT (OR IF REPAIR OR REPLACEMENT IS NOT POSSIBLE, PROVIDE A CREDIT OR REFUND OF THE PURCHASE PRICE) AS PROVIDED ABOVE. NOVATEL WIRELESS...
- Page 7 Regulatory Compliance CE MARKING This device has been tested to and conforms to the essential regulatory requirements of the European Union R&TTE directive 1999/5/EC. The device also conforms to the European Union’s restrictions on use of Certain Hazardous Substances in Electrical and Electronic Equipment Directive, 2002/95/EC (commonly called “RoHS”) and amendments and 2011/65/EU (commonly called RoHS Recast”).
- Page 8 WARNING: DO NOT ATTEMPT TO SERVICE THE WIRELESS COMMUNICATION DEVICE YOURSELF. SUCH ACTION MAY VOID THE WARRANTY. THE SA 2100 MODEM IS FACTORY TUNED. NO CUSTOMER CALIBRATION OR TUNING IS REQUIRED. CONTACT NOVATEL WIRELESS, INC. TECHNICAL SUPPORT FOR INFORMATION ABOUT SERVICING YOUR WIRELESS COMMUNICATION DEVICE.
- Page 9 Should an external antenna be required, these instructions must be followed. The following installation practices are required to comply with FCC and IC rules on RF exposure. Failure to follow these guidelines can result in operations that exceed RF Exposure limits. Maintain a minimum distance of at least 20 cm (8 in) from all persons regardless of how the antenna is mounted (stand assembly or wall mount).
- Page 10 1850 - 1910 2.0 The antenna is shipped with both a suction cup and clip for mounting. Use only the supporting cable to connect the antenna to the SA 2100. Never use an antenna from another vendor or another source.
- Page 11 Battery Information And Safety Requirements NOTE: Failure to comply with all of the following precautions could: Cause personal injury or property damage Cause abnormal chemical reactions which would make the battery overheat, smoke, distort, leak, or catch on fire Destroy internal protections built into the battery Shorten battery life Reduce battery performance Precautions...
- Page 12 Documentation Conventions Notes This is a note, it indicates important features or instructions. Warnings This is a warning, it indicates a situation that might result in loss of data, hardware damage, or personal injury. Hyperlinks Blue text indicates an active, clickable link (e.g., http://www.novatelwireless.com). Monospace Font Indicates source code, command line entries, and code embedded in text.
-
Page 13: Table Of Contents
Caring For Your Device Technical Specifications General Radio Technology (WWAN) Environmental Components Device Management Document References Certifications Accessories 2 Using The Device SIM Card Positioning Your Router Powering The Device Connecting To The SA 2100 Router Connecting Via USB Connecting Via Wi-Fi novatelwireless.com... - Page 14 Driver Installation Cable Installation Installing The Antenna Installing The Power Cable Mounting The Device Mounting Bracket Double-Sided Tape Vehicle Mounting 3 Using The Web User Interface Logging In Home Connected Devices Connected Devices List Blocking And Unblocking Devices Data Usage Data Usage Settings Settings Settings Page >...
- Page 15 Settings Page > Mobile Settings > Network Selection Settings Page > Mobile Settings > Manual DNS Settings Page > Mobile Settings > SIM Lock Settings Page - Advanced Settings Settings Page > Advanced Settings > Firewall Settings Page > Advanced Settings > MAC Filter Settings Page >...
- Page 16 About Page - Software Update Tab Current Software Last Update Update History 4 Accessories Antenna Backup Battery Power Cable Power Supply USB Cable Part Ordering Accessories novatelwireless.com...
-
Page 17: Getting Started
Getting Started Device Overview LEDs Connectors Reset Button Caring For Your Device Technical Specifications novatelwireless.com... -
Page 18: Device Overview
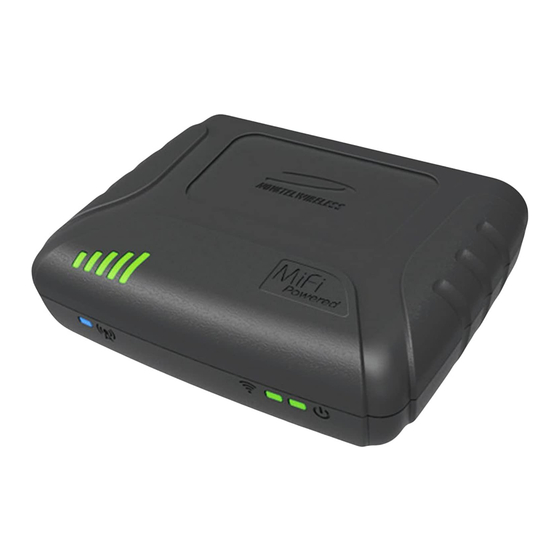
This device is intended for professional installation and not for consumer use. System Requirements A computer or computing device supporting Wi-Fi 802.11 b/g/n Internet browser software: i.e., Microsoft Internet Explorer 8.0 or higher, Firefox, Safari, Opera, Chrome, etc. Components Router Figure 1-1 SA 2100 novatelwireless.com... -
Page 19: Label
IMEI or ESN Number SSID (Factory preset, unique to each device) WiFi Key (Factory preset, unique to each device) LEDs The SA 2100 router has LEDs that verify status, signal, and connectivity. Figure 1-3 The following table describes each LED: Symbol... -
Page 20: Connectors
No SIM/No Signal/Operating from battery strength: Green Active only when external power is present. Note that while the SA 2100 is operating on battery power, the Power LED is the only LED that operates. Connectors The SA 2100 router has the following connectors:... - Page 21 Figure 1-4 Router Connections Cellular antenna connector RF1 (Primary) Micro USB Port Graceful shutdown button Ethernet port 8 Pin IO connector (Includes power) Cellular antenna connector RF2 (Diversity) Figure 1-5 8 Pin IO connector For Pin Out descriptions refer to the "Power Cable"...
-
Page 22: Reset Button
We recommend that you use a paperclip to push the Reset button if a device reset is required. Caring For Your Device You must handle the SA 2100 router carefully to ensure it functions properly. We recommend the following guidelines: Place the router in an area free from liquids, dust, and extreme temperatures. - Page 23 sitting on or against it. Route the cord so that it is not easily damaged by someone walking on it, or by items sitting on or against it. Avoid dropping or shaking the router. Avoid moving the router when it is powered on. novatelwireless.com...
-
Page 24: Technical Specifications
Technical Specifications General Model: SA 2100 Weight: 220g Dimensions: 107 x 81 x 30 mm Wireless Network: Wi-Fi 802.11 b/g/n, 10 clients, pre-configurable security: WPA/WPA2 Wired: 1 Ethernet Port (RJ45 Connector) Battery: 10-hour continuous (optimal) Input Power Range: 9 - 32 VDC (Molex Connector); 12V or 24V vehicle ready... -
Page 25: Environmental
Environmental Operating Temperature: -30ºC to 70ºC (external power) -20ºC to 60ºC (battery) Storage Temperature: -40°C to 85°C (external power) -40°C to 60°C (battery) Humidity: Up to 95% non-condensing Components Built-In Wi-Fi (2.4 GHz): Up to 10 endpoints Network Selection Switch: 4G/3G SIM: 1 slot for micro-SIM card (Inside Battery Compartment) -
Page 26: Document References
Document References SA 2100 AT Command Set SA2100AT001 FOTA Application Note ENF0000AN002 API Reference ENF0000CB001 Access the Novatel Wireless M2M Test ENF0000AN014 Server 1-Wire Interface Application Note ENF0000AN018 Certifications FCC: PTCRB: GCF: Wi-Fi Alliance: eMark: Safety: AT&T: Accessories Lithium Battery Rechargeable 3.7 V 2900 mAh 1073 Wh Li-ion battery... -
Page 27: Using The Device
Using The Device SIM Card Positioning Your Router Powering the Device Connecting to the SA 2100 Router Driver Installation Cable Installation Mounting the Device novatelwireless.com... -
Page 28: Sim Card
Insert the SIM card into the SIM card slot located inside the battery compartment. Remove the battery to uncover the SIM card holder. Figure 2-1 SA 2100 Battery Compartment You should hear a "click" when the SIM card is in place. -
Page 29: Powering The Device
Connecting To The SA 2100 Router Users can connect to the SA 2100 router either via USB cable or Wi-Fi connection. Connecting Via USB To connect via USB, perform the following steps: 1. - Page 30 Figure 2-2 Factory Driver Installer for LTE Products Figure 2-3 Driver Installer Welcome Screen 2. Click Next. novatelwireless.com...
- Page 31 The Novatel Wireless Factory Driver Installer License Agreement Window opens. Figure 2-4 Driver Installer License Agreement 3. Once you have read, and if you agree to the terms, select the I accept the terms in the license agreement radio button.
- Page 32 Figure 2-5 Driver Installer Ready to Install screen 5. Click Install. The Installation Progress window will open. Figure 2-6 Installing screen novatelwireless.com...
-
Page 33: Cable Installation
Once the installer has successfully installed the driver, the Installation Complete window will open. Figure 2-7 Installation Completed screen 6. Click Finish. Cable Installation Installing The Antenna Connect the antennas to the device before mounting the device. At least 20 cm (8 in) of separation between the router and the user’s body must be maintained at all times. -
Page 34: Installing The Power Cable
While performing these steps, do not apply excessive force to the retention legs or snap feature prior to inserting the device as this may deform the mounting bracket. Figure 2-8 SA 2100 Mounting Bracket 1. Secure the mounting bracket to the desired mounting surface using one of the following... -
Page 35: Double-Sided Tape
Vehicle Mounting Follow the steps and guidelines in this section if you are Mounting the SA 2100 in a Vehicle. Novatel Wireless recommends the SA 2100 vehicle installation should be carried out by a qualified automotive electronic accessory technician. -
Page 36: Using The Web User Interface
Using The Web User Interface Logging In Home Connected Devices Data Usage Settings Messages Customer Support About novatelwireless.com... -
Page 37: Logging In
Logging In To log in to your SA 2100 Web Interface, open your Internet browser and navigate to 192.168.1.1. or http://my.sa2100/ The browser will display the SA 2100 Home Page. Figure 3-1 SA 2100 Home Page novatelwireless.com... -
Page 38: Home
Sign In link in the top right corner of the page, or simply click any of the quick links or navigation tabs and the SA 2100 Sign In page will be displayed as shown in the following figure. - Page 39 Figure 3-3 Home Page The left side of the screen displays navigation tabs for Home, Connected Devices, Data Usage, Settings, Messages, GPS, Customer Support, and About. novatelwireless.com...
-
Page 40: Connected Devices
The Connected Devices page displays details of each device connected to, or blocked from this SA 2100 device, including any computer connected via a USB connection. You can also edit the name and type for connected devices, and add or remove connected devices from the Blocked Devices list. -
Page 41: Connected Devices List
Figure 3-4 Connected Devices Page Connected Devices List The following information is displayed for each connected device: Type The first column indicates the type of connected device. You can use the Edit option to set or change the type. If the type has not been set, no icon is displayed. Once you set the device type, an appropriate icon is displayed. -
Page 42: Blocking And Unblocking Devices
Normally, this is the hostname of the connected device, as set on the connected device. If you have used this interface to assign a name to a connected device, the assigned name displays in place of the hostname. In rare cases, the hostname may be unavailable. You can use the Edit option to change the name of any connected device. -
Page 43: Data Usage
Data Usage The Data Usage screen displays your current data usage. You can also reset the data counter and cycle start date, and select the desired data usage monthly limit. Alerts will be generated to warn you that data usage is approaching or has reached the alert level specified on this page. -
Page 44: Settings
Select the day of the month when you wish the data counter to reset to zero. Settings The settings of your SA 2100 can be found on the Settings page. There are four settings tabs: Hotspot Settings, Device Settings, Mobile Settings, and Advanced Settings. -
Page 45: Settings Page > Hotspot Settings Tab
Settings Page > Hotspot Settings Tab Figure 3-6 Settings Page - Hotspot Settings (Advanced Settings Shown) The Hotspot Settings Tab contains the following information: Wi-Fi Click this ON/OFF control to enable or disable the Wi-Fi hotspot. novatelwireless.com... -
Page 46: Basic Settings
Basic Settings All Wi-Fi connected devices must use these Wi-Fi settings. If you change these settings, existing connected devices may lose their connection. Wi-Fi name: This sets the network name or SSID for the Wi-Fi network created by this device. Enter a suitable name. -
Page 47: Settings Page - Device Settings Tab
If running on the battery, the longer range or higher power option will deplete the battery more quickly. Wi-Fi Multimedia (WMM): This setting should normally be enabled to assist throughput. It must be enabled if you are using 802.11n. Settings Page - Device Settings Tab Under Device Settings you have three categories of settings: Preferences Web Interface Password... -
Page 48: Settings Page > Device Settings > Admin Password
Device Preferences Delayed Shutdown: When powered by the battery, select the length of time after which the device shuts down when no network devices are connected. To prevent automatic shutdown, select "Never". User Preferences Language: Select the desired language option. Date Format: Specify the format in which the date is displayed on this Web-based interface. -
Page 49: Settings Page > Device Settings > Backup And Restore
Change Admin Password Enter current admin password: Enter the current password in this field. Note that if you enter an incorrect value too many times, you will be locked out of this Web Interface. Enter new admin password: Enter the new password, using only letters, numbers, and standard punctuation symbols. -
Page 50: Settings Page - Mobile Settings
Admin Password: Enter the current password in this field to restore the settings from a previously saved backup file. Select a file: Select the configuration file you previously downloaded from this SA 2100 device to your computer. Restore Now: After selecting a configuration file, click this button to begin the file upload. -
Page 51: Settings Page > Mobile Settings > Mobile
Mobile Network Selection Manual DNS SIM Lock Settings Page > Mobile Settings > Mobile These settings affect the connection to the mobile network. Figure 3-10 Settings Page - Mobile Settings - Mobile Cellular Data: You can use this setting when necessary to turn off cellular data and prevent access to the mobile network. -
Page 52: Settings Page > Mobile Settings > Apn
Preferred Technology: The default value is "Automatic". The SA 2100 device will select the best available technology. If desired, you can change this to limit the network technologies that will be used. Settings Page > Mobile Settings > APN The APN settings should be configured when installing the SIM. The device will not be able to establish a WAN (cellular) internet connection until the APN settings have been configured. -
Page 53: Settings Page > Mobile Settings > Network Selection
APN Settings Active APN Profile: Multiple APN profiles are available. The "Default" profile cannot be edited. If you need to change the APN, select another APN option, and then provide the required data below. This information is available from your network service provider. APN: The APN associated with the selected profile. - Page 54 Figure 3-12 Settings Page - Mobile Settings - Network Selection This device automatically selects the optimal mobile network. In most cases, you can also select a network manually (Manual Network Selection). This feature is only useful if multiple networks are available. If this setting is enabled, the device connects only to the specified network.
-
Page 55: Settings Page > Mobile Settings > Manual Dns
Settings Page > Mobile Settings > Manual DNS Figure 3-13 Settings Page - Mobile Settings - Manual DNS The DNS address is usually provided automatically by the network. This page allows you to manually specify a DNS, if required. Settings Enable Manual DNS: Use this setting to enable or disable the Manual DNS feature. -
Page 56: Settings Page > Mobile Settings > Sim Lock
Figure 3-14 Settings Page - Mobile Settings - SIM Lock The SIM card inside your SA 2100 device can be locked using a PIN. If the SIM card is locked, you must enter the PIN before connecting to the mobile network. Once entered, the PIN is remembered until the next shutdown. - Page 57 SIM status: The field indicates the current status of the SIM card. Possible values are: Ready - This is the normal state. The SIM PIN is not used. PIN Locked - The SIM PIN must be entered before you can use the mobile network. PUK Locked - The PUK for the SIM must be entered in order to continue.
-
Page 58: Settings Page - Advanced Settings
Settings Page - Advanced Settings The following five setting categories are available under the Advanced Settings tab: Firewall, MAC Filter, LAN, Port Filtering, and Port Forwarding. Settings Page > Advanced Settings > Firewall Figure 3-15 Settings Page - Advanced Settings - Firewall A firewall protects your connected devices against malicious incoming traffic from the Internet. - Page 59 Normally, the firewall will block incoming IPv6 connection requests intended for an IPv6- enabled connected device. If you wish to allow these incoming connection requests to reach the intended connected device, enable this setting. DMZ (IPv4) If enabled, then the connected device specified as the DMZ IP address (DMZ destination) will receive all traffic which would otherwise be blocked by the firewall.
-
Page 60: Settings Page > Advanced Settings > Mac Filter
Settings Page > Advanced Settings > MAC Filter Figure 3-16 Settings Page - Advanced Settings - MAC Filter If the MAC Filter feature is enabled it will prevent access to this network by any device which is included in the "Allowed Devices" list. The filter applies to both Wi-Fi and Ethernet connections. -
Page 61: Settings Page > Advanced Settings > Lan
Operations Add Device: Use this button to add a new device to the "Allowed Devices" list. Add Myself: Click this button to add your own device (the device being used to view this screen) to the "Allowed Devices" list. Delete All: This button can be used to delete all devices from the "Allowed Devices" list, leaving it empty. - Page 62 IPv4 IP address: The IP address for this device, as seen from the local network. Normally, you can use the default value. Subnet mask: The default value 255.255.255.0 is standard for small (class "C") networks. If you change the LAN IP Address, ensure you use the correct Subnet Mask. MAC address: The MAC address is a unique network identifier, assigned when a network device is manufactured.
-
Page 63: Settings Page > Advanced Settings > Port Filtering
Settings Page > Advanced Settings > Port Filtering Figure 3-18 Settings Page - Advanced Settings - Port Filtering Use the Port Filtering feature as needed to block outgoing Internet traffic. If this setting is enabled, only traffic from the selected applications can access the Internet. Traffic is identified by port numbers. -
Page 64: Settings Page > Advanced Settings > Port Forwarding
Settings Page > Advanced Settings > Port Forwarding Figure 3-19 Settings Page - Advanced Settings - Port Forwarding The Port Forwarding feature allows incoming traffic from the Internet to be forwarded to a particular computer or device on your Wi-Fi network. Normally, the built-in firewall blocks incoming traffic from the Internet. - Page 65 Note that use of Port Forwarding creates a security risk and should be disabled when not required. Some Mobile Wireless Networks provide you with an IP address on their own network rather than an Internet IP address. In this case, Port Forwarding cannot be used because Internet users cannot reach your IP address.
-
Page 66: Messages
For a single port, enter the port number in both the Begin Port and End Port fields. For a port range, enter the beginning of the range in the Begin Port field and the end of the range in the End Port field. Protocol: For each port range, select the protocol (TCP or UDP) used by that port range. -
Page 67: Gps
Two counters at the top of the screen indicate the total number of messages, and the number of unread (new) messages. Note that all messages are set to "read" once they are displayed on this screen. Message List All messages are listed in order of the date received. Unread (new) messages are indicated by an icon. -
Page 68: Using Gps
Figure 3-21 GPS Page (Shown with GPS Turned ON) Using GPS Enable GPS Use this ON/OFF control to enable or disable the GPS feature. GPS Status If the GPS receiver has not yet obtained a fix (location), a Searching status appears. Once a fix has been obtained, the following Current Location information is displayed, and a Google map appears to visually indicate the current location. -
Page 69: Current Location
Use this to access the download page for the available drivers. These drivers are needed to use the GPS over the Wi-Fi feature. Customer Support The Customer Support Details of your SA 2100 are found on the Customer Support page in the user interface. novatelwireless.com... -
Page 70: About
Use this information to access the user guide, to obtain additional information, or support. About The About page contains information about your SA 2100 router. The information is presented on 5 tabs: Current Status, Device Info, Diagnostics, Logs, and Software Update. -
Page 71: About Page - Current Status Tab
About Page - Current Status Tab Figure 3-23 About Page - Current Status Tab The Current Status Tab displays status information for the device. Internet Status Connection Status: This displays the connection status for the Internet connection and indicates if an error condition exists. Network Name: The name of the network to which this device is currently connected. -
Page 72: Wi-Fi Hotspot
Restart: Click this button to restart the device. All Internet connections and Wi-Fi connections will be lost during the restart. Shutdown: Click this button to shut down the device. All existing connections will be lost. About Page - Device Info Tab The Device Information tab contains information about the SA 2100 router. novatelwireless.com... - Page 73 Figure 3-24 About Page - Device Info Tab Manufacturer: The manufacturer of this device. Model: The official model name and number for this device. Radio technologies supported: This lists the different radio technologies supported by this device. Note that this list refers to this device, and not to the mobile network. IMEI: The IMEI (International Mobile Equipment Identity) for this device.
- Page 74 Wi-Fi FW version: For the Wi-Fi component, this is the version of the firmware (software) currently installed. Web UI version: The version number for the SA 2100 Web Interface. PRI version: The configuration version currently applied to this device. novatelwireless.com...
-
Page 75: About Page - Diagnostics Tab
About Page - Diagnostics Tab This page contains information about the SA 2100 and the available networks. Use it as needed for troubleshooting; it is not required for normal operation. Figure 3-25 About Page - Diagnostics Tab novatelwireless.com... -
Page 76: Modem
Modem Phone number (MDN): Although this device does not support voice calls, it has a normal phone number, which is displayed here. IMEI: The IMEI (International Mobile Equipment Identity) for this device is a 15 or 17 digit code used to uniquely identify an individual mobile station on a LTE network. The IMEI does not change when the SIM is changed. -
Page 77: 4G Lte Status
RSSI: This indicates the RSSI for the GSM/WCDMA/HSPA signal. RSSI is a measure of signal strength in decibels, relative to one milliwatt. It is always negative because mobile radio devices are much less powerful than one milliwatt. Higher values indicate a stronger signal, so -50dBm is a stronger signal than -70dBm. -
Page 78: About Page - Logs Tab
About Page - Logs Tab The Log information is useful for troubleshooting, but is not required for normal operation. Figure 3-26 About Page - Logs Tab Settings Enable logs: Enable the Logs as needed. novatelwireless.com... -
Page 79: Log Data
Delete System Log: This setting determines for how long the system log data is retained. Select the desired option. Note that if the log is full, the oldest data is deleted, regardless of this setting. Log Data The provided tabs allow you to select the type of Log Data to view. Mobile Network Log: This log contains data regarding connections to the mobile network. -
Page 80: About Page - Software Update Tab
About Page - Software Update Tab Software updates are delivered automatically over the mobile network. This page allows you to monitor these updates. Figure 3-27 About Page - Software Update Tab The following information is provided on the Software Update tab: Current Software Current Software Version: This field indicates the version of the software currently installed on this device. -
Page 81: Last Update
Update available: This indicates if an update is available. If an update is available, it is automatically downloaded and installed. Last Update This panel displays the details of the last update installed on this SA 2100 device. If no updates have been installed, this panel is blank. Update History The Update History panel displays the details of all updates that have been downloaded and installed to this SA 2100 device. -
Page 82: Accessories
Accessories Antenna Backup Battery Power Cable Power Supply USB Cable Part Ordering Accessories novatelwireless.com... -
Page 83: Antenna
Antenna Should an external antenna be required, these instructions must be followed. The following installation practices are required to comply with FCC rules on RF exposure. Failure to follow these guidelines can result in operations that exceed RF Exposure limits. Maintain a minimum distance of at least 20 cm (8 in) from all persons regardless of how the antenna is mounted (stand assembly or wall mount). - Page 84 1850 - 1910 2.0 The antenna is shipped with both a suction cup and clip for mounting. Use only the supporting cable to connect the antenna to the SA 2100. Never use an antenna from another vendor or another source.
-
Page 85: Backup Battery
USB cable. Power Cable The Power Cable has an 8 pin Molex connector that supplies power to the SA 2100. The Black Wire goes to the chassis ground. The Red Wire goes to a 12V or 24V vehicle ready power supply. -
Page 86: Power Supply
Pin -6 User Controlled IO1 Pin -7 User Controlled IO2 Pin -8 User Controlled Output Power Supply The Power Adapter has an 8 pin Molex connector that supplies power to the SA 2100. Input: 100-240v 50/60 Hz 0.45A Output: novatelwireless.com... -
Page 87: Usb Cable Part
An industry standard Micro USB (not included) is required only if communication through the Com port is required. Figure 4-6 Micro USB Cable Ordering Accessories The following table shows the available accessories (and their SKU) for the SA 2100. To order an accessory contact your Novatel Wireless sales representative. novatelwireless.com... - Page 88 Accessoy .01019886. USB (latched) .60715094. mounting .21915041. mounting (vehicle) .21915042. power cable .60715093. power adapter NA(-30 TO 70C) .40123113.01. power adapter EU(-30 TO 70C) .40123113.01. battery .40115130-001. novatelwireless.com...
Need help?
Do you have a question about the SA 2100 and is the answer not in the manual?
Questions and answers