Advertisement
Quick Links
Advertisement

Related Manuals for Hanna Instruments GroLine HI98168


Summary of Contents for Hanna Instruments GroLine HI98168
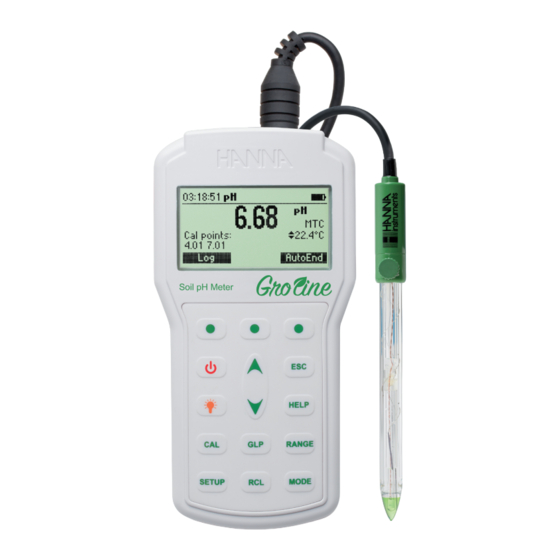
- Page 1 HI98168 Professional Soil pH Meter...
- Page 2 If you need additional technical information, do not hesitate to e‑mail us at tech@hannainst.com or view our worldwide contact list at www.hannainst.com. All rights are reserved. Reproduction in whole or in part is prohibited without the written consent of the copyright owner, Hanna Instruments Inc., Woonsocket, Rhode Island, 02895, USA.
- Page 3 PRELIMINARY EXAMINATION ....................SAFETY MEASURES ......................GENERAL DESCRIPTION ...................... FUNCTIONAL DESCRIPTION ....................SPECIFICATIONS ........................ SOIL pH ..........................ORGANIC SUBSTRATE ......................IRRIGATION WATER ......................NUTRIENT SOLUTION ......................OPERATIONAL GUIDE ......................pH CALIBRATION ....................... pH BUFFER TEMPERATURE DEPENDENCE ................GOOD LABORATORY PRACTICE (GLP) ................... SETUP ..........................
- Page 4 Remove the instrument from the packing material and examine it carefully to make sure that no damage has occurred during shipping. If there is any damage, please contact your local Hanna Instruments Office. Each instrument is supplied with: •HI12923 Glass body, conical tip, refillable pH electrode with internal temperature sensor •HI700663 Cleaning solution for soil deposits (1 pc.) •HI700664...
- Page 5 HI98168 is a portable, pH and temperature meter specifically designed for direct soil measurement. It is provided with a series of new diagnostic features which add an entirely new dimension to the measurement of pH, by allowing the user to dramatically improve the reliability of the measurement: •...
- Page 6 FRONT VIEW Soil pH Meter 1) Liquid Crystal Display (LCD). 2) Functional keys. / keys to scroll through calibration buffers, setup options, manual temperature compensation and logged data. 4) ON/OFF ( ) key, to turn the instrument ON and OFF. 5) LIGHT ( ) key to toggle display backlighting.
- Page 7 TOP VIEW 14) Electrode quick connect DIN connector. 15) USB connector.
- Page 8 Range ‑2.0 to 20.0 pH / ‑2.00 to 20.00 pH / ‑2.000 to 20.000 pH Resolution 0.1 pH / 0.01 pH / 0.001 pH Accuracy ±0.1 pH / ±0.01 pH / ±0.002 pH Range ‑20.0 to 120.0 °C (‑4.0 to 248.0 °F) Temperature Resolution 0.1 °C (0.1 °F)
- Page 9 pH is the measure of the hydrogen ion concentration [H ]. The pH scale goes from 0 (very acidic) to 14 (basic) with pH 7 being neutral. Soil can be acid, neutral or alkaline. Fig. 1. shows the relationship between the scale of pH and types of soil. Most plants prefer a pH range from 5.5 to 7.5;...
- Page 10 Each plant needs elements in different quantities and this is the reason why each plant requires a particular range of pH to optimize its growth. For example, iron, copper and manganese are not soluble in an alkaline environment. This means that plants needing these elements should theoretically be in an acidic type of soil.
- Page 11 Different naturally occuring minerals may effect soil pH same way but the method for correction may differ. Take for example elevated soil pH: ‑ Soils rich with limestone: Add organic matter (non‑organic ameliorants such as sulfur and sulfuric acid might not make economic sense due to the large quantities needed).
- Page 12 For best result, it is advisable to measure the pH of a soil solution, using a sample of soil and soil preparation solution HI7051; it is better to use this procedure if you have to test a stony field in which you risk damaging the electrode.
- Page 13 The pH measurement of organic substrates is important in greenhouses and nursery growing pots. pH should be checked at the outset to make sure that the pH of the substrate bought is that desired (pH can change if too much time elapses from the date of packaging to the moment of utilization). A) Verify pH meter is set up correctly and pH electrode is calibrated.
- Page 14 A rational fertilization program is required for optimum plant growth in greenhouses. The pH value of the nutrient solution (water + fertilizer) has to meet the plants need. If a fertirrigation system with automatic pH control is used, ensure that it is functioning properly. Check the pH of the irrigation solution as well as any recycled solution.
- Page 15 LAWN Preferred pH Range Lawn 6‑7.5 GARDEN PLANTS AND FLOWERS Preferred pH Range Preferred pH Range Acacia 6‑8 Ligustrum 5‑7.5 Acanthus 6‑7 Magnolia 5‑6 Amaranth 6‑6.5 Narcissus 6‑8,5 Bougainvillea 5.5‑7.5 Oleander 6‑7.5 Dahlia 6‑7.5 Paulownia 6‑8 Erica 4.5‑6 Portulaca 5.5‑7.5 Euphorbia 6‑7 Primula...
- Page 16 Cyclamen 6‑7 Peperomia 5‑6 Dieffenbachia 5‑6 Philodendron 5‑6 Dracaena 5‑6 Yucca 6‑7.5 Freesia 6‑7.5 Table 3. Optimum pH for various Plants.
- Page 17 DIN connector. Turn the instrument ON by pressing ON/OFF key. At start‑up the display will show the Hanna Instruments logo for a few seconds followed by the percentage indication of the remaining battery life, then enters the measurement mode.
- Page 18 On the pH screen are displayed: • pH reading with the selected resolution. • Temperature reading in the selected unit (°C or °F). • Electrode condition during the calibration day. • The buffers used in last pH calibration (if feature is enabled in SETUP). •...
- Page 19 It is recommended to calibrate the instrument frequently, especially if high accuracy is required. The pH range should be recalibrated: • Whenever the pH electrode is replaced. • At least once a week. • After testing aggressive chemicals. • When calibration alarm time out is expired ‑ “CAL DUE” blinks (if feature is enabled in SETUP).
- Page 20 FIVE POINT CALIBRATION • Immerse the pH electrode approximately 4 cm (1½”) into a buffer solution of your choice (pH 1.68, 4.01, 6.86, 7.01, 9.18, 10.01, 12.45 or a custom buffer) and stir gently. • Press CAL. The instrument will display the measured pH, the LCD first expected buffer and the temperature reading.
- Page 21 • After the first calibration point is confirmed, immerse the pH electrode probe approximately 4 cm (1½”) into the second buffer solution and stir gently. • If necessary, press the / keys to select a different buffer value. • The “ ” tag will blink on the LCD until the reading is stable. •...
- Page 22 • If necessary, press the / keys to select a different buffer value. • The “ ” tag will blink on the LCD until the reading is stable. • When the reading is stable and within range of the selected buffer, the CFM functional key is displayed.
- Page 23 • Press CFM to confirm calibration. • The calibrated value and the fifth expected buffer will be displayed. • After the fourth calibration point is confirmed, immerse the pH electrode approximately 4 cm (1½”) into the fifth buffer solution and stir gently. •...
- Page 24 FOUR, THREE, TWO or ONE POINT CALIBRATION • Proceed as described in “FIVE POINT CALIBRATION” section. • Press CAL or ESC after the appropriate accepted calibration point. The instruments will return to measurement mode and will memorize the calibration data. FIRST POINT MODE Two SETUP options are available to determine how the previous calibration will be affected by a subsequent one point calibration.
- Page 25 Wrong slope The calibration cannot be confirmed. The evaluated slope is less than the lowest accepted value (80% of default slope). The evaluated slope is more than the highest accepted value (110 % of default slope). Wrong old slope An inconsistency between new and previous (old) calibration is detected. Clear old calibration parameters and proceed with the calibration from the current point.
- Page 26 If the current confirmed buffer has no correspondence in the existing stored calibration and this is not full, the current buffer is added to the existing stored calibration. If the existing stored calibration is full (five calibration points), after confirming the calibration point, the instrument will ask which buffer will be replaced by current buffer.
- Page 27 WORKING WITH MILI pH BUFFERS If calibration is invoked from mili pH range, the calibration buffer can be modified in a ±0.020 pH range in according with the label on the calibration buffer. Press Change to enter buffer adjust mode. / keys to change the buffer value.
- Page 28 ELECTRODE CONDITION The display is provided with an icon, and a numeric value (unless the feature is disabled) which gives an indication of the electrode status after calibration. The “condition” remains active until the end of the calibration day. Note: The electrode condition is evaluated only if current calibration includes at least two standard buffers.
- Page 29 The temperature has an effect on pH. The calibration buffer solutions are affected by temperature changes to a lesser degree than normal solutions. During calibration the instrument will automatically calibrate to the pH value corresponding to the measured temperature. TEMP pH BUFFERS °C °F 1.68 4.01 6.86 7.01 9.18 10.01 12.45...
- Page 30 GLP is a set of functions that allows storage and retrieval of data regarding the maintenance and status of the electrode. All data regarding the pH calibration is stored for the user to review when necessary. EXPIRED CALIBRATION The instrument is provided with a real time clock (RTC), in order to monitor the time elapsed since the last pH calibration.
- Page 31 Setup mode allows viewing and modifying the measurement parameters. The following table lists the general SETUP parameters, their valid range and the factory default settings. Description Valid value Default Backlight Backlight Level 0 to 7 Contrast Contrast Level 0 to 20 Auto light off Time until backlight is ON 1, 5, 10, 30 min...
- Page 32 The following table lists the specific range parameters. Item Description Valid value Default Calibration Timeout Number of days after Disable, 1 to 7 days Disable Calibration warning is displayed First point mode Management of Replace or offset Replace 1 point calibration Custom buffer Custom buffer setting Max.
- Page 33 GENERAL PARAMETER SCREENS Backlight Highlight Backlight. Press Modify. keys to change the intensity then press Accept to confirm. Press ESC to leave without changing. Contrast Highlight Contrast. Press Modify. keys to change contrast then press Accept to confirm. Press ESC to leave without changing.
- Page 34 Auto Light Off Highlight Auto Light Off. Press 5, 10 or 30 to change settings. Auto Power Off Highlight Auto Power Off. Press Modify. Press / keys to select interval then press Accept. Press ESC to leave without changing. Date/Time Highlight Date/Time.
- Page 35 Press Modify. keys to select item. keys to change focused values. Press Accept to confirm new setting, or ESC to leave without changing. Time Format Highlight Time Format. Press displayed functional key to change the option. Date Format Highlight Date Format. Press Modify.
- Page 36 Language Highlight Language. Use the desired functional key to change the option. Wait until new language is loaded. If language load fails the instrument will try to reload current language. If any language can’t be loaded, the instrument will work in safe mode. In this mode all messages are displayed in English and Help is not available.
- Page 37 Instrument ID Highlight Instrument ID. Press Modify. keys to change the instrument ID. Press Accept to confirm or ESC to exit without saving. Baud Rate Highlight Baud Rate. Press Modify. / keys to select the desired communication baud. Press Accept to confirm or ESC to exit.
- Page 38 Meter information Highlight Meter Information. Press Select. The meter informations are displayed: ‑firmware version ‑language version ‑mV and temperature factory calibration time/date ‑battery capacity RANGE SPECIFIC PARAMETERS SCREENS Calibration Timeout Highlight Calibration Timeout. Press Modify. / keys to set desired value. Press Accept to confirm or ESC to return without saving.
- Page 39 Note: If enabled “CAL DUE” warning will be displayed, the set number of days after calibration is over passed. First Point Mode Highlight First Point Mode. Press the displayed functional key in order to change the option. If the Replace option is selected, the slopes between current buffer and nearest lower and higher buffers will be recalculated.
- Page 40 Press Add to add a new buffer to the list (max 5). Press Modify to set custom buffer value. keys to change the value. Press Accept to confirm custom buffer value or ESC to exit without saving. View Calibration Points Highlight View Calibration Points.
- Page 41 Out of Calibration Range Warning Highlight Out of Cal.Range Warning. Press the displayed functional key in order to change option. If enabled, the “Out Cal Range” message will be displayed if the pH reading is outside. Approxi‑ mately 1 pH unit, from the lowest and highest pH buffer value used for calibration. For single point pH 7.01 calibration the message will be displayed for pH values less than 4 or greater than 10.
- Page 42 This feature allows the user to log pH measurements. All logged data can be transferred to a PC through the USB port using HI92000 application. The maximum logging space is 200 (100 pH and 100 mV range) for HI98168 record locations. LOGGING THE CURRENT DATA To store the current reading into memory, press LOG while in measurement mode.
- Page 43 If More is pressed. Use / keys to scroll between complete log information. If Delete is pressed. key to focus the record to be deleted and then press CFM. Press ESC to exit. If Delete All is pressed the instrument asks for confirmation. Press CFM to confirm or ESC to exit without deleting.
- Page 44 Hanna Instruments’ temperature sensors are interchangeable and no temperature calibration is needed when they are replaced. If the temperature is inaccurate, calibration should be performed. For an accurate recalibration, contact your local Hanna Instruments Office or follow the instructions below. ENTER CALIBRATION MODE With the instrument off, press and hold down the then power on the instrument.
- Page 45 • Press CFM to confirm. • The second expected calibrated point is displayed. • Immerse the pH probe including temperature sensor into the second vessel as close as possible to the reference thermometer. Allow a few seconds for the probe to stabilize. •...
- Page 46 USB socket and the other to the serial or USB port of your PC. To allow our users access to the latest version of Hanna Instruments PC compatible software, we made the products available for download at http://software.hannainst.com. Select the product code and click Download Now.
- Page 47 Is equivalent to pressing OFF key CHR xx Change the instrument range according with the parameter value (xx): • xx=00 pH range/0.001 resolution • xx=01 pH range/0.01 resolution • xx=02 pH range/0.1 resolution • xx=03 mV range The instrument will answer for these commands with: <STX>...
- Page 48 • Reading status (2 chars): R ‑ in range, O ‑ over range, U ‑ under range. First character corresponds to the primary reading. Second character corresponds to mV reading. • Primary reading (corresponding to the selected range) ‑ 11 ASCII chars, includ‑ ing sign and decimal point and exponent.
- Page 49 • Auto Light Off time (3 chars) • Auto Power Off time (3 chars) • The number of custom buffers (1 char) • The custom buffer values, with sign and decimal point, for each defined custom buffer (7 chars) • The short name of the selected language (3 chars) NSLx Requests the number of logged samples (4 chars).
- Page 50 To replace the batteries, follow the next steps: • Turn OFF the instrument. • Open the battery compartment by removing the four screws from the back of the instrument. • Remove the old batteries. • Insert four new 1.5V AA batteries in the battery compartment while paying attention to the correct polarity.
- Page 51 High concentrations of sodium ions interfere with readings in alkaline solutions. The pH at which the interference starts to be significant depends upon the composition of the glass. This interference is called alkaline error and causes the pH to be underestimated. Hanna Instruments’ glass formulations have the indicated characteristics.
- Page 52 *Not present in gel electrodes. PREPARATION PROCEDURE Remove the electrode protective cap. DO NOT BE ALARMED IF ANY SALT DEPOSITS ARE PRESENT. This is normal with electrodes and they will disappear when rinsed with water. During transport tiny bubbles of air may have formed inside the glass bulb. The electrode cannot function properly under these conditions.
- Page 53 Allow the electrode to stand upright for 1 hour. Follow the Storage Procedure above. pH CLEANING PROCEDURE • General Soak in Hanna Instruments HI7061 General Cleaning Solution for approximately ½ hour. • Inorganic Soak in Hanna Instruments HI7074 Inorganic Cleaning Solution for 15 minutes.
- Page 54 Instruction for Application Cleaning Solution 1. Add in a beaker about 50 ‑ 75 mL (or minimum to cover the electrode junction) one of the following cleaning solution: • Cleaning solution for inorganic soil deposits (HI70663); • Cleaning solution for organic soil deposits (HI70664); 2.
- Page 55 IMPORTANT: After performing any of the cleaning procedures, rinse the electrode thoroughly with distilled water, refill the reference chamber with fresh electrolyte (not necessary for gel‑filled electrodes) and soak the electrode in HI70300 Storage Solution for at least 1 hour before taking measurements.
- Page 56 Electrode Cleaning Solution Code Description Electrode Rinse Solution, 20 mL sachet, 25 pcs. HI70000P HI700601P General purpose cleaning solution for laboratories, 20 mL sachet, 25 pcs. HI700661P General purpose cleaning solution for agriculture, 20 mL sachet, 25 pcs. HI700663P Cleaning solution for soil deposits, 20 mL sachet, 25 pcs. HI700664P Cleaning solution for humus deposits, 20 mL sachet, 25 pcs.
- Page 57 pH Calibration Solution Code Description HI50004-01 pH 4.01 Buffer Solution, 20 mL sachet, 10 pcs. HI50004-02 pH 4.01 Buffer Solution, 20 mL sachet, 25 pcs. HI50007-01 pH 7.01 Buffer Solution, 20 mL sachet, 10 pcs. HI50007-02 pH 7.01 Buffer Solution, 20 mL sachet, 25 pcs. HI50010-01 pH 10.01 Buffer Solution, 20 mL sachet, 10 pcs.
- Page 58 Hard carrying case CERTIFICATION All Hanna Instruments conform to the CE European Directives. Disposal of Electrical & Electronic Equipment. The product should not be treated as household waste. Instead hand it over to the appropriate collection point for the recycling of electrical and electronic equipment which will conserve natural resources.
- Page 59 Returned Goods Authorization (RGA) number from the Technical Service department and then send it with shipping costs prepaid. When shipping any instrument, make sure it is properly packed for complete protection. Hanna Instruments reserves the right to modify the design, construction or appearance of its products without advance notice.
- Page 60 World Headquarters Hanna Instruments Inc. Highland Industrial Park 584 Park East Drive Woonsocket, RI 02895 USA www.hannainst.com MAN98168 Printed in ROMANIA...
Need help?
Do you have a question about the GroLine HI98168 and is the answer not in the manual?
Questions and answers