
Related Manuals for Centrios 1611305

Summary of Contents for Centrios 1611305
- Page 1 1611305 DivX DVD RECORDER with battery backup PLE SE C REFULLY RE D THIS M NU L BEFORE OPER TING THIS UNIT...
-
Page 2: Safety Information
The light flash with an arrowhead symbol, within an equilateral triangle, is intended to alert the user to the presence of uninsulated "dangerous voltage" within the product's enclosure that may be of sufficient magnitude to constitute a risk of electric shock to persons. -
Page 3: Introduction
This is a feature designed to allow easier access to the disc inside the tray during diagnostics.First check and identify the contents of your player package, as listed below: • 1611305 DivX DVD Recorder • Remote control •... -
Page 4: Table Of Contents
TABLE OF CONTENTS Safety Information ... i Introduction...1 Table Of Contents ...2 Identification Of Controls ...3 The Remote Control ...5 Connection ...6 Mp3 & Progressive Scan ...10 Playing Back A Disc ...11 Playing A Normal Disc ...11 Playing A DVD +RW Or DVD+R Disc...11 General Features...13 USB, DV, Zoom, Source Function...13 Locating A Specific Title, Chapter Or Track ...14... -
Page 5: Identification Of Controls
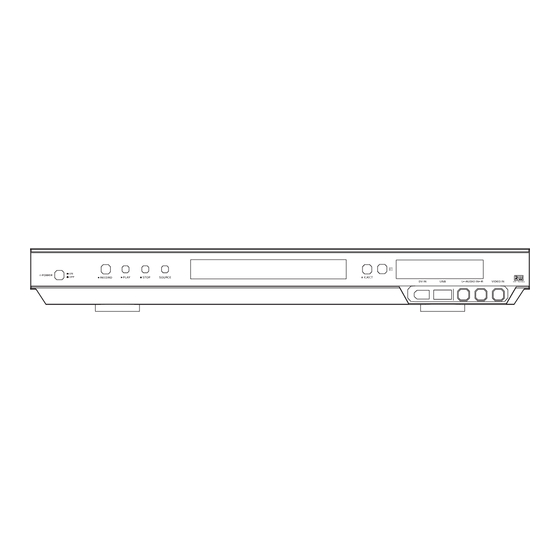
IDENTIFICATION OF CONTROLS FRONT PANEL 1. POWER(ON/OFF) 2. RECORD 3. PLAY 4. STOP 5. SOURCE 6. DISC TRAY 7. EJECT REAR PANEL 1. TV ANTENNA IN 2. COMPOSITE VIDEO INPUT 3. COMPOSITE VIDEO OUTPUT 4. TV ANTENNA OUT 5. S-VIDEO INPUT 6. -
Page 6: Remote Control
IDENTIFICATION OF CONTROLS REMOTE CONTROL The instructions below describe the functions of the remote control STANDBY NUMERIC BUTTONS GO TO ADD/CLEAR FAST BACKWARD PAUSE FAST FORWARD ENTER DIRECTION BUTTONS 10. SETUP 11. MENU 12. TITLE 13. P/N(PAL / NTSC) 14. PROGRAM 15. -
Page 7: The Remote Control
THE REMOTE CONTROL Battery Installation: Push downward and outward on the leaf spring to remove the battery compartment cover. Insert two size AA batteries according to the "+" and "-" markings. Note: A. Do NOT mix different types together, or old batteries with new batteries. -
Page 8: Connection
CONNECTION Enjoy Digital Stereo Sound Enjoy the dynamic sound of Digital Stereo by connecting an amplifier equipped with a digital audio input and speaker system (right and left front speakers, a centre speaker, and one or two rear speakers). CONNECTION FOR VIDEO OUTPUT GOOD Composite video... -
Page 9: Connection For Av Signal (A/V Rear Input)
CONNECTION CONNECTION FOR TV TUNER Signal input The DVD recorder unit allows you to enjoy or record programs with signal from AV systems such as VCR, DVD player, etc. CONNECTION FOR AV SIGNAL (A/V REAR INPUT) VIDEO IN AUDIO IN... - Page 10 CONNECTION CONNECTION FOR AV SIGNAL (A/V FRONT INPUT) Note: 1. Refer to the manual of the connected system. 2. Turn off the power and unplug both units before setting up any connections. EXTERNAL SIGNAL AV VIDEO IN DIGITAL VIDEO INPUT USB INPUT...
-
Page 11: Mp3&Progressive Scan
MP3&PROGRESSIVE SCAN WHAT IS MP3? MP3 refers to a new format of music files available for playback over the internet. The popularity of MP3 allows people to download music from MP3 website into one's home computer. WHAT IS PROGRESSIVE SCAN? Progressive scan creates a picture with double the scan lines of traditional component video pictures and creates a sharper image. -
Page 12: Playing Back A Disc
PLAYING BACK A DISC PLAYING A NORMAL DISC 1. Power on your recorder. 2. Inset a DVD disc. 3. Press direction keys or the number buttons to select the title. TITLE 1 TITLE 3 4. Press the ENTER or PLAY button. The DVD video player will start playback from the title selected. -
Page 13: General Features
PLAYING BACK A DISC PLAYING A DVD+RW or DVD+R DISC 1. Power on your recorder. 2. Insert a DVD+RW or DVD+R disc. The index pictures will appear on the screen. 3. Press the EJECT button to open or close the disc tray. -
Page 14: Usb, Dv, Zoom, Source Function
USB function You must put the USB storage device into the USB port on the front of the DVD recorder. If the device is recognized by the system a USB symbol will appear on the bottom corner of your screen. -
Page 15: Locating A Specific Title, Chapter Or Track
LOCATING A SPECIFIC TITLE, CHAPTER OR TRACK DVD Video Discs are normally divided into titles and sub-divided into chapters. Similarly, CD's (audio, HDCD, and Mp3) are divided into tracks. You can conveniently locate any specific title, chapter, or track with this player. Chapter 1 Chapter 2 LOCATING A TITLE USING THE TITLE MENU... -
Page 16: Locating A Title
LOCATING A SPECIFIC TITLE, CHAPTER OR TRACK LOCATING A TITLE If a DVD video disc contains title numbers, you can locate a specific title by directly selecting a title number. 1. Press GOTO one time during playback. Title selection will be displayed on the screen, input the desired title number, then press ENTER button to confirm. -
Page 17: Playing Repeatedly
PLAYING REPEATEDLY THIS RECORDER ALSO ALLOWS YOU TO PLAYBACK A SPECIFIC TITLE, CHAPTER, TRACK or SEGMENT REPEATEDLY. (TITLE REPEAT, CHAPTER/TRACK REPEAT, A-B REPEAT) HOW TO REPEAT A TITLE, CHAPTER or TRACK 1. Press the REPEAT button during playback. The repeat mode changes each time you press the REPEAT button. C-RPT T-RPT D-RPT... -
Page 18: Selecting Camera Angles, Languages & Audio Settings
SELECTING CAMERA ANGLES, LANGUAGES & AUDIO SETTINGS THIS RECORDER ALLOWS YOU TO SELECT FROM SEVERAL DIFFERENT ANGLES AND LANGUAGES. ANGLE 1 ANGLE 2 Selecting the camera angle HOW TO CHANGE THE CAMERA ANGLE If the video on the DVD was recorded with multiple angles, you have the option to change the camera angle of the scene you are watching. -
Page 19: Playing In A Favourite Order
PLAYING IN A FAVORITE ORDER THIS PLAYER ALLOWS YOU TO PROGRAM UP TO 99 ITEMS INTO MEMORY AND THEN PLAY THEM BACK IN THAT ORDER. (PROGRAM/PLAYBACK) HOW TO SET TITLES, CHAPTERS or TRACKS IN A FAVORITE ORDER 1. Press NAVIGAT button to access the control bar. 2. -
Page 20: Selecting Subtitles
SELECTING SUBTITLES THIS RECORDER ALLOWS YOU TO DISPLAY THE SUBTITLES FROM THOSE INCLUDED ON THE DISC ON YOUR TV SCREEN. HOW TO DISPLAY SUBTITLES Press the SUBTITLE button during playback to choose one of the subtitles available on the disc, or turn the subtitle off. SUBTITLE: 01/07 ENG SUBTITLE: 02/07 GER SUBTITLE: 03/07 SPA... -
Page 21: Setting The Parental Lock
SETTING THE PARENTAL LOCK YOU CAN USE THE PARENTAL LOCK FUNCTION ONLY WITH DVD EQUIPPED WITH THE PARENTAL LOCK FEATURE. SETTING THE PARENTAL LOCK DVDs equipped with the parental lock function are rated according to their content. The contents allowed by a parental lock level and the way a DVD can be controlled may vary from disc to disc. -
Page 22: Factory Defaults
CUSTOMIZING FUNCTION SETTINGS THIS PLAYER ALLOWS YOU TO CUSTOMIZE THE PERFORMANCE TO YOUR PERSONAL PREFERENCES. GENERAL GENERAL PLAYBACK PLAYBACK DISPLAYING THE SETUP MENU SCREEN Main Page GENERAL PLAYBACK RECORD LANGUAGE CHANNEL SCAN CLOCK 1. Press SETUP. 2. Press direction keys to highlight category, then press ENTER to confirm. -
Page 23: Recording Options
RECORDING OPTIONS CHANNEL SEARCH To record TV programs, you should search TV channels first. 1. Press SETUP to access the setup menu. 2. Press UP/DOWN to highlight the icon CHANNEL SCAN and press ENTER. 3. Use the direction buttons to highlight SCAN and press ENTER button to confirm. -
Page 24: Normal Recording
RECORDING OPTIONS NORMAL RECORDING 1. Make connections illustrated as page 6-8 2. Insert a DVD+RW or DVD+R disc into the recorder 3. Press NAVIGATION to access the Control Menu RECORD (DVD+R) MODE New Title SOURCE Ch000 QUALITY REC TO DVD-VIDEO TRICK Stop HTLE... -
Page 25: One-Touch Record
RECORDING OPTIONS ONE-TOUCH RECORD 1. Press RECORD and the recorder will now begin recording. NOTE: If it does not, ensure you have selected the proper in/out source and that you have a DVD+R or DVD+RW in the disc tray. 2. Pressing RECORD once will record the show until the disk is full or until you press STOP. Pressing RECORD multiple times will cycle through multiple preset lengths, i.e., 30 min, 60 min, 90 min, 120 min, then off (no preset length). - Page 26 RECORDING OPTIONS TIMER RECORD TIMER RECORD 1. Ensure your recorder’s time and date are current (using CLOCK SETUP). Note: When you unplug the power connection, the clock information may be lost. 2. Press TIMER, the record scheduler will pop up. Record scheduter Source Quality...
-
Page 27: Editing
EDITING EDITING A TITLE OF DVD + RW 1. Insert a recorded DVD+RW on the disc tray. The index Picture Screen pops up. 2. Use the direction keys to highlight the title which you want to edit. When the top index icon is highlighted, press UP and the previous index pictures will display on the screen. - Page 28 EDITING CHAPTER EDITING From the control menu, select the Chapter Marker icon, press SELECT repeatedly, it will cycle as follows: • Insert marker is selected by pressing ENTER, a new chapter marker will be added to the current point. • Delete marker is selected by pressing ENTER, the marker of the current chapter will be deleted.
-
Page 29: Editing A Disc Of Dvd +Rw Or Dvd +R
EDITING EDITING A DVD+RW DISC 1. Insert a DVD+RW on the disc tray. 2. Press DISC/OP button to access the disc editing menu. Note: You can enter the disc operation menu from the first page of DVD+RW disc. Enter the first page and the information of DVD+RW disc will be displayed. Press RIGHT button and the operate menu will be displayed on screen. - Page 30 EDITING EDITING A DVD+RW OR DVD+R DISC This icon is selected to view the disc information. Play PLAY (DVD+R and DVD+RW) Highlight the icon and press ENTER. It will start to play the first title on the disc. Erase Disc ERASE DISK (VD+RW only) Press ENTER to begin erasing.
-
Page 31: Specifications
SPECIFICATIONS PERSONAL VIDEO RECORDER Power Supply Power Consumption Mass External Dimensions Signal System Laser Supported Formats USB Version SUPPLIED ACCESSORIES Audio Cable (red/white/yellow) Remote Control Batteries (AAA) Package for the unit User manual 110V - 240V AC 60Hz/50Hz 9.9 lbs (4.5 kg) 20.5 x 14.9 x 6.1 inches (522 x 380 x 155 mm) AUTO/NTSC/PAL... -
Page 32: Trouble Shooting Guide
TROUBLE SHOOTING GUIDE Check the following guide for a possible correction to a problem before contacting customer service. SYMPTOM No power Connect the power plug into the wall outlet securely. Or no press ON/STANDBY/OFF button No picture Verify the connection from the DVD video output to the TV video input. Then switch TV to appropriate mode (video 1) Connect the video cable into the jacks securely. -
Page 33: Limited Warranty
LIMITED WARRANTY Who is Providing This Warranty? • Orbyx Electronics, LLC (“Orbyx"), as the distributor of this Centrios™ product (your “Product”). What Does This Warranty Cover? • This warranty covers defects in materials or workmanship in your Product under normal use and conditions.
Need help?
Do you have a question about the 1611305 and is the answer not in the manual?
Questions and answers