Table of Contents
Advertisement
Quick Links
Advertisement
Table of Contents

Related Manuals for LTS Security LTH-301M-WIFI

Summary of Contents for LTS Security LTH-301M-WIFI
- Page 1 Video Intercom Villa Door User Manual...
- Page 2 Video Intercom Villa Door Station User Manual Legal Information About this Manual The Manual includes instructions for using and managing the Product. Pictures, charts, images and all other information hereinafter are for description and explanation only. The information contained in the Manual is subject to change, without notice, due to firmware updates or other reasons.
- Page 3 Video Intercom Villa Door Station User Manual OTHER DAMAGES RESULTING FROM CYBER-ATTACK, HACKER ATTACK, VIRUS INSPECTION, OR OTHER INTERNET SECURITY RISKS; HOWEVER, OUR COMPANY WILL PROVIDE TIMELY TECHNICAL SUPPORT IF REQUIRED. YOU AGREE TO USE THIS PRODUCT IN COMPLIANCE WITH ALL APPLICABLE LAWS, AND YOU ARE SOLELY RESPONSIBLE FOR ENSURING THAT YOUR USE CONFORMS TO THE APPLICABLE LAW.
- Page 4 Video Intercom Villa Door Station User Manual Symbol Conventions The symbols that may be found in this document are defined as follows. Symbol Description Indicates a hazardous situation which, if not avoided, will or Danger could result in death or serious injury. Indicates a potentially hazardous situation which, if not Caution avoided, could result in equipment damage, data loss,...
- Page 5 Video Intercom Villa Door Station User Manual Safety Instruction Warning • The working temperature of the device is from -10 ºC to 55 ºC. • All the electronic operation should be strictly compliance with the electrical safety regulations, fire prevention regulations and other related regulations in your local region.
- Page 6 Video Intercom Villa Door Station User Manual • Please use the provided glove when open up the device cover, avoid direct contact with the device cover, because the acidic sweat of the fingers may erode the surface coating of the device cover. •...
- Page 7 Video Intercom Villa Door Station User Manual Regulatory Information FCC Information Please take attention that changes or modification not expressly approved by the party responsible for compliance could void the user’s authority to operate the equipment. FCC compliance: This equipment has been tested and found to comply with the limits for a Class B digital device, pursuant to part 15 of the FCC Rules.
- Page 8 Video Intercom Villa Door Station User Manual EU Conformity Statement This product and - if applicable - the supplied accessories too are marked with "CE" and comply therefore with the applicable harmonized European standards listed under the EMC Directive 2014/30/EU, the RoHS Directive 2011/65/EU 2012/19/EU (WEEE directive): Products marked with this symbol cannot be disposed of as unsorted municipal waste in the European Union.
-
Page 9: Table Of Contents
Video Intercom Villa Door Station User Manual Contents 1 Appearance ....................1 2 Terminal and Wiring Description ..............3 2.1 Terminal Description ..................3 2.2 Wiring Description .................... 3 2.2.1 Door Lock Wiring ..................3 2.2.2 Door Contact Wiring ................. 4 2.2.3 Exit Button Wiring .................. - Page 10 Video Intercom Villa Door Station User Manual 5.3.3 Network Settings ..................19 5.3.4 Video & Audio Settings ................24 5.3.5 Image Settings ..................26 5.3.6 Event Settings ..................28 5.3.7 Intercom Settings ..................30 6 Configuration via Client Software ............. 35 6.1 Device Management ..................
- Page 11 Video Intercom Villa Door Station User Manual 6.5.2 Search Call Logs ..................44 6.5.3 Upload Armed Information ..............45...
-
Page 12: Appearance
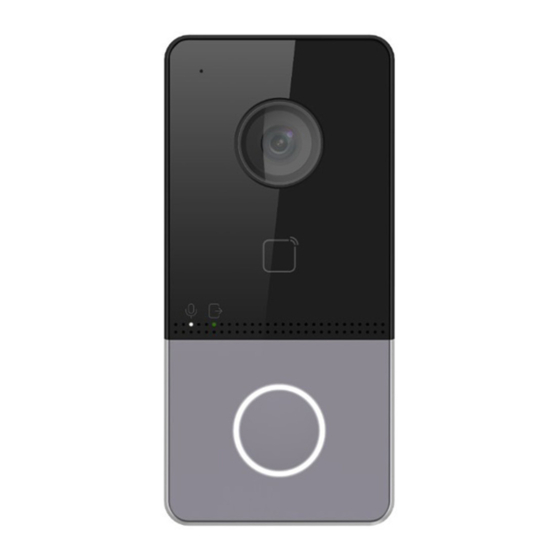
Video Intercom Villa Door Station User Manual 1 Appearance Front Panel and Rear Panel Here takes 6 Series device with swiping card function for example. Figure 1-1 Front Panel and Rear Panel Table 1-1 Description Description Microphone Camera Indicator Unlock (Green)/ Call (Orange)/ Communicate (White) Button Card Reading Area... - Page 13 Video Intercom Villa Door User Manual Loudspeaker Terminals Debugging Port TAMPER Set Screw Panel Figure 1-2 Panel Table 1-2 TF Card Slot(Future use) Network Interface...
-
Page 14: Terminal And Wiring Description
Video Intercom Villa Door Station User Manual 2 Terminal and Wiring Description 2.1 Terminal Description Figure 2-1 Terminal Description 2.2 Wiring Description 2.2.1 Door Lock Wiring Figure 2-2 Door Lock Wiring... -
Page 15: Door Contact Wiring
Video Intercom Villa Door Station User Manual Note Terminal NC/COM is set as default for accessing magnetic lock/electric bolt; terminal NO/COM is set as default for accessing electric strike. 2.2.2 Door Contact Wiring Figure 2-3 Door Contact Wiring 2.2.3 Exit Button Wiring Figure 2-4 Exit Botton Wiring... -
Page 16: Alarm Input Device Wiring
Video Intercom Villa Door Station User Manual 2.2.4 Alarm Input Device Wiring Figure 2-5 Alarm Input Device Wiring... -
Page 17: Installation
Video Intercom Villa Door Station User Manual 3 Installation Note • Make sure the device in the package is in good condition and all the assembly parts are included. • Make sure your power supply matches your door station. • Make sure all the related equipment is power-off during the installation. -
Page 18: Surface Mounting Without Protective Shield
Video Intercom Villa Door Station User Manual 3.2 Surface Mounting without Protective Shield Before You Start • Tools that you need to prepare for installation: Drill (ø2.846) and gradienter. • Purchase the protective shield before installation. Steps 1. Stick the mounting template on the wall. Drill screw holes according to the mounting template. -
Page 19: Surface Mounting With Protective Shield
Video Intercom Villa Door Station User Manual Figure 3-3 Surface Mounting without Protective Shield 3.3 Surface Mounting with Protective Shield Before You Start • Tools that you need to prepare for installation: Drill (ø2.846) and gradienter. • Purchase the protective shield before installation. Steps 1. - Page 20 Video Intercom Villa Door Station User Manual Figure 3-4 Mounting Template 2. Align the protective shield with the mounting template. 3. Secure the mounting plate and protective shield on the wall with 4 supplied screws according to the screw holes. 4.
- Page 21 Video Intercom Villa Door Station User Manual Figure 3-5 Flush Mounting with Protective Shield...
-
Page 22: Activation
Video Intercom Villa Door Station User Manual 4 Activation 4.1 Activate Device via Web You are required to activate the device first by setting a strong password for it before you can use the device. Default parameters of the door station are as follows: •... -
Page 23: Edit Network Parameters
Video Intercom Villa Door Station User Manual 3. Select an inactivated device and click Activate. 4. Create a password, and confirm the password. Note We highly recommend you to create a strong password of your own choosing (using a minimum of 8 characters, including at least three kinds of following categories: upper case letters, lower case letters, numbers, and special characters) in order to increase the security of your product. -
Page 24: Remote Configuration Via Web
Video Intercom Villa Door Station User Manual 5 Remote Configuration via Web 5.1 Live View In the browser address bar, enter the IP address of the device, and press the Enter key to enter the login page. Enter the user name and password and click Login to enter the Live View page. Or you can click Live View to enter the page. -
Page 25: Parameters Settings
Video Intercom Villa Door Station User Manual Figure 5-2 Organization Structure Settings 2. Click Fresh to refresh the list. 3. Enter the Keyword and click Search. The person information will display in the list. 5.3 Parameters Settings Click Configuration to set the parameters of the device. Note Run the browser, click →... - Page 26 Video Intercom Villa Door Station User Manual Set the stream type as Main Stream or Sub-stream. Play Performance Set the live view performance to Shortest Delay, Balanced or Fluent. Rules It refers to the rules on your local browser, select enable or disable to display or not display the colored marks when the motion detection, face detection, or intrusion detection is triggered.
-
Page 27: System Settings
Video Intercom Villa Door Station User Manual Set the saving path of the manually captured pictures in live view mode. Note You can click Browse to change the directory for saving the clips and pictures, and click Open to open the set folder of clips and picture saving. Click Save to enable the settings. - Page 28 Video Intercom Villa Door Station User Manual RS-485 Click System Settings → RS-485 to enter the settings page. Select the No. and Working Mode from the drop-down list. Click Save to enable the settings. Maintenance Click Maintenance → Upgrade & Maintenance to enter the settings page. Figure 5-3 Maintenance •...
- Page 29 Video Intercom Villa Door Station User Manual Note The upgrading process will last 1 to 10 minutes, do not power off during the upgrading. The device reboots automatically after upgrading. User Management Click User Management to enter the settings page. Administrator can edit the permission for the users.
-
Page 30: Network Settings
Video Intercom Villa Door Station User Manual Arming/Disarming Information Click User Management → Arming/Disarming Information to view the information. Click Refresh to get the present information. 5.3.3 Network Settings TCP/IP Settings TCP/IP settings must be properly configured before you operate the device over network. - Page 31 Video Intercom Villa Door Station User Manual Steps 1. Click Network → Basic Settings → Port to enter the settings page. Figure 5-6 Port Settings 2. Set the ports of the device. HTTP Port The default port number is 80, and it can be changed to any port No. which is not occupied.
- Page 32 Video Intercom Villa Door Station User Manual 4. Click Save to enable the settings. SNMP Settings Before You Start Before setting the SNMP, please download the SNMP software and manage to receive the camera information via SNMP port. By setting the Trap Address, the camera can send the alarm event and exception messages to the surveillance center.
- Page 33 Video Intercom Villa Door Station User Manual 4. Click Save to enable the settings. Note To lower the risk of information leakage, you are suggested to enable SNMP v3 instead of SNMP v1 or v2. FTP Settings Steps 1. Click Network → Advanced Settings → FTP to enter the settings page. Figure 5-8 FTP Settings 2.
- Page 34 Video Intercom Villa Door Station User Manual 3. Select Server Type. 4. Input the Server IP Address and Port. 5. Configure the FTP Settings, and the user name and password are required for the server login. 6. Set the Directory Structure, Parent Directory and Child Directory. 7.
-
Page 35: Video & Audio Settings
Video Intercom Villa Door Station User Manual Figure 5-9 Linked Network Settings 2. Set the Master Station IP, SIP Server IP Address, Center IP Address and Center Port No. 3. Click Save to enable the settings. 5.3.4 Video & Audio Settings Video Parameters Steps 1. - Page 36 Video Intercom Villa Door Station User Manual Figure 5-10 Video Parameters 2. Select the Stream Type. 3. Configure the video parameters. Video Type Select the stream type to video stream, or video & audio composite stream. The audio signal will be recorded only when the Video Type is Video & Audio.
-
Page 37: Image Settings
Video Intercom Villa Door Station User Manual higher frame rate is advantageous when there is movement in the video stream, as it maintains image quality throughout. Max. Bitrate Set the max. bitrate from 32 to 16384 Kbps. The higher value corresponds to the higher video quality, but the better bandwidth is required. - Page 38 Video Intercom Villa Door Station User Manual Figure 5-11 Display Settings 2. Select the Format. 3. Set the display parameters. Wide Dynamic Range can be used when there is a high contrast of the bright area and the dark area of the scene. Brightness Brightness describes bright of the image, which ranges from 1 to 100.
-
Page 39: Event Settings
Video Intercom Villa Door Station User Manual You can customize the camera name, time/date format, display mode, and OSD size displayed on the live view. Steps 1. Click Image → OSD Settings to enter the settings page. 2. Check the corresponding checkbox to select the display of camera name, date or week if required. - Page 40 Video Intercom Villa Door Station User Manual Figure 5-12 Motion Detection 2. Check Enable Motion Detection to enable the function. 3. Click Draw Area.Click and drag the mouse on the live video to draw a motion detection area. Click Stop Drawing to finish drawing one area. Click Save to save the settings.
-
Page 41: Intercom Settings
Video Intercom Villa Door Station User Manual Notify Surveillance Center Send an exception or alarm signal to the remote management software when an event occurs. 7. Click Save to enable the settings. Access Control Events Steps 1. Click Event → Access Control Event to enter the settings page. 2. - Page 42 Video Intercom Villa Door Station User Manual Note • For main door station (D series or V series), the serial No. is 0. • For sub door station (D series or V series), the serial No. cannot be 0. Serial No.
- Page 43 Video Intercom Villa Door User Manual Figure 5-14 Access Control and Elevator Control 2. Set the access control parameters. 1) Select the Door No. 2) Set the Door-unlocked Enable Delay Door Alarm. 4) Click Save to enable the Note • The door-unlocked ranges from 1s to 225s.
- Page 44 Video Intercom Villa Door Station User Manual 2) Set the Negative Floor. 3) Select the Interface Type as RS-485 or Network Interface. And enable the elevator control. If you select RS-485, make sure you have connected the door station to the elevator controller with RS-485 wire.
- Page 45 Video Intercom Villa Door Station User Manual Note • For door station, maximum speaking time and maximum message time should be configured. • Maximum speaking time varies from 90s to 120s, and maximum message time varies from 30s to 60s. Ring-Back Tone Settings Click Intercom →...
-
Page 46: Configuration Via Client Software
Video Intercom Villa Door Station User Manual 6 Configuration via Client Software 6.1 Device Management Device management includes device activation, adding device, editing device, and deleting device, and so on. After running the Guarding Vision, video intercom devices should be added to the client software for remote configuration and management. -
Page 47: Live View Via Door Station
Video Intercom Villa Door Station User Manual 6.2 Live View via Door Station Steps 1. On the main page of the client software, click Main View to enter the Live View page. 2. In the left list of the window, double-click the device IP or click the play icon to live view. -
Page 48: Person Management
Video Intercom Villa Door Station User Manual Note • The lower-level organizations will be deleted as well if you delete an organization. • Make sure there is no person added under the organization, or the organization cannot be deleted. 6.4 Person Management After adding the organization, you can add person to the organization and manage the added person such as issuing cards in batch, importing and exporting person's information in batch, etc. -
Page 49: Modify And Delete Person
Video Intercom Villa Door Station User Manual Click Upload Select the person picture from the local PC to upload it to the client. Click Take Phone Take the person's photo with the PC camera. Click Remote Take the person's photo with the collection device. Collection 3. -
Page 50: Change Person To Other Organization
Video Intercom Villa Door Station User Manual 6.4.3 Change Person to Other Organization You can move the person to another organization if needed. Steps 1. Select the person in the list and click Change Organization. 2. Select the organization to move the person to. 3. -
Page 51: Issue Card In Batch
Video Intercom Villa Door Station User Manual Steps Note This function is only supported by the device the connection mothod of which is TCP/IP when adding the device. 1. In the organization list on the left, click to select an organization to import the persons. - Page 52 Video Intercom Villa Door Station User Manual Figure 6-1 Issue Card in Batch 2. Click Settings.
-
Page 53: Permission Settings
Video Intercom Villa Door User Manual Figure 6-2 Card 3. Select Card Type and Card No. Type. 4. Click OK to save the Result issuing the card to the person, the person and card will display in the Person(s) with Card Issued list. 6.4.7 Permission Add Permissions Steps... -
Page 54: Video Intercom Settings
Video Intercom Villa Door Station User Manual 2) Select the Template of the schedule. 3) Check the person to Selected according to your needs. 4) Check the device to Selected according to your needs. 4. Click Save. 5. Check the permission and click Apply All to Device. The status of the permission displays as Applied. - Page 55 Video Intercom Villa Door Station User Manual Adjust the Volume of Click to adjust the volume of loudspeaker. Loudspeaker Hang Up Click Hang Up to hang up. Adjust the Volume of Click to adjust the volume of microphone. Microphone Unlock Remotely For door station, you can click to open the door remotely.
- Page 56 Video Intercom Villa Door Station User Manual 2. Set the search conditions, including call status, device type, start time and end time. Call Status Click ˅ to unfold the drop-down list and select the call status as Dialed, Received or Missed. Or select All to search logs with all statuses. Device Type Click ˅...
Need help?
Do you have a question about the LTH-301M-WIFI and is the answer not in the manual?
Questions and answers