Advertisement
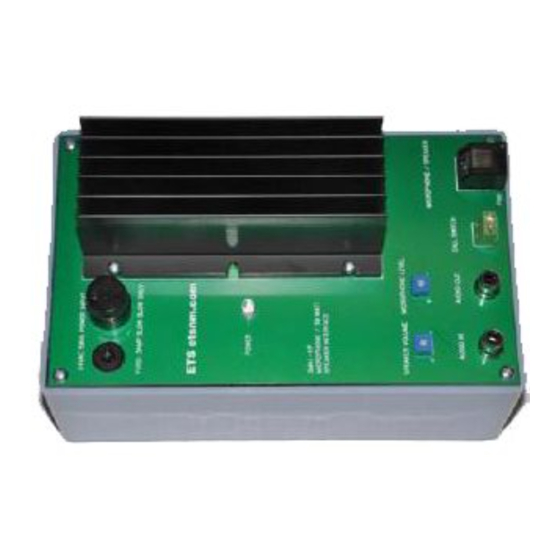
The SMA1-HPC5 is a two way public address, audio surveillance interface that is designed to connect to DVRs and I/P
cameras. The SMA1-HPC5 can be used with any ETS Sound Surveillance speaker/microphone with the C5 option. The
SMA1-HPC5 can also be used with any 70v speaker and any Sound Surveillance pre-amplified microphone with the use
of our MIS-C5BO breakout box. The SMA1-HPC5 is typically located near the DVR or I/P camera. Note-input and output
signals on the SMA1-HPC5 are "line level" only. The SMA1-HPC5 is for use in half duplex audio systems only. Audio
whine or "feedback" will be result if both speaker and microphone are active at the same time.
Microphone / Speaker Placement.
Locate the speaker and microphone near the area of interest in the space to be monitored. If a large area is to be
monitored, locate the speaker and microphone in the middle of the space if possible. Avoid mounting the speaker and
microphone near air conditioning vents, light fixtures or electrical equipment. The speaker and microphone should be
placed as close to the subject(s) as possible. 5 to 10 feet is ideal. The speaker and microphone are still useable in the
range of 15-25 feet in public address applications but is dependent on the level of background noise in the area.
Experimentation in the environment will determine what distances work best.
Audio Signal Cable Runs
Recommended cable is: CAT5 between the SMA1-HPC5 amplifier / interface and the microphone/speaker (HSM11-C5 or
CSM8-C5). Keep the cable run distances under 350 feet and away from AC power sources, light fixtures and electrical
equipment. Make connections as shown in Figure 1.
IMPORTANT
Wire the RJ45 connectors in the following manner. DO NOT wire as a standard Ethernet cable and do not cross
connections over.
Pair 1
1
2
Pair 2
3
4
Pair 3
5
6
Pair 4
7
8
SMA1-HPC5 location and power: The SMA1-HPC5 interface box is designed to be located next to a DVR or I/P camera.
The SMA1-HPC5 requires a 120VAC power source within 3 feet of its location. If this is not possible in your application,
you can splice in up to 100 feet of 18 awg, 2 conductor cable to extend the distance between the AC power source and
the SMA1-HPC5.
DVR or I/P camera connections:
Connect the "audio out" of the SMA1-HPC5 to the "audio in" of the DVR or I/P camera. Connect the "audio in" of the
SMA1-HPC5 to the "audio out" of the DVR or I/P camera. Note-input and output signals on the SMA1-HPC5 are "line
level" only. If the DVR or I/P camera uses screw terminals for audio connections, simply cut off the ends of the supplied
RCA patch cables, strip the wires back and connect the wires to the I/P camera terminal blocks. The center conductor of a
cut patch cable is + and the shield is -.
SMA1-HPC5 Speaker/Microphone Interface Instructions
CALL SW
CALL SW
SPEAKER (70V) +
SPEAKER (70V) –
MICROPHONE +
MICROPHONE –
+12V (MICROPHONE)
COM (MICROPHONE)
Advertisement
Table of Contents

Related Manuals for ETS SMA1-HPC5


Summary of Contents for ETS SMA1-HPC5
- Page 1 DVR or I/P camera connections: Connect the “audio out” of the SMA1-HPC5 to the “audio in” of the DVR or I/P camera. Connect the “audio in” of the SMA1-HPC5 to the “audio out” of the DVR or I/P camera. Note-input and output signals on the SMA1-HPC5 are “line level”...
- Page 2 If the will SMA1-HPC5 be used with a “line level” input, turn the gain control of the SM1 to 3/4 full clockwise and adjust the level control on the SMA1-HPC5 to produce the clearest audio level at the head end.
Need help?
Do you have a question about the SMA1-HPC5 and is the answer not in the manual?
Questions and answers