Table of Contents
Advertisement
Quick Links
Advertisement
Table of Contents

Related Manuals for Celestron NEXSTAR 4


Summary of Contents for Celestron NEXSTAR 4
-
Page 2: Table Of Contents
Steup Time-Site... 20 Anti-backlash ... 20 Slew Limits ... 20 Direction Buttons ... 20 Light Control ... 20 Select Model... 20 RS-232... 20 Hand Control Command Tree ... 21 TELESCOPE BASICS... 22 ... 22 MAGE RIENTATION ... 23 OCUSING ... 23 ALCULATING AGNIFICATION ... - Page 3 ... 26 OTION OF THE TARS OLAR LIGNMENT WITH OPTIONAL Photography with the NexStar 4 ... 28 Finding the North Celestial Pole ... 28 CELESTIAL OBSERVING ... 30 ... 30 BSERVING THE ... 30 BSERVING THE LANETS ... 31 BSERVING THE ...
-
Page 4: Introduction
Congratulations on your purchase of the Celestron NexStar! The NexStar ushers in a whole new generation of computer automated technology. Simple and friendly to use, the NexStar is up and running after locating just two alignment stars. It’s the perfect combination of power and portability. If you are new to astronomy, you may wish to start off by using the NexStar's built-in Sky Tour feature, which commands the NexStar to find the most interesting objects in the sky and automatically slews to each one. - Page 5 When the display reads NexStar Ready, press ENTER to AutoAlign the NexStar. The hand control display will ask you to move the telescope tube so that it is level with the ground and facing the north horizon. Use the direction arrow buttons on the hand control to position the telescope north and level.
- Page 6 Alignment Star The NexStar will automatically pick an alignment star and slew the telescope close to that star. Once there, the display will ask you to use the arrow buttons to aim the Star Pointer at the star. If the star is not visible (perhaps behind a tree), press UNDO to select a new star.
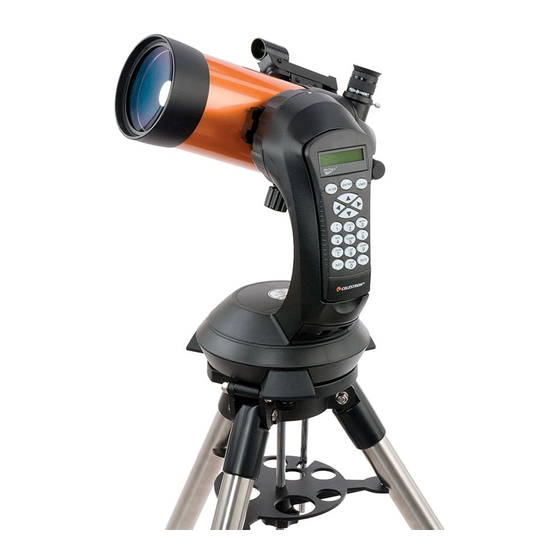
- Page 7 Optical Tube Liquid Crystal Display Hand Control ON/OFF Switch Battery Compartment Focuser Knob Straight Through Photographic Adapter Flip Mirror Control Eyepiece Star Pointer Finderscope...
-
Page 8: Assembly
The NexStar 4 comes completely pre-assembled and can be operational in a matter of minutes. The NexStar is conveniently packaged in one reusable shipping carton that contains all of the following accessories: ¼ • 25mm SMA Eyepiece – 1 "... -
Page 9: The Hand Control
Once the telescope is powered up, the hand control can be used to move the optical tube in altitude (up and down) and azimuth (side to side). Use the Up arrow directional button to move the telescope tube until it is roughly parallel to the ground. -
Page 10: The Star Pointer Finderscope
The Star Pointer Finderscope The Star Pointer is the quickest and easiest way to point your telescope exactly at a desired object in the sky. It's like having a laser pointer that you can shine directly onto the night sky. The Star Pointer is a zero magnification pointing tool that uses a coated glass window to superimpose the image of a small red dot onto the night sky. - Page 11 Without moving the main telescope, turn the Star Pointer's azimuth and altitude alignment controls until the red dot is directly over the alignment star. If the LED dot is brighter than the alignment star, it may make it difficult to see the star. Turn the variable brightness control counterclockwise, until the red dot is the same brightness as the alignment star.
-
Page 12: Hand Control
The NexStar 4 has a removable hand controller built into the side of the fork arm designed to give you instant access to all the functions the NexStar has to offer. With automatic slewing to over 4,000 objects, and common sense menu descriptions, even a beginner can master its variety of features in just a few observing sessions. -
Page 13: Hand Control Operation
The NexStar will then automatically choose two stars for alignment and roughly center the stars in the field of view of the Star Pointer. Before the telescope is ready to be aligned, it should be set up in an outside location with all accessories (eyepiece and Star Pointer) attached and lens cover removed as described in the Assembly section of the manual. - Page 14 Based on this information, the NexStar will automatically select a bright star that is above the horizon and slew towards it. At this point the telescope is only roughly aligned, so the alignment star should only be close to the field of view of the Star Pointer finder.
-
Page 15: Two Star Alignment
ENTER. The NexStar display will ask you to move the telescope tube until it is horizontal to the ground. To do this, use the direction keys (3) to move the telescope until it is roughly level with the ground. Press ENTER. -
Page 16: Nexstar Re-Alignment
Selecting an Object Now that the telescope is properly aligned, you can choose an object from any of the catalogs in the NexStar's extensive database. The hand control has a key designated for each of the catalogs in its database. There are two ways to select objects from the database: scrolling through the named object lists and entering object numbers. -
Page 17: Tour Mode
To see the next tour object, press the Down key. The NexStar has four direction buttons in the center of the hand control which control the telescope motion in altitude (up and down) and azimuth (left and right). The telescope can be controlled at nine different speed rates. -
Page 18: Setup Procedures
To use this feature, simply press the arrow button that corresponds to the direction that you want to move the telescope. While holding that button down, press the opposite directional button. This will increase the speed to the maximum slew rate. -
Page 19: Date/Time
The NexStar stores celestial objects to its database by saving its right ascension and declination in the sky. This way the same object can be found each time the telescope is aligned. Once a desired object is centered in the eyepiece, simply scroll to the "Save Sky Obj"... -
Page 20: Rs-232
Sets the limits in altitude that the telescope can slew without displaying a warning message. The slew limits prevent the telescope tube from slewing to an object below the horizon or slewing to an object that is high enough that the tube might hit one of the tripod legs. -
Page 21: Hand Control Command Tree
M ENU A L IG NM ENT T R ACK IN G M ODE A L T -A Z E Q N O R T H E Q S O U T H O F F R AT E S ID E R E A L S O L A R L U N A R V IE W T IM E -S IT E... -
Page 22: Telescope Basics
A telescope is an instrument that collects and focuses light. The nature of the optical design determines how the light is focused. Some telescopes, known as refractors, use lenses. Other telescopes, known as reflectors, use mirrors. The Maksutov-Cassegrain optical system uses a combination of mirrors and lenses and is referred to as a compound or catadioptric telescope. This unique design offers large-diameter optics while maintaining very short tube lengths, making them extremely portable. -
Page 23: Focusing
240 power. Although this is the maximum useful magnification, most observing is done in the range of 20 to 35 power for every inch of aperture which is 80 to 140 times for the NexStar telescope. -
Page 24: General Observing Hints
Never look through window glass. Glass found in household windows is optically imperfect, and as a result, may vary in thickness from one part of a window to the next. This inconsistency can and will affect the ability to focus your telescope. -
Page 25: Astronomy Basics
Up to this point, this manual covered the assembly and basic operation of your NexStar telescope. However, to understand your telescope more thoroughly , you need to know a little about the night sky. This section deals with observational astronomy in general and includes information on the night sky and polar alignment. -
Page 26: Motion Of The Stars
The daily motion of the Sun across the sky is familiar to even the most casual observer. This daily trek is not the Sun moving as early astronomers thought, but the result of the Earth's rotation. The Earth's rotation also causes the stars to do the same, scribing out a large circle as the Earth completes one rotation. -
Page 27: Polar Alignment ( With Optional Wedge )
To do an accurate polar alignment, the NexStar requires an optional equatorial wedge (#93658) between the telescope and a tripod. Celestron also offers a steel tripod with an attached wedge tilt plate (#93497). This allows the telescope's tracking motors to rotate the telescope around the celestial pole, the same way as the stars. Without the equatorial wedge, you would notice the stars in the eyepiece would slowly rotate around the center of the field of view. -
Page 28: Photography With The Nexstar 4
The camera must have interchangeable lenses so you can attach it to the telescope and so you can use a variety of lenses for piggyback photography. If you can't find a new camera, you can purchase a used camera body that is not 100-percent functional. - Page 29 Since the Little Dipper (technically called Ursa Minor) is not one of the brightest constellations in the sky, it may be difficult to locate from urban areas. If this is the case, use the two end stars in the bowl of the Big Dipper (the pointer stars).
-
Page 30: Celestial Observing
With your telescope set up, you are ready to use it for observing. This section covers visual observing hints for both solar system and deep sky objects as well as general observing conditions which will affect your ability to observe. -
Page 31: Observing The Sun
The best time to observe the Sun is in the early morning or late afternoon when the air is cooler. • To center the Sun without looking into the eyepiece, watch the shadow of the telescope tube until it forms a circular shadow. -
Page 32: Seeing
Seeing Seeing conditions refers to the stability of the atmosphere and directly affects the amount of fine detail seen in extended objects. The air in our atmosphere acts as a lens which bends and distorts incoming light rays. The amount of bending depends on air density. -
Page 33: Telescope Maintenance
This will prevent contaminants from entering the optical tube. Internal adjustments and cleaning should be done only by the Celestron service department. If your telescope is in need of internal cleaning, please call the factory for a return authorization number and price quote. -
Page 34: Optional Accessories
Adapter, Car Battery (#18769) - Carrying Case (#302080) - This case fits both the NexStar 4 and NexStar 5 and is made of sturdy ABS plastic. It is completely lined with pick-n-pluck foam for a customized and secure fit to safely transport and store your scope and accessories. - Page 35 Planisphere (#93720) - A simple and inexpensive tool for all levels of observers, from naked eye viewers to users of highly sophisticated telescopes. The Celestron Planisphere makes it easy to locate stars for observing and is a great planet finder as well.
- Page 36 This accessory is a must for long exposure prime focus photography. A full description of all Celestron accessories can be found in the Celestron Accessory Catalog (#93685).
-
Page 37: Appendix A - Technical Specifications
Near Focus standard eyepiece or camera Field of View: Standard Eyepiece : 35mm Camera Linear Field of View (at 1000 yds) Magnification: Standard Eyepiece : Camera Optical Tube Length Weight of Telescope Input Voltage Maximum Minimum Batteries Required Power Supply Requirements Motor: Type... -
Page 38: Appendix B - Glossary Of Terms
Sun against the stars". Equatorial mount A telescope mounting in which the instrument is set upon an axis which is parallel to the axis of the Earth; the angle of the axis must be equal to the observer's latitude. - Page 39 1 and those increasingly fainter from 2 down to magnitude 5. The faintest star that can be seen without a telescope is about magnitude 6. Each magnitude step corresponds to a ratio of 2.5 in brightness. Thus a star of magnitude 1 is 2.5 times brighter than a star of magnitude 2, and 100 times brighter than a magnitude 5 star.
- Page 40 Sidereal Rate This is the angular speed at which the Earth is rotating. Telescope tracking motors drive the telescope at this rate. The rate is 15 arc seconds per second or 15 degrees per hour. Terminator The boundary line between the light and dark portion of the moon or a planet.
-
Page 41: Appendix C - Maps Of Time Zones
– –... - Page 49 CELESTRON ONE YEAR WARRANTY Celestron International (CI) warrants this telescope to be free from defects in materials and workmanship for one year. CI will repair or replace such product or part thereof which, upon inspection by CI, is found to be defective in materials or workmanship.
- Page 50 Celestron International 2835 Columbia Street Torrance, CA 90503 Tel. (310) 328-9560 Fax. (310) 212-5835 Web site at http//www.celestron.com Copyright 2001 Celestron International All rights reserved. (Products or instructions may change without notice or obligation.) This device complies with Part 15 of the FCC Rule. Operation is subject to the following...
Need help?
Do you have a question about the NEXSTAR 4 and is the answer not in the manual?
Questions and answers