
Related Manuals for URC URCTKP7600


Summary of Contents for URC URCTKP7600
- Page 1 Order Number : GETEC-C1-16-250 FCC Part 15 Certification Test Report Number : GETEC-E3-16-027 Page 1 / 1 APPENDIX G : USER’S MANUAL EUT Type: Network Keypad FCC ID.: OZ5URCTKP7600...
- Page 2 TKP-7600 Network Keypad...
-
Page 3: Introducing The Tkp-7600
Easily communicate throughout your home using the Audio Video Intercom feature with multiple TKP-7600 clients and/or URC Mobile app clients. You can also make sure the baby is safe and sound by viewing the baby monitor right on the TKP-7600. -
Page 4: Parts List
Rooms Menu With the touch of a single button, take control of your domain. Besides the ability to temporarily link the different rooms/areas of your system for music listening, the Rooms Menu offers a snapshot of “what’s going on” in every room of your Total Control system. Better yet, tapping on a room converts your keypad into a controller for THAT room. -
Page 5: Installing The Tkp-7600
Installing the TKP-7600 The TKP-7600 is wall-mountable and fits into a standard dual gang (J-box or Mud Ring) opening. Prior to installation, make sure power is available at the preferred location. Power can be supplied to the TKP-7600 through an Ethernet ( ) cable connected to a PoE ) or in either of the following ways: ●... -
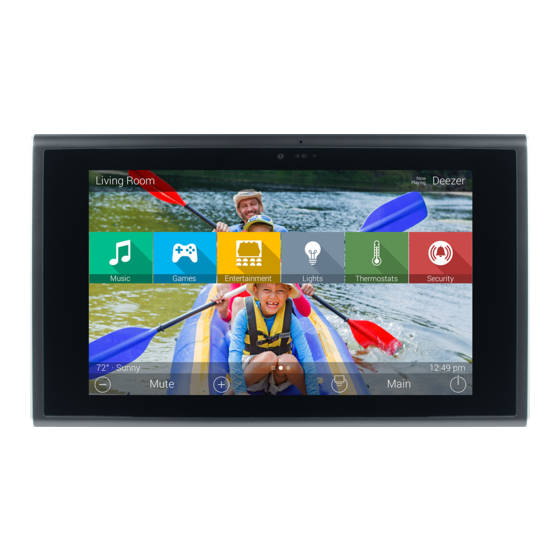
Page 6: Main Menu Navigation
Main Menu Navigation Although specific screen design and certain options are dictated by the custom integrator that programmed the Total Control system, the general layout remains the same. Actual navigation is performed through screen swipes ( ) while selecting any item is as simple as pressing the icon/text to be selected. -
Page 7: Title Bar
● The Now Playing display shows the device that is being used (in this case, William’s iPod), associated artwork, and metadata information is displayed since it is a URC media device. ● If an activity is being performed (like DVD or cable) in the selected room, the Now Playing... -
Page 8: Category/Device Ribbon
Category/Device Ribbon This ribbon shows the various categories of control that are available to the selected room. The quantity of categories is determined by the system setup and can vary from one to however many categories were programmed by the system designer. Although only seven categories can fit on the screen at any moment, navigate to other categories ) by swiping left or right. -
Page 9: Status Bar
Sunset Time: Updated at midnight every day, this shows the sunset time for the next day. URC Thermostat Temperature: If a THZ-100 (URC’s thermostat) is included in the home, this shows the current temperature status based upon the internal sensor, additional sensor, or the mean temperature of both. -
Page 10: Core Buttons
Core Buttons These key system navigation buttons always are present at the bottom of the screen. Vol-, Vol+, & Mute These audio controls affect the volume for the room to which the TKP-7600 is assigned. See the Rooms Menu section of this manual for more details. Main Selecting this button always returns the user to the Main screen. - Page 11 Power When pressed, this performs the Room Off function programmed by the Custom Integrator. If this button is pressed for greater than three (3) seconds, the Power Menu appears. In this menu, it is possible to: ● Turn Off the ROOM ( ●...
-
Page 12: Audio Video Intercom Menu
Audio Video Intercom Menu The Intercom module communicates with other installed TKP-7600’s via audio, audio & video, or a baby monitor. In order to use the intercom it must first be enabled within the Settings screen. Using the Intercom 1. Touch the screen and navigate through the Category ribbon (scroll left or right) to locate the Intercom icon. - Page 13 After selecting an option, the TKP-7600 turns the unit’s camera ON ( ) displaying an onscreen image of the selected client. Increase/ Press to decrease or mute call. volume 6. Pressing the End Call button displays an onscreen message concluding the call.
-
Page 14: Using Audio Broadcast
Using Audio Broadcast Simultaneously communicate to two or more TKP-7600 clients. 1. Touch the screen and navigate through the Category ribbon (scroll left or right) to locate the Intercom icon. 2. Press the Intercom icon. 3. Select Audio Broadcast. 4. Select available clients from the Audio Broadcast call list and press Ok to begin the intercom call. -
Page 15: Using Do Not Disturb
Using Do Not Disturb Turning ON Do Not Disturb Setting the TKP-7600 to do not disturb renders the client unavailable for intercom communication with other clients. This icon states the client is currently set to Do Not Disturb 1. Touch the screen and navigate through the Category ribbon ( ) to locate the Intercom Icon. -
Page 16: Rooms Menu
Rooms Menu The Rooms Menu is the “landing” screen for the TKP-7600. This menu (see picture below) displays whenever the keypad reboots, loses/regains power, or is rest. The most common choice would be to select the room where the TKP-7600 is physically located; however, this is up to the user. The Rooms Menu is used to: ●... - Page 17 Initial View (Room Monitoring) When the Rooms Menu opens up, the room list populates with all of the rooms in the Total Control project. Each room displays its status so the user can visually see what is “going on” in that room.
-
Page 18: Linking Rooms (Dms Audio Only)
Linking Rooms (DMS Audio only) Selecting the Link Rooms button opens up the Link Rooms screen with the current room already selected. Only rooms/areas that are part of the DMS family of products appear on this menu. ● Select, using the check boxes, the rooms that you would like to LINK. Pressing the check bo alternately “check”... - Page 19 Selecting the Room Options button for a room causes the menu to expand and offer the user various options to control the room. ● Lights Off: If the URC controlled lights are located in the selected room, the Options menu displays a light bulb icon. Selecting this icon issues a “lights off” command for the chosen room.
-
Page 20: Time & Weather Module
Time & Weather Module This module displays information about the time, date, and local weather. Pressing the Time, Date & Weather display in the Title Bar of the TKP-7600 opens the Time & Weather Module. ● Selecting Exit returns the TKP-7600 to the previous screen. ●... -
Page 21: Shortcuts Pop-Up
Shortcuts Pop-Up The Shortcuts Pop-Up menu is designed to give the user the ability to select their most frequently used devices/activities and place them within an easy to reach menu. There are a maximum of six (6) shortcuts per room location. Remember, regardless of the physical location of the TKP-7600 it may still access, via the Rooms Menu, any of the other rooms in the Total Control system (dependent upon programming). - Page 22 Select up to 6 devices/activities by selecting the check box shown for each possibility. Once all 6 are chosen, the remaining devices/activities are grayed out to show there are no more choices to be made. Reorder devices by selecting the reorder icon at the top of the Add/Edit window; this opens the reorder Items list.
-
Page 23: Proximity Sensor
Proximity Sensor Built into the TKP-7600 the Proximity Sensor automatically detects the distance a user is from the keypad to illuminate and be ready for control. The sensitivity of this sensor can be easily adjusted from the Settings menu. ● Sensor sensitivity can be adjusted between 5cm to 100cm ●... - Page 24 Adjusting User Settings on the TKP-7600 By pressing and holding the Main and Mute buttons for 5 seconds ( simultaneously the TKP-7600 Settings Menu appears. Simultaneously press both the Main and Mute buttons to activate the Settings Menu. Settings Menu The Settings Menu allows you to adjust some basic parameters of the TKP-7600 keypad.
-
Page 25: Sleep Settings
Sleep Settings Decide upon the option that best fits the current needs. LCD Screen is always ON: This option keeps the LCD screen illuminated at all times. LCD Screen will turn OFF: This option allows the user to decide on the amount of time that the LCD screen will remain illuminated after it is last used. - Page 26 General The General settings screen allows for setting the Time, Date and decide on the scale used to display the temperature( ). To view the rest of the General settings menu, be sure to scroll up/down. Using the arrow found at the left and right sides of each property ( adjusts the value up, or down, respectively.
- Page 27 Sound By default, the TKP-7500 emits a low volume beep as a confirmation tone for screen presses. Use this menu to adjust the sound to your liking. Use the + /– buttons or drag the slider to raise or lower the volume. Selecting OK accepts any changes made and returns to the Main menu, as well as selecting Cancel returns the user to the Main menu, without incorporating any changes.
- Page 28 Brightness Determine the overall brightness of the TKP-7500's display, or incorporate a light sensor that adjusts the brightness of the unit based upon ambient room lighting. Use the + /– buttons or drag the slider to raise or lower the brightness. Selecting Enable Light Sensor disables the Brightness Level selection and dynamically adjust the LCD brightness based upon the ambient room lighting detected by the light sensor.
- Page 29 System Although none of the information can be modified, these System Pages will show important information about your TKP-7600. These pages should only be needed by a custom install professional, or technical support.
- Page 30 Network This option shows important information about the current network, its settings and give the ability to edit the IP address of the TKP-7600. Be careful, these settings should only be edited by a professional. Entering values without specific information or instruction could easily result in the TKP-7600 failing to function correctly. The Network Information screen displays the status of the network connection ( ) as well as the current address type ( ), IP address and Subnet Mask.
-
Page 31: Audio-Video Intercom
Audio-Video Intercom The Audio-Video Intercom Settings screen allows you to set the Intercom function. You can enable or disable your video, select from a list of notification sounds and adjust the volume. You can also check if your baby is safe through one-way video communication by enabling the Baby Monitor. Enable Intercom: Enables the audio intercom function. -
Page 32: Factory Default
Factory Default This should only be attempted by a custom install professional that is familiar with Total Control, or under instruction from the manufacturer. Selecting this option will reset the TKP-7600 to factory default and the unit WILL NOT work until reprogrammed! -
Page 33: Specifications
Specifications Microprocessor: Coretex-A9 dual 1GHz Memory: 4GB eMMC, 1GB RAM Devices: Supports up to 255 Devices Pages: Supports up to 255 Pages on each Device Macro Capability: Up to 255 steps Network: One 10/100 Ethernet port (PoE) LCD : 7 inch (1280x800 ) Weight: 10.51 oz Size: 7.91"... - Page 34 Federal Communications Commissions (“FCC”) regarding electromagnetic interference caused by electronic/computing devices and to the extent that the URC equipment and/or the URC software fails to so comply, URC shall, at its own expense, take all reasonable measures to promptly cause such to comply.
- Page 35 It is likely that such data, software, or other materials will be lost during service and URC will not be responsible for any such damage or loss. A dated purchase receipt, bill of sale, installation contract or other verifiable proof of purchase is required. For the URC equipment support and other important information, please visit URC's website available at www.universalremote.com or call the Customer Service Center at (914) 835-4484.
-
Page 36: End User Agreement
MAY HAVE OTHER RIGHTS WHICH VARY FROM STATE TO STATE OR JURISDICTION TO JURISDICTION. End User Agreement The terms and conditions of the End User Agreement available at www.universalremote.com/eua.php shall apply. Federal Communication Commission Interference Statement This equipment has been tested and found to comply with the limits for a Class B digital device, pursuant to part 15 of the FCC Rules. -
Page 37: Regulatory Information To The User
Regulatory Information to the user ● CE conformity Notice Products with “CE” marking comply EMC Directive 2004/108/EC issued by the commission of the European Community. 1. EMC Directive ❑Emission :EN 55022 ❑Immunity :EN 55024 ❑Power :EN-61000-3-2, 3 ● Declaration of Conformity “Hereby, Universal Remote Control Inc. - Page 38 Declaration of Conformity Company Name Universal R emote Control Inc. Company Address 500 Mamaroneck Avenue, Harrison, NY 10528, U.S .A www.universalremote.com Contact Information Phone: (914)835-4484 F ax: (914)835-4532 Brand Name UNIVE R S AL remote control Product Name Network Keypad Model Name TKP-7600 This product herewith complies with the requirements of E MC Directive (2004/108/E C)
Need help?
Do you have a question about the URCTKP7600 and is the answer not in the manual?
Questions and answers