Table of Contents
Advertisement
Available languages
Available languages
Quick Links
GCSTSP6201, GCSTSP6202,
MODELOS
GCSTSP6203, GCSTSP6204,
MODELS
GCSTSP6205, GCSTSP6206
& GCSTSP6212
Manual de Instrucciones
PLANCHA DE VAPOR CON
TECNOLOGÍA AVANZADA DE VAPOR
SUELA CERÁMICA
LEA TODAS LAS INSTRUCCIONES ANTES DE USAR ESTE APARATO
Instruction Manual
STEAM IRON WITH
ADVANCED STEAM TECHNOLOGY
CERAMIC SOLEPLATE
PLEASE READ ALL INSTRUCTIONS BEFORE USING THIS APPLIANCE
Advertisement
Table of Contents

Subscribe to Our Youtube Channel
Related Manuals for Oster GCSTSP6212


Summary of Contents for Oster GCSTSP6212
- Page 1 GCSTSP6201, GCSTSP6202, MODELOS GCSTSP6203, GCSTSP6204, MODELS GCSTSP6205, GCSTSP6206 & GCSTSP6212 Manual de Instrucciones PLANCHA DE VAPOR CON TECNOLOGÍA AVANZADA DE VAPOR SUELA CERÁMICA LEA TODAS LAS INSTRUCCIONES ANTES DE USAR ESTE APARATO Instruction Manual STEAM IRON WITH ADVANCED STEAM TECHNOLOGY...
-
Page 2: Precauciones Importantes
PRECAUCIONES IMPORTANTES Cuando se utilizan electrodomésticos, siempre debe de seguir algunas medidas básicas de seguridad, incluyendo las siguientes: LEA TODAS LAS INSTRUCCIONES ANTES DE USAR LA PLANCHA DE VAPOR. 1. La plancha siempre debe de estar apagada con su control en la posición “Apagado” antes de ser conectada o desconectada del tomacorriente. - Page 3 19. Para evitar sobrecargar los circuitos, nunca use otro artefacto de alta potencia (watts) en el mismo circuito. 20. El fabricante no es responsable por los daños causados si se usa la unidad para un propósito distinto para el cual se creó o por el uso incorrecto. 21.
-
Page 4: Descripción De La Unidad
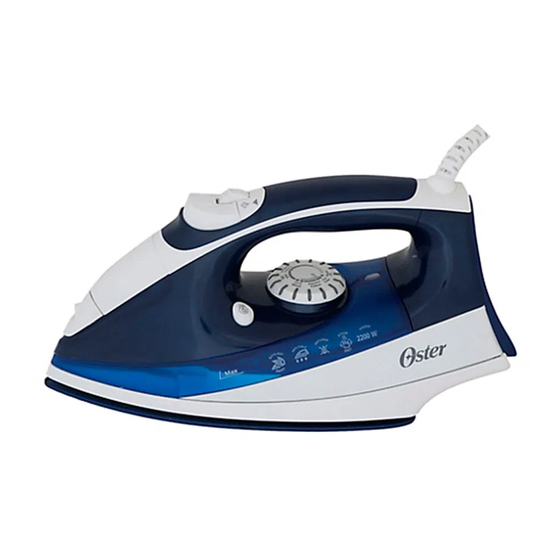
DESCRIPCIÓN DE LA UNIDAD 1. Tapa del tanque de agua 8. Luz indicadora 2. Botón de rocío fino 9. Amplia base de soporte 3. Vapor de doble uso 10. Suela de Cerámica con nano hendiduras cóncavas y plexo canales 4. Selector de vapor 11. -
Page 5: Antes De Usar Por Primera Vez
Antes de Usar Por Primera Vez • Cuando use la plancha de vapor por primera vez, pruébela con un pedazo de tela inservible para controlar que la base y el tanque de agua estén bien limpios. • Posiblemente observe un poco de humo o perciba un olor leve proveniente de la plancha al usarla por primera vez. -
Page 6: Planchado En Seco
Llenando Con Agua • Apague la plancha y desconecte la clavija del tomacorriente antes de llenar la plancha con agua. • Asegúrese de que el selector de vapor se encuentre en la posición de cerrado • Ponga la plancha en la posición indicada (figura 2) y llénela con agua con cuidado para que no pase del nivel máximo en la ventana visora del tanque de agua. -
Page 7: Golpe De Vapor
• Espere hasta que la luz indicadora se encienda y se apague de nuevo. • Ajuste el selector de vapor al nivel de vapor deseado. Ahora la plancha estará lista para que usted empiece a planchar a vapor. El vapor será liberado de forma uniforme por los orificios localizados en la base de la plancha para un planchado más fácil. - Page 8 Golpe de Vapor Vertical La función de vapor vertical permite que su plancha funcione como vaporizador para prendas. Consejo: Cuando use el vapor vertical sobre las prendas, cuélguelas de una percha para obtener mejores resultados. También se puede usar en cortinas y cortinados colgados.
-
Page 9: Sistema Antigoteo
Tabla Guía de Temperaturas Temperatura Tipo de Tejido Material de la Fibra sintético acrílico, modacril, polipropileno, poliuretano sintético acetato, triacetato sintético metalizado, cupro, poliamide (nylon), poliéster, modal, viscosa, rayón seda seda lana lana algodón algodón lino lino en la etiqueta significa que esta prenda no puede plancharse (por ejemplo: clorofibra, elastodieno) Nueva Tecnología de Suela con Nano Hendiduras Cóncavas y Plexo Canales... -
Page 10: Mantenimiento Y Limpieza
• La Plancha no necesita ningún otro mantenimiento que no sea el recomendado en las instrucciones de este manual. Si por cualquier razón su plancha de vapor requiere reparación, no intente repararla. Llévela a un Centro de Servicio Oster Autorizado. E s p a ñ o l -9... - Page 11 USO DE LA FUNCIÓN DE AUTOLIMPIEZA Debe utilizar la función de autolimpieza para mantener el rendimiento óptimo de su plancha. La función de autolimpieza va a limpiar el tanque de agua y la acumulación de minerales, polvo o pelusas de los orificios de vapor. Para utilizar la función de autolimpieza: 1.
-
Page 12: Important Safeguards
IMPORTANT SAFEGUARDS When using electrical appliances, basic safety instructions should always be followed, including the following: READ ALL INSTRUCTIONS BEFORE USING THE STEAM IRON. 1. The Iron should always be turned to the “OFF” position before plugging or unplugging from outlet. Never yank Cord to disconnect from outlet; grasp Plug and pull to disconnect. - Page 13 20. The manufacturer is not liable for any damages, which are caused by using the appliance incorrectly or for any other purpose than that intended. 21. If an extension cord is absolutely necessary, a cord with the same amperage or higher than that of your iron should be used.
-
Page 14: Description Of The Appliance
DESCRIPTION OF THE APPLIANCE 1. Water Reservoir Lid 8. Indicator Light 2. Spray Mist Button 9. Wide Heel Rest 3. Dual Shot of Steam Button 10. Ceramic Soleplate with Dimpling and Channeling 4. Steam Select Switch 11. Self Clean Button 5. -
Page 15: Before First Use
Before First Use • When using the Iron for the first time, test it on a piece of old cloth to be sure that the Soleplate and the Water Reservoir are clean. • It is possible that the Iron will discharge some smoke or give off a slight odor during its first usage. -
Page 16: Filling With Water
Filling With Water • Turn off the Iron and disconnect the plug from the electrical wall outlet before filling the Iron with water. • Turn the Steam Select Switch to the closed position • Set the Iron in the position indicated below (figure 2) and fill it with water, no higher than the Max fill level shown on the See Through Water Window. -
Page 17: Spray Mist
• Wait until the Indicator Light has turned off after lighting up. • Set the Steam Select Switch to the desired steam level position (figure 3). You are now ready to start steam ironing. The steam will be released evenly through vents located in the soleplate for easier ironing. -
Page 18: Vertical Shot Of Steam
Vertical Shot of Steam The vertical shot steam feature allows your iron to function as a garment steamer. Tip: When using the vertical shot of steam on clothing, hang the clothing on a clothes hanger for best results. Hanging curtains and drapes may also be steamed. How to use Vertical Steam: 1. -
Page 19: Temperature Settings Table
Temperature Settings Table Temperature Control Dial Kind of Textile Fiber Material synthetic Acrylic, modacryl polypropylene, polyurethane acetate, triacetate synthetic metalized, cupro, polyamide (nylon), synthetic polyester silk silk wool wool cotton cotton linen linen on the label means: This article cannot be ironed (e.g. chlorofiber, elastodiene) New Soleplate Dimpling and Channeling Technology New steam dimpling and channeling technology incorporates principles of aerodynamics... -
Page 20: Maintenance And Cleaning
Way Auto-Off Feature (Models GCSTSP6202, GCSTSP6203, GCSTSP6204, GCSTSP6205, GCSTSP6206 & GCSTSP6212) When the iron is plugged in, the Power Indicator will light steadily, indicating that there is power to the iron. IF YOU LEAVE THE IRON: • in a horizontal position without moving it, or accidentally tip the iron over, it will automatically stop heating after 30 seconds. -
Page 21: Self-Cleaning Feature
Self-Cleaning Feature You should use the Self-Cleaning feature to maintain the optimal performance of your iron. The Self Cleaning feature will clean the water reservoir and steam vents of accumulated minerals, dust and lint. TO USE THE SELF-CLEANING FEATURE: 1. Move the Steam Control back and forth several times to remove debris and minerals from the steam valve. - Page 22 ® MODELOS: GCSTSP6201, GCSTSP6201-013, GCSTSP6202, GCSTSP6202-013, GCSTSP6203, GCSTSP6203-013, GCSTSP6204, GCSTSP6204-013, GCSTSP6205, GCSTSP6205-013, GCSTSP6206, GCSTSP6206-013, GCSTSP6212 , GCSTSP6212-013 LEA EL INSTRUCTIVO ANTES DE USAR EL APARATO LA SIGUIENTE INFORMACIÓN ES PARA MÉXICO: IMPORTADOR: NEWELL BRANDS DE MÉXICO S.A. DE C.V. AVE. JUÁREZ Nº 40-201, COLONIA EX HACIENDA SANTA MÓNICA, TLALNEPANTLA 54050, ESTADO DE MÉXICO...
Need help?
Do you have a question about the GCSTSP6212 and is the answer not in the manual?
Questions and answers