
Related Manuals for MiWire SeaWire Pro

Summary of Contents for MiWire SeaWire Pro
- Page 1 User Guide SeaWire Pro UserGuide_SeaWirePro_Rev.1.02 Developed and produced by MiWire ApS, Denmark Diplomvej 381, DK-2800 Kongens Lyngby Phone: +45 82 820 820, E-mail: info@miwire.net...
-
Page 3: Table Of Contents
STEP 1 – Inserting the Micro-SIM card ................... 8 STEP 2 – Preparing mounting bracket and connecting the ethernet cable......9 STEP 3 – Mounting the SeaWire Pro..................10 STEP 4 – Cable wiring ......................11 STEP 5 – Powering the RouDems ..................11 STEP 6 –... -
Page 4: Introduction
User Guide SeaWire Pro Introduction Thank you for purchasing SeaWire Pro. The SeaWire Pro makes it possible to extend the reach of mobile networks in coastal areas with an automatic directional turning antenna. The SeaWire Pro solution is a configuration of 2x automatic turning directional antennas (SeaWire RouDem) and a 19”... -
Page 5: Package Content
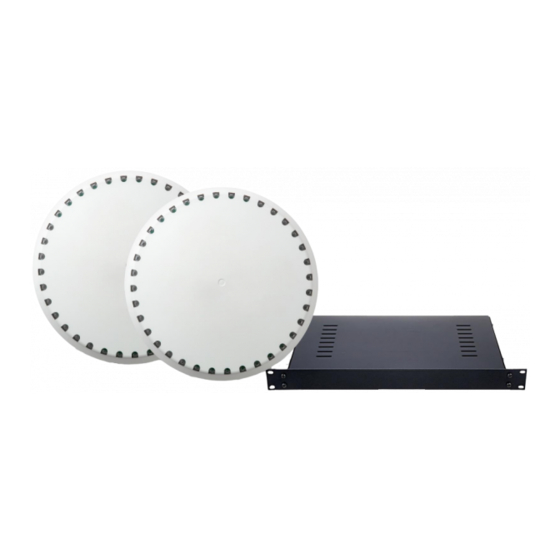
Introduction User Guide SeaWire Pro Package Content Name Picture Quantity SeaWire RouDem 1x IP 192.168.2.1 1x IP 192.168.3.1 Mounting Bracket 19’’ BDU Pro including rack assembly items BDU Power Cable 100-240V Screws M4x16mm Unbraco 4 Key Torx 10 Key Privacy Policy... -
Page 6: Requirements
User Guide SeaWire Pro Requirements • Data subscription To receive data via the SeaWire Pro solution you must have subscription with a data provider and a SIM card. • Cable(s) The package content DOES NOT include cables for cable run installations. To install... -
Page 7: Hardware Overview
Introduction User Guide SeaWire Pro Hardware Overview IMPORTANT: Read PORTS SEAWIRE ROUDEM Step 1 in the section about Installation of the SeaWire RouDem. ❶ SIM card slot The slot is a Micro-SIM slot used for the SIM card from the data provider. The SIM card slot is a click system. -
Page 8: Led's
Green: When the device is ready for use the LED will light green. It indicates the direction of the operator tower it is connected to. It is possible to turn off the LED. See how in the section MiWire user interface > SIM > LED Settings MiWire ApS... -
Page 9: Bdu Pro
BDU PRO System State Status Flashing White Bootup in progress Ready for use, not connected to MiWire White Network Management System (NMS) Blue Ready for use, connected to NMS. Ready for use, unable to connect to NMS, Steady Blue with Occasional Flashing check connection to UNMS server. -
Page 10: Installation Of The Seawire Pro
User Guide SeaWire Pro Installation of the SeaWire Pro The SeaWire Pro solution is a configuration of 2x automatic turning directional antennas (SeaWire RouDem) and a Below Deck Unit (BDU). Repeat step 1-4 for each SeaWire RouDem. STEP 1 – INSERTING THE MICRO-SIM CARD You find the SIM card slot at the bottom of the RouDem. -
Page 11: Step 2 - Preparing Mounting Bracket And Connecting The Ethernet Cable
Installation of the SeaWire Pro User Guide SeaWire Pro STEP 2 – PREPARING MOUNTING BRACKET AND CONNECTING THE ETHERNET CABLE IMPORTANT: It is required to mount the mounting bracket to avoid humidity and dirt entering the RouDem. 1. Pass the cable through the cable gland. -
Page 12: Step 3 - Mounting The Seawire Pro
Installation of the SeaWire Pro User Guide SeaWire Pro STEP 3 – MOUNTING THE SEAWIRE PRO In the following you can see examples of installation on different types of vessels. The installation examples are for inspiration. Before installing each SeaWire RouDem permanently you should determine the suitability of the location for installing. -
Page 13: Step 4 - Cable Wiring
Installation of the SeaWire Pro User Guide SeaWire Pro STEP 4 – CABLE WIRING Cable wiring considerations: • Where possible avoid routing the cables near other electrical equipment and cables. • If possible, all cable routing must be done in a cable duct. -
Page 14: Step 6 - Configuration Of Internet Via Seawire Roudem
The device will automatically search for available WiFi networks (make sure WiFi is on). 2. Choose the WiFi network with the name containing MiWire. The SSID (network name) and WiFi key. Find the information on the unit label, which is found under the RouDem, on the box or on the registration flyer. -
Page 15: Miwire User Interface
User Guide SeaWire Pro MiWire user interface After installation of the SeaWire Pro solution has been performed, the system is fully operational. In this section there will be a description of system settings which are configurable from the Web Server/MiWire user interface. - Page 16 Installation of the SeaWire Pro User Guide SeaWire Pro Status The status page presents an overall status of the RouDem. The lamps in the left side can light red, yellow, and green (see the Troubleshoot section if some of the lamps are red). The right side shows unique information for the specific RouDem.
- Page 17 Installation of the SeaWire Pro User Guide SeaWire Pro Ethernet IPv4 Address Change of IP address. 192.168.2.1 (default) IPv4 Netmask Change of netmask. 255.255.255.0 (default) DHCP Start IP Address 10 (default) Address Limit 100 (default) IP Range Result of values in Start IP Address and...
- Page 18 Installation of the SeaWire Pro User Guide SeaWire Pro Network operator Scan mode Select between: 4G-LTE Only (default) LTW-HS (High Speed) LTE-800 LTE-1800 LTE-2100 LTE-2600 Auto 4G/3G 3G WCDMA Only Network Discovery Roaming Turn Roaming ON (default)/OFF APN List Select between:...
- Page 19 Installation of the SeaWire Pro User Guide SeaWire Pro Status ICCID (Integrated Circuit Card ID) IMSI (International Mobile Subscriber Identity) PIN Attempts PUK Attempts Enable / Disable PIN Protection Enable or disable PIN. Disabled (default). For your convenience, we recommend disabling the PIN, as you will otherwise need to enter the PIN every time the device is rebooted or updated.
- Page 20 Installation of the SeaWire Pro User Guide SeaWire Pro Heading Enter value to fix antenna direction, enter -1 to unfix it. Depending on the software version the heading will be reset if you reboot the device. Admin Change Password New Password/Repeat Password Change password for MiWire user interface.
-
Page 21: Specifications
Specifications User Guide SeaWire Pro Specifications SeaWire RouDem CAT6 Dimensions Ø335mm x (H1)80mm/(H2)160mm Weight 1.8 kg with mounting bracket 2.1 kg Networking Interface 10/100 Mbps Button On/off Power Method Passive POE 22-48V, Max 0.5A Power Supply 100-240VAC, 47-63Hz, 24W 48VDC, 500mA... -
Page 22: Faq/Troubleshoot
• Check whether you must enter the PIN The LED light on the RouDem is Red code. Go to MiWire user interface and see if the message on the status page in front of SIM says to enter the pin code. If so, go to the SIM page and enable the PIN code. - Page 23 User Guide SeaWire Pro network. This can be resolved by moving the device outdoors and up so that it has a clear line of sight through 360 degrees. • If the indicator is red, this is because there are problems with the data subscription.
-
Page 24: Service & Repair
Before contacting your dealer/distributor, please identify the product. Find the serial number and IMEI number on the unit label, which is found under the RouDem, on the box or on the registration flyer. Alternatively log on MiWire user interface and read out the serial number or IMEI number.
Need help?
Do you have a question about the SeaWire Pro and is the answer not in the manual?
Questions and answers