Advertisement
Available languages
Available languages
Quick Links
Anleitung / Manual
EAN-0065
Vor dem Umbau am Fahrzeug muss das Fahrzeug, laut Herstellerangaben, stromlos gemacht
werden. Sollte laut Werksangaben die Batterie nicht abgeschlossen werden dürfen, so sollte sich
zumindest das Fahrzeug im Ruhemodus befinden.
Die Lüftungsdüsen links und rechts ausbauen
Die 4 Schrauben von der Blende lösen
Die Blende mit den Ablagefächern herausnehmen bzw. das Originalradio ausbauen
© PMA Mobile Electronics
Advertisement

Related Manuals for RTA 700.0701.0011

Summary of Contents for RTA 700.0701.0011
- Page 1 Anleitung / Manual EAN-0065 This manual contains the languages German and English Ladeablage CARica Fiat Ducato Serie 8 Vor dem Umbau am Fahrzeug muss das Fahrzeug, laut Herstellerangaben, stromlos gemacht werden. Sollte laut Werksangaben die Batterie nicht abgeschlossen werden dürfen, so sollte sich zumindest das Fahrzeug im Ruhemodus befinden.
- Page 2 Anleitung / Manual EAN-0065 Ausbau der Ablage am Armaturenbrett Originale Ablage entfernen: Die 2 vorderen Schrauben lösen. Diese befinden sich unterhalb der originalen Ablage (mit roten Pfeilen markiert). Anschließend kann die Ablage nach oben herausgenommen werden. Ausbau des Notizblock-Tablet-Halters Ausbau vom Notizblock-Tablet-Halter Die 2 vorderen Schrauben lösen.
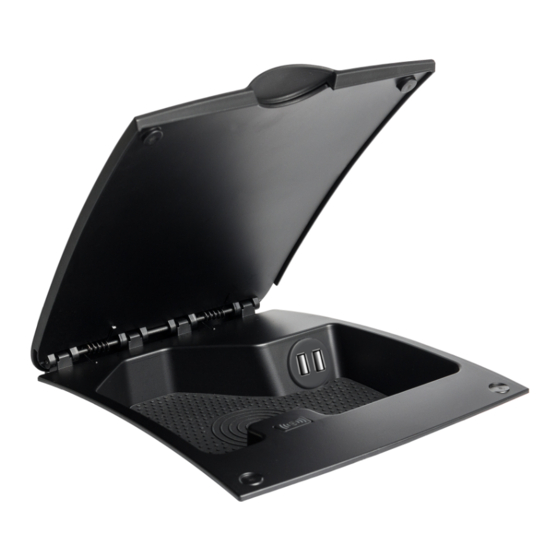
- Page 3 Anleitung / Manual EAN-0065 Vorbereitung der CARica zum Einbau CARica Zusatzfunktionen installieren: Je nach Konfiguration liegt ein USB-Verlängerungskabel mit einem 2. Steckanschluss bei. Das Kabel mit den Steckern durch die Öffnung führen. Die Buchsen müssen bündig mit der CARica abschließen. Danach von hinten den beiliegenden Schraubring anbringen und mit der Hand festziehen. Es wird empfohlen die Buchsen horizontal anzubringen! Wichtig: Optional kann die CARica auch verschraubt werden.
- Page 4 Anleitung / Manual EAN-0065 © PMA Mobile Electronics Seite 4 von 12...
- Page 5 Anleitung / Manual EAN-0065 CARica anschließen und einsetzen: Das Kabel von der CARica mit dem Kabelsatz im Radioschacht verbinden (Rotes Kabel mit rotem Kabel, schwarzes Kabel mit schwarzem Kabel verbinden) Die Zusatzkabel anschließen und die CARica in die Aussparung des originalen Ablagefaches einsetzen. Hierzu zunächst die hintere Seite mit den Führungsstiften einführen.
- Page 6 Anleitung / Manual EAN-0065 Optional kann die CARica mit den Originalschrauben verschraubt werden. LED Anzeige: Die LED kann ich 3 verschiedenen Farben aufleuchten. Folgend werden die Bedeutungen erläutert. Grün Blau Bereit zum laden Wird geladen Störung Nach erfolgreichem Funktionstest kann das Armaturenbrett in umgekehrter Reihenfolge wieder zusammengebaut werden.
- Page 7 Anleitung / Manual EAN-0065 Charging Tray CARica Fiat Ducato Series 8 Before rebuilding the vehicle, the vehicle must be de-energized according to the manufacturer`s instructions. If, according to the factory information, the battery should not be disconnected, the vehicle should at least be in sleep mode.
- Page 8 Anleitung / Manual EAN-0065 Remove the original tray Removal procedure: Unscrew the 2 front-screws as shown with the red arrows below. After these screws have been taken off the tray can be simply released as shown in the pic below. Remove the Paper pad- or Tablet holder Removal procedure Unscrew the 2 front-screws located underneath the tablet holder.
- Page 9 Anleitung / Manual EAN-0065 Preparing the CARica installation Install in first place the accessories: Depending on the set configuration there is an extension wire included. Pull the wire with its connectors through the hole. The plugs have to be set flat with the charging unit. Use the enclosed screw ring from behind and tighten it safely by hand.
- Page 10 Anleitung / Manual EAN-0065 © PMA Mobile Electronics Seite 10 von 12...
- Page 11 Anleitung / Manual EAN-0065 Insert CARica in place and connect it: Then connect the CARica cables with the one routed from the cigarette lighter connection. (Connect red cable with red cable & black cable with black cable). Connect the additional cables and insert the CARica into the recess of the original storage compartment. First insert the rear side with the guide pins.
- Page 12 Anleitung / Manual EAN-0065 Optionally, the CARica can be screwed with the original screws. LED Display: The LED will light up in 3 different colours. The meanings are explained below. GREEN BLUE Ready to charge Unit is charging Fault After a successful test, the dashboard can be reassembled in reverse order. Remove the protective film from the anti-slide pads.
Need help?
Do you have a question about the 700.0701.0011 and is the answer not in the manual?
Questions and answers