Advertisement
Installation notes for EVO 4/G-Dash or EVO 4/MXL-Dash and SmartyCam HD
1) The components are pre-configured. Here are more details, tips and hints.
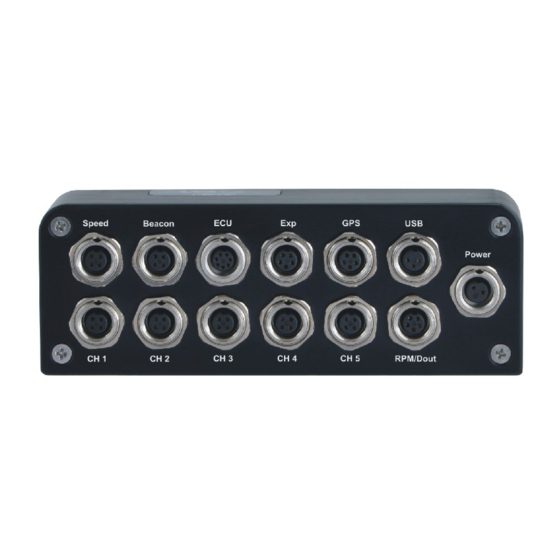
The Data Hub plugs into the Exp port on the EVO 4 and should be located as close to the G-
Dash or MXL-Dash display as possible. The TP (throttle position sensor) should be connected
to an extension cable and the metal end connected to the channel listed on the printout included
with the order. The BP (brake pressure sensor) should be connected to an extension cable and
the metal end connected to the channel listed on the printout included with the order. The cable
from the SmartyCam EXT port should connect to any open port on the Data Hub. The G-Dash
or MXL-Dash coiled cord should connect to any open port on the Data Hub. There is an optional
extension cable for the G-Dash from the Data Hub. The download cable (three pin metal screw
connector with the EVO 4) should be connected to the Usb port on the EVO 4 and left in the car
for convenient download.
There are two connector cables with unterminated (bare wire) ends in the EVO 4 box. One is
labeled CAN- and CAN+, RS-232 and is not used for older cars. The other, labeled 4-50V,
150-400V and has a lead labeled "output" is used to connect to the tach lead. Use the 4-50V
blue lead to connect to the back of the instrument cluster to the tach lead or an MSD tach output
(preferred) OR use the 150-450V for connection to the low side of the coil as a last resort.
2) The SmartyCam HD should be mounted using the RAM mount clamping to the diagonal of
the roll bar in the plane of the main hoop at driver's eye level. It should be mounted right of
centerline facing forward and aimed slightly down (10-15 degrees from level) towards the
centerline of the car.
Advertisement
Table of Contents

Related Manuals for Aim EVO 4/G-Dash


Summary of Contents for Aim EVO 4/G-Dash
- Page 1 Installation notes for EVO 4/G-Dash or EVO 4/MXL-Dash and SmartyCam HD 1) The components are pre-configured. Here are more details, tips and hints. The Data Hub plugs into the Exp port on the EVO 4 and should be located as close to the G- Dash or MXL-Dash display as possible.
- Page 2 Plug other end of the USB lead into “Usb” The Data Hubs allow multiple AiM accessories to be plugged into the “exp” port on the EVO4, in this case, both the G-Dash and the SmartyCam HD are supplied power and information from the EVO4 through one Data Hub supplied, which is plugged into the “exp”...
- Page 3 Then, with the car on a level platform, connect the EVO4 to your laptop, power it up, open Race Studio 2 and select “Device Calibration.” Select Auto Calibrate all sensors, press ok, and Transmit. You will use Race Studio 2 for all interaction with the EVO 4 and G-Dash, you will use SmartyManager 2 to interact with the camera and change the video background.
Need help?
Do you have a question about the EVO 4/G-Dash and is the answer not in the manual?
Questions and answers