Harvia WHP1500 Instructions For Installation Manual
Hide thumbs
Also See for WHP1500:
- Instructions for installation manual (10 pages) ,
- Instructions for installation manual (10 pages) ,
- Instructions for installation manual (9 pages)

Related Manuals for Harvia WHP1500


Summary of Contents for Harvia WHP1500
- Page 1 Steel Chimney Ñòàëüíîé äûìîõîä Instructions for installation of Steel Chimney Èíñòðóêöèÿ ïî ìîíòàæó ñòàëüíîãî äûìîõîäà Harvia Oy PL12 40951 Muurame Finland www.harvia.fi 07032006H...
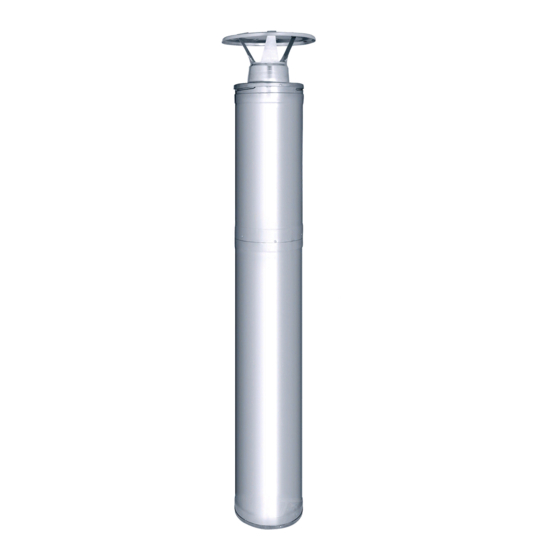
- Page 2 Steel Chimney extensions WHP1500 Standard delivery Äîïîëíèòåëüíûå ìîäóëè Ñòàíäàðòíàÿ êîìïëåêòàöèÿ Rain cap Rain flange Îãîëîâîê Äîæäåâîé ôëàíåö WHP500 WHP1000 Lead-through flange Length: 0.5 m Length: 1.0 m Ïðîõîäíîé ôëàíåö Length of isolated Length of isolated component: 470 mm component: 970 mm ì...
- Page 3 5. Óñòàíîâêà îãîëîâêà äûìîõîäà ............ 8 6. Installing the lead-through flange......... 8 6. Óñòàíîâêà ïðîõîäíîãî ôëàíöà ........... 8 0809 0809 Harvia Oy, PL 12, 40951 Muurame, Finland Harvia Oy, PL 12, 40951 Muurame, Finland 0809-CPD-0548 0809-CPD-0548 EN 1856-1 EN 1856-1 Steel Chimney Äûìîõîä...
- Page 4 1. General information 1. Îáùàÿ èíôîðìàöèÿ The steel chimney is a CE-standardised chimney Ñòàëüíîé äûìîõîä ñ ìàðêèðîâêîé ÑÅ ïðåäíàçíà÷åí for removal of chimney gas in solid fuel run äëÿ îòâîäà äûìîâûõ ãàçîâ èç êàìåíîê è êàìèíîâ, saunas and iron stoves and fireplaces using solid èñïîëüçóþùèõ...
- Page 5 Figure 2. Examples of chimney heights required for fire safety regulations. Ðèñóíîê 2. Ïðèìåðû òðåáîâàíèé ïîæàðíîé áåçîïàñíîñòè ê âûñîòå äûìîõîäà. 2. Protective distances 2. Áåçîïàñíîå ðàññòîÿíèå The protective distance between the inflammable Áåçîïàñíîå ðàññòîÿíèå ìåæäó âîñïëàìåíÿþùèìèñÿ structures and the chimney outer casing must be êîíñòðóêöèÿìè...
- Page 6 3. Connecting the parts of the Steel Chimney 3. Ñîåäèíåíèå ýëåìåíòîâ äûìîõîäà ìåæäó ñîáîé The components of the steel chimney are joined Ýëåìåíòû äûìîõîäà ñîåäèíÿþòñÿ ìåæäó ñîáîé ñïîñîáîì, by following the instructions in the pictures. The óêàçàííûì íà ñåðèè ðèñóíêîâ. Ïðåäâàðèòåëüíî ñ leading principle is to lock the smoke pipe to the îñíîâíîãî...
- Page 7 4. Installing the rain flange 4. Óñòàíîâêà äîæäåâîãî ôëàíöà The rubber rain flange prevents water and snow Äîæäåâîé ôëàíåö èç ðåçèíû ïðåïÿòñòâóåò entering through the chimney lead-through hole. ïðîíèêíîâåíèþ äîæäåâîé âîäû è ñíåãà ñêâîçü ïðîõîä If the profile of the roofing material is very high äûìîõîäà.
- Page 8 5. Installing the rain cap 5. Óñòàíîâêà îãîëîâêà äûìîõîäà Slot in the damper with the smoke Ïàçû îãîëîâêà äûìîõîäà ïîäãîíÿþòñÿ pipe of the lower module. Lock the ïîä øèïû âíóòðåííåé ÷àñòè ýëåìåíòà, rain cap in place by gently turning íàõîäÿùåãîñÿ âíèçó.
Need help?
Do you have a question about the WHP1500 and is the answer not in the manual?
Questions and answers