Advertisement
Quick Links
Advertisement

Related Manuals for Ferret Leak Locator


Summary of Contents for Ferret Leak Locator
- Page 1 Ferret Leak Locator User Manual ferret-technology.com...
-
Page 2: Table Of Contents
Table of contents Controls Connecting the Ferret Leak Locator Moving the Ferret along the leaking pipe Locating the leak Locating the Ferret from above ground Basic Maintenance... -
Page 3: Controls
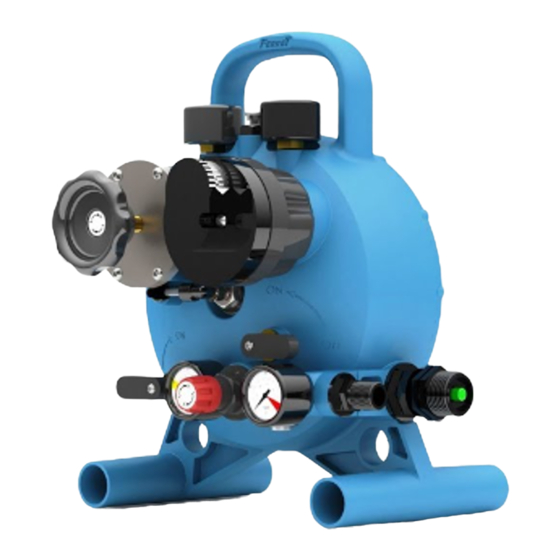
Controls 1.1 Ferret Controls: how to adjust the pressure in the Ferret. Ferret Pressure Gauge Shows the pressure inside the Ferret Ferret Pump Inflates/deflates the Ferret Ferret Blocks the flow in the leaking pipe when inflated... - Page 4 Pipe Pressure Gauge Shows the pressure inside the leaking pipe Flow Gauge Shows when water is flowing through the Ferret Leak Locator Flow Valve Turns flow to the leaking pipe on and off...
- Page 5 Controls 1.3 Leaking Pipe Controls: how to adjust the working pressure in the leaking pipe. Inlet Pressure Gauge Shows the pressure within the incoming water supply Pressure Regulator Controls the working pressure. Pull out to adjust and push in to lock Set Pressure Gauge Shows the working pressure in the leaking pipe...
-
Page 6: Connecting The Ferret Leak Locator
Ferret Leak Locator. The connection hoses have internal O-ring seals at the ends that connect to the Ferret Leak Locator. They should only be hand tightened. Do not use a wrench... - Page 7 Connecting the Ferret Leak Locator 2.1 Connecting a water supply Step 2. Make sure the Flow Valve is in the off position and then turn the incoming water supply back on. You should now see pressure registering on the Set and Inlet Pressure Gauges.
- Page 8 Connecting the Ferret Leak Locator 2.2 Fitting the Ferret to the Ferret Leak Locator IMPORTANT: Step 1. Step 2. Step 3. Pass the yellow Ferret Pipe through Remove the Green Cap from Screw the Ferret on the Outlet Hose and connection the end of the Ferret Pipe and hand tight.
- Page 9 2.3 Stretch and test the Ferret. Use the Ferret Pump to inflate the Ferret to check it is not damaged. Then deflate the Ferret. IMPORTANT: A new Ferret must first be stretched to a larger diameter than the internal bore of the leaking pipe.
- Page 10 Connecting the Ferret Leak Locator 2.4 Connecting to the leaking pipe Step 1. Step 2. Step 3. Step 4. Feed the Ferret into the Open the Flow Valve You should now see the Open a vent at the far and wait for the pipe...
-
Page 11: Moving The Ferret Along The Leaking Pipe
Turn the Flow Valve off. Turn the Ferret Pump to Turn the Flow Valve back If the Ferret starts to move or the Ferret inflate the Ferret to on and wait for the Flow Winder turns, close the Flow Valve and approximately 1bar (15psi) Gauge to stop. - Page 12 Moving the Ferret along the leaking pipe 3.2 Moving the Ferret forwards IMPORTANT: Step 2. Note. Step 1. When working with smaller At the same time watch the Slowly turn the Ferret Pump Ferrets and in metallic pipes Ferret Pipe and Ferret Winder Always make sure the to deflate the Ferret.
- Page 13 3.3 Restrictions in the pipe Note. The Ferret will stop if it meets a restriction in the pipe before You will see the Ferret Winder stop turning it gets to the leak. and no flow registering on the Flow Gauge.
- Page 14 Ferret Winder back a quarter is back in the larger diameter turn (B) to put some slack in the Ferret Pipe. the restriction. Watch the pipe it will stop but the...
- Page 15 Moving the Ferret along the leaking pipe 3.5 Stopping the Ferret and moving it backwards Step 1. Step 2. Step 3. IMPORTANT: Turn the Flow Valve off Turn the Ferret Pump to Turn the Ferret Winder anti-clockwise, to stop the Ferret.
-
Page 16: Locating The Leak
Turn the flow back on to the pipe. the Flow Valve and inflate the Check that no water is • If the Ferret is before the leak the flow gauge will stop. Ferret so it blocks the pipe flowing through the open vent. - Page 17 Locating the leak 4.2 Pinpointing the leak 4.2 Pinpointing the leak Step 1. Step 2. Move the Ferret backwards Repeat this process until or forwards as required and the leak is pinpointed to within a quarter turn of repeat the leak test on the previous page.
-
Page 18: Locating The Ferret From Above Ground
Locating the Ferret from above ground 5.1 Tracing the line of the pipe (without sonde) Step 1. Step 2. Connect a signal generator to the Trace the line of the pipe as per the terminal on the Ferret Winder. manufacturer’s instructions for... - Page 19 Step 3. Connect the Trace Lead supplied with Connect a 33kHz signal generator Trace the line of the pipe as per the the Ferret Leak Locator to the terminal manufacturer’s instructions for to the red Trace Lead. on the Ferret Winder.
- Page 20 Locating the Ferret from above ground 5.3 Measuring the distance to the Ferret Step 1. Step 2. IMPORTANT: Find a distance mark on the Place a measuring wheel on the Outlet Hose so it lines up Always rewind the yellow Ferret Pipe inside the...
- Page 21 Locating the Ferret from above ground 5.4 Using the Sonde Connect a 33kHz signal generator Move receiver along line using the trace lead supplied with of pipe, not across the Ferret Leak Locator. Large Peak Small Peak Small Peak Null...
-
Page 22: Basic Maintenance
Basic Maintenance 6.1 Test for checking if there is air in the Ferret inflation system Step 1. Step 2. IMPORTANT: Install the Green Cap on Slowly turn the Ferret Pump clockwise (+) the end of the Ferret Pipe. If there is no air in the Ferret... - Page 23 When you have finished flushing air from the system close the Fill Valve. Wait for the Ferret Pressure Gauge to fall to zero and then re-fit the Green Cap. Now do the test on the previous page to check that all the air has been removed.
- Page 24 ferret-technology.com...
Need help?
Do you have a question about the Leak Locator and is the answer not in the manual?
Questions and answers