Advertisement
Quick Links
QUICK
START
1: Align the circles through the lenses
FRONT LENS
REAR LENS
2: View from 5cm distance
5CM
Ring Flash Notifications
1
8
2
7
3
6
4
5
REMAINING PHOTOS
NO PHOTOS / NO FILM PACK
CONTROL KNOB:
CONTROL KNOB:
100
25
75
50
BATTERY LEVEL (%)
SEARCHING FOR DEVICE
CONTROL KNOB:
CONTROL KNOB:
+ SHUTTER BUTTON
Indicating LED Notifications
NO LIGHT: CAMERA OFF
SOLID RED LIGHT: CAMERA ON
BLINKING RED LIGHT: BATTERY LOW/FLASH INHIBITED
SOLID RED LIGHT (WHEN USB CHARGER CONNECTED): CAMERA ON
NO LIGHT (WHEN USB CHARGER CONNECTED): CHARGING COMPLETE
Welcome to the I-1. This Quick Start provides a basic overview of the I-1, and will be a useful reference sheet as you
explore the camera. Make sure you charge the camera and read the User Manual in full before you start making photos.
1
Turn camera on
Control Knob:
3
Close film door.
Remove darkslide
LENS ALIGNMENT
from beneath frog tongue
5
Take photo. Always
use flash when
shooting indoors
Control Knob
CAMERA OFF
Shutter Button
CAMERA ON
APP MODE
2
Open film door.
Load film pack
4
Open viewfinder. Compose photo
See "VIEWFINDER" opposite
6
Protect photo during
development
See film packaging for details
Lighten/Darken Switch
TAKE PHOTO
NORMAL
DARKER
LIGHTER
(PRESS)
IMAGE
IMAGE
Flash Switch
ON
OFF
Advertisement

Related Manuals for Impossible I-1

Summary of Contents for Impossible I-1
- Page 1 Welcome to the I-1. This Quick Start provides a basic overview of the I-1, and will be a useful reference sheet as you explore the camera. Make sure you charge the camera and read the User Manual in full before you start making photos.
- Page 2 When the shutter button is pressed, the shutter opens to allow light to enter the camera through the lens. Light is focused through the lens onto the mirror at the back of the camera. VIEWFINDER REAR LENS The light bounces off the mirror and down onto the film.
- Page 3 USER MANUAL...
- Page 4 USER MANUAL Please be sure to read through this manual before using the I-1. Keep for future reference. For updated information, video tutorials and more, please visit: support.the-impossible-project.com...
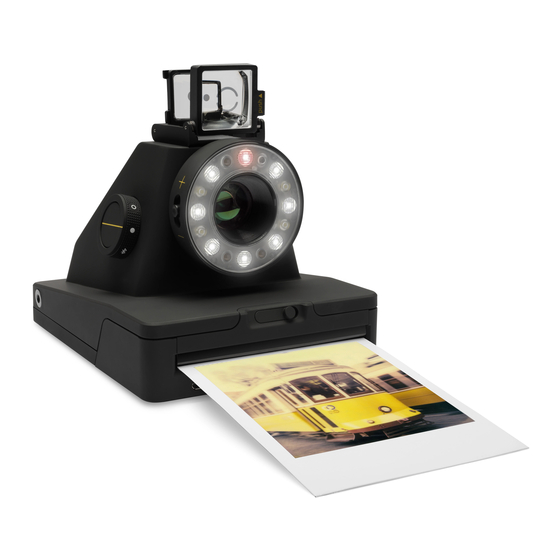
- Page 5 INTRODUCTION The Impossible I-1 is an easy to use, point and shoot analog instant camera for the original instant photo format. It makes real, physical photos that develop in the palm of your hand. The I-1 features an advanced ring flash, designed for taking great portraits.
- Page 6 DIAGRAMS Parts diagram Viewfinder USB data rear lens cable Viewfinder front lens Lighten/darken Switch Ring Flash Control Knob Flash Switch Shutter Button charging cable Film Door Latch Hand strap Strap Mount Screws Frog Tongue Film Door Indicating LED USB Power Connector...
- Page 7 The Viewfinder The Ring Flash REMAINING PHOTOS NO PHOTOS / NO FILM PACK Front lens Rear lens Lens CONTROL KNOB: CONTROL KNOB: alignment BATTERY LEVEL (%) SEARCHING FOR DEVICE CONTROL KNOB: CONTROL KNOB: + SHUTTER BUTTON...
- Page 8 IMPORTANT: Always charge the I-1 fully before using How to use the I-1 Flash On Flash Off Lighter Image Normal Darker Image...
- Page 9 CONTENTS ENGLISH FRANÇAIS 日本語 内容物 Contenu de la boîte Box Contents I-1の使い方 Utilisation de l’I-1 How to Use the I-1 詳細ガイ ダンス Conseils supplémentaires Further Guidance I-1アプリ The I-1 App L’Appli I-1 トラブルシューティ ングとよく ある質問 Troubleshooting & FAQ Dépannage & FAQ カスタマーサポート...
- Page 10 I-1 CAMERA CHARGE THE CAMERA at the front. To turn it off again, way to the back of the camera. Important: The I-1 will not be DETACHABLE VIEWFINDER turn the control knob clockwise charged upon purchase – it must SET FLASH & LIGHTEN/DARKEN until the empty circle symbol is be fully charged before fi...
- Page 11 Values (EV). The camera’s Expo- camera out in front of you, at fi rst the way in to take the photo. Your The I-1 uses infrared light to work sure Values are + (when you about 20cm away from your face.
- Page 12 Then open the fi lm door - the your fi lm pack, or if there is no fi lm The I-1 ring fl ash is made up of black & white. rollers are two metal cylinders pack inserted in the camera, then 12 individual LEDs.
- Page 13 Twist camera off and on again. ‘Connection Successful’ and the I-1 App for Apple iOS (8 and up) the screws in until they can go no When the I-1 battery is low (3 or blue LED stops blinking.
- Page 14 Make sure you are not shooting towards the sun: check, turn the control knob off and on. The ring the I-1 meters the average light level it sees. When fl ash will indicate how many shots you have left. shooting towards sunlight, the sun exposes the If the red LED (top) in the ring fl...
- Page 15 TIPS FOR MAKING GREAT PHOTOS My photo turned The I-1 autofocus system selects the focus distance out blurry or fuzzy when you press the shutter button halfway in. It MAKE PHOTOS INDOORS MAKE PHOTOS OUTDOORS will use the center of what you see as the reference point.
- Page 16 CUSTOMER SUPPORT TECHNICAL SPECIFICATIONS GENERAL The Impossible Customer Support Shutter system: custom design, Team is always more than happy using precision step motors for Dimensions: 145mm (L) x 110mm to hear from you. Please get in shutter and focus control...
- Page 17 This is to avoid a photo getting stuck as it’s being ter must not be co-located or operating in conjunction battery and/or the electronics located below the rollers I-1 Analog Instant Camera is in compliance with the processed through the roller system. with any other antenna or transmitter.
- Page 18 IMPOSSIBLE I-1 ANALOG INSTANT CAMERA Impossible B.V. Hoge Bothofstraat 45 7511 ZA Enschede The Netherlands End of life disposal warning: When the unit has come to the end of life, dispose of it in accordance with local regulations. This product is subject to...
Need help?
Do you have a question about the I-1 and is the answer not in the manual?
Questions and answers