Table of Contents
Advertisement
Quick Links
142mm
INSTRUCTION MANUAL
PATIO QUARTZ HEATER
MODEL:SPH-15NR
Thank you for purchasing our new heater.
These operating instructions will help you use it properly and safely.
We recommend that you spend some time reading this instruction manual in order that
you fully understand all the operational features it offers.
Read all the safety instructions carefully before use and keep this instruction manual for
future reference
Facebook: #SundayLiving
Message: #SundayLiving
Email: service@sundaylivinginc.com
Advertisement
Table of Contents

Related Manuals for Sunday Living SPH-15NR

Summary of Contents for Sunday Living SPH-15NR
- Page 1 142mm INSTRUCTION MANUAL PATIO QUARTZ HEATER MODEL:SPH-15NR Thank you for purchasing our new heater. These operating instructions will help you use it properly and safely. We recommend that you spend some time reading this instruction manual in order that you fully understand all the operational features it offers.
-
Page 2: Safety Warnings
SAFETY WARNINGS READ ALL INSTRUCTIONS BEFORE ATTEMPTING TO OPERATE THIS UNIT. KEEP THE ASSEMBLY INSTRUCTIONS FOR FUTURE REFERENCE. KEEP THE ASSEMBLY INSTRUCTIONS FOR FUTURE REFERENCE. KEEP THE ORIGINAL PACKAGING FOR USE WHEN STORING THE HEATER DURING EXTENDED PERIODS OF NON-USE. 1. -
Page 3: Grounding Instructions
16. Children shall not play with the appliance. 17.If the power cable is damaged, it must be replaced by the qualified persons in order to avoid a hazard. 18. There is the possible danger of installation close to curtains and other combustible materials. -
Page 4: Product Diagram
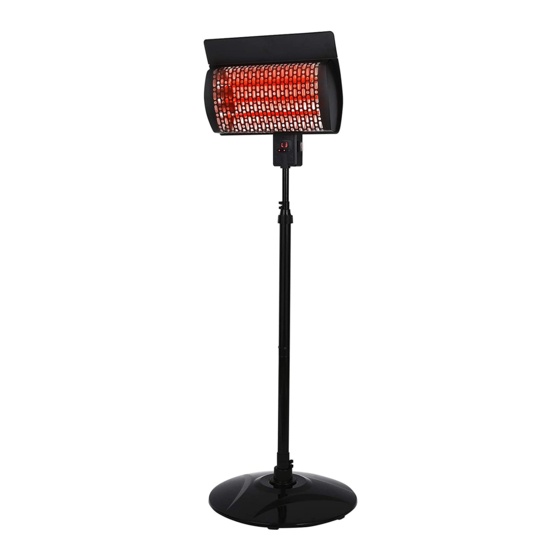
PRODUCT DIAGRAM INSTALLATION INSTRUCTIONS Heater Holder installation Instruction 1. Place installation pipe on the base and tighten 4 long screws into each of the slots to fix its location. The base is pre-assembled with heavy object by extra 4 long screws for steady freestanding. - Page 5 2. Slide protective flange cover through installation pipe till the base. 3. Slide one large cord clips over their respective sides of the telescopic pole and tighten the screws to keep them in the location of your choice. 4. Then slide one installation pipe on another one, tighten 3 short screws to fix it in the location.
- Page 6 5. Slide second large cord clips over their respective sides of the pipe and tighten the screws to keep them in the location of your choice. 6. Small pipe is pre-installed into bigger pipe, pull the thin side of small pipe out from the upper opening of bigger pipe.
- Page 7 8. Slide pipe into another pipe over their respective sides, tighten 3 short screws to fix it in the location. REMARKS: There are totally four installation pipes in the package,One small pipe and three big pipes,you can remove the third big pipe,and connect the first tube with the bottom tube.
- Page 8 3. The angel of heater head is adjustable manually by adjusting the transfer joint. Wall Mount Heater Instruction Step1: Insert the 4 expansion screws on the wall according the position of slots in the back of heater (exact distance in diagram below) head at a certain height of the wall. Step2: Mount the heater head against the wall on the 4 inserted expansion screws.
- Page 9 PRE-OPERATING INSTRUCTIONS Attention: Please read all important instructions(page 1)before using your Patio Heater. 1.Make sure the unit is in the OFF position before plugging the heater into the outlet. 2.Place heater on a level surface. Note: The product has tip over protection function, which means when the product incline 45 degrees or more,the tip over switch will work and the product will be power off automatically to ensure safety.
- Page 10 1. Press Mode Button once the digital screen shows “L1” which means 500W power setting. 2. Press Mode Button once again, the digital screen shows “L2” which means 1000W power setting. 3. Press Mode Button once again, the digital screen shows “L3” which means 1500W power setting.
-
Page 11: Tip-Over Protection
NOTE: Please feel free to contact Service Team for help if the remote control is missing or damaged. Facebook: #SundayLiving Message: #SundayLiving Email: service@sundaylivinginc.com TIP-OVER PROTECTION The product has tip over protection function, which means when the product incline 45 degrees or more,the tip over switch will work and the product will be power off automatically to ensure safety.
Need help?
Do you have a question about the SPH-15NR and is the answer not in the manual?
Questions and answers
Can the WL-SPH15NR be ceiling mounted
The context mentions that the heater has a stable articulated wall-mounted bracket and allows for a 15-degree up and down angle adjustment. It is designed for wall mounting and does not specifically mention ceiling mounting. Therefore, based on the provided information, it cannot be confirmed that the Sunday Living SPH-15NR can be ceiling mounted.
This answer is automatically generated