Advertisement
Quick Links
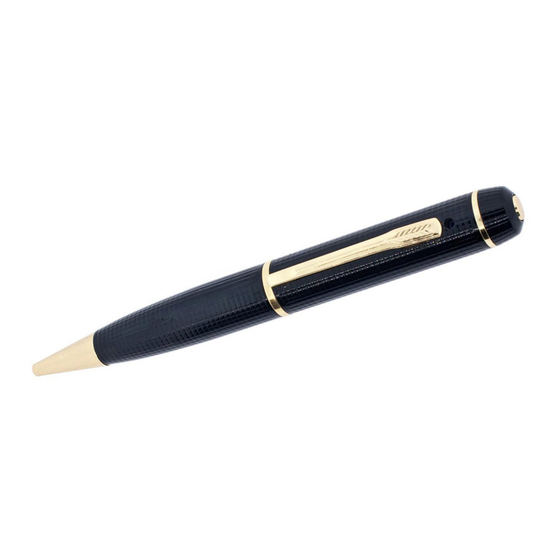
HD Video Spy Pen
MIC
RESET
LED
USB
MODE SWITCH
The HD Video Spy Pen is a simple,
multifunctional recording device built
into a working ballpoint pen. Take
photos, record audio, or capture HD
video with the touch of a button.
All manuals and user guides at all-guides.com
In the Box
In the box you will find the HD V ideo Spy Pen, a
USB cable, and a micro SD card, already inserted
in the device.
Getting Started
The first step in using your device is charging it.
ON/OFF
Connect the device to a USB port on your PC. While
RECORD
charging, the LED indicator will blink orange and will
become solid when the battery is full. Before first use,
we suggest charging the device for 4 hours.
This device records data to a micro SD card. Depending
on which version you purchased, it will either have a 4
CAMERA LENS
or 8 GB memory card. It is compatible with micro SD
cards of up to 32GB capacity. To insert a micro SD card,
gently slide it into the slot with the copper contacts
facing away from you until you feel resistance.
If you plan on viewing your files on your computer, we
suggest using VLC Player. The most recent version can
be downloaded at no cost from http://www.videolan.org.
To power the device on, hold down the Record button
for 2-3 seconds. The LED indicator will be orange and
blue while the device is booting. Once it finishes booting
it will automatically begin recording audio or video,
depending on what mode the device is set to. To power
the device off, hold down the Record button for 2-3
seconds, and the LED light will tur n off.
Recording Video
To record video, move the Mode switch to the 2
position and power the device on. The LED will blink
blue twice, and immediately begin recording video.
Press the Record button again to save your current
file and stop recording, retur ning the device to
Standby. The LED will glow orange while in Standby.
To begin recording again, press the Record button.
Recording Audio
To record audio, move the Mode switch to the 1
position and power the device on. The LED will blink
orange twice to indicate it is recording audio. Press the
Record button again to save your current file and stop
recording, retur ning the device to Standby. The LED will
glow orange while in Standby. To start recording a new
audio file, you will need to power the device down and
tur n it back on.
Taking Photos
To take photos move the Mode switch to the
1 position. Power the device on, which will
automatically record an audio file, as described
above. Press the Record button to end recording and
enter Standby. Press the Record button. The LED will
blink blue once to indicate it is capturing and storing
your photo, and will return to solid orange.
Advertisement

Related Manuals for Brickhouse Security 190

Summary of Contents for Brickhouse Security 190
- Page 1 All manuals and user guides at all-guides.com In the Box HD Video Spy Pen Recording Video In the box you will find the HD V ideo Spy Pen, a USB cable, and a micro SD card, already inserted To record video, move the Mode switch to the 2 in the device.
- Page 2 All manuals and user guides at all-guides.com Reviewing Files on a Computer Glossary Once you’ve created the file, connect the device to your computer via USB and save the .txt file to To view your files on a computer, simply connect LED: An abbreviation for “light emitting diode,”...
Need help?
Do you have a question about the 190 and is the answer not in the manual?
Questions and answers