Table of Contents
Advertisement
Quick Links
9 in 1 Wireless Rain Gauge
Item No.W208703
User Manual
Thank you for purchasing W208703 Wireless Rain Gauge. Please
take a moment to read this guide and store it for future reference.
1
2
4
3
10
11
5
12
13
6
14
7
8
15
9
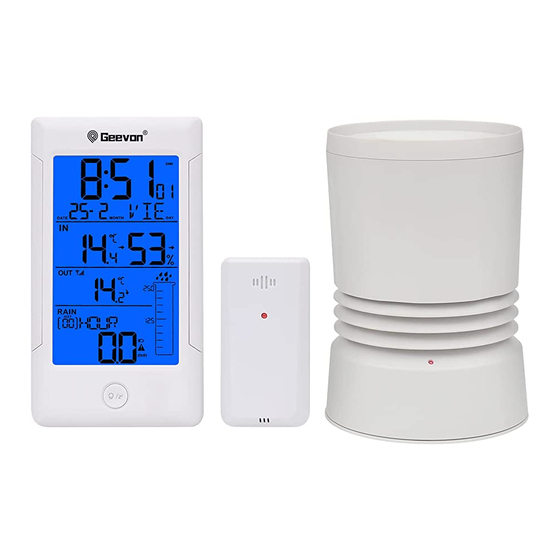
1.Controls and displays:
1. Time display
2. Weekday
3. Calendar
4. Alarm Clock and Snooze icons
5. Rainfall display
6. Rainfall history display
7. Indoor temperature / humidity
16
8. Outdoor temperature / humidity
external sensor
9. SNZ/LIGHT button
17
a. Turn on/off the backlight
b. Stop the alarm for 5 minutes
10. MODE button
a. Hold for 3 seconds during the normal mode to enter setting mode.
b. Press button during the normal mode to check the alarm time.
11. HIS button
Check the rainfall history record
12. UP button
a. Increase the current setting value.
b. In normal display mode, press this button to check Max./Min. Records.
13. DOWN button
a. Decrease the current setting value.
b. Switch between Celsius and Fahrenheit at any time
14. RAIN button
Check the rainfall records(daily,weekly,monthly,total.)
15. Battery Compartment 3xAA (batteries not included)
16. Wireless signal indicator (Flashes when data is being sent to the
display unit)
17. Compartment 2xAA batteries (batteries not included)
2. Package Contents:
1. Display unit
2. Wireless rain gauge
3. Instructions Manual
3. Getting started
3.1 Inserting the batteries
• Place 3xAA batteries into the display unit.
• Place 2xAA batteries into the wireless rain gauge.
Note:
• The range is 150 ft. (50m) unobstructed. The wireless range may
be reduced by trees, walls, windows, etc.
• Do not place rain gauge in direct sunlight as this will give you an
inaccurate reading.
3.2 Replacing Batteries:
• We recommend using high quality batteries for the best product
performance.
• Heavy duty or rechargeable batteries are not recommended.
• The outdoor sensor requires lithium batteries in low temperature
conditions. Cold temperatures would cause alkaline batteries work
improperly.
• Do not mix old and new batteries. Do not mix alkaline, standard,
and rechargeable batteries.
3.3 Low Battery Indicator:
If the low battery indicator is displayed on the LCD for either the
outdoor sensor or the display unit, immediately change the batteries
to prevent disruptions in communications of the devices.
Default settings
1. Default time: 12:00 (Time form: 12H)
2. Default date: 01/01 (Year: 2019, date form: M/D)
3. Default week: TU (Language: EN, 7 languages can be selected)
5. Default temperature: °F
6. Rainfall unit: IN
6. Default alarm: AM 6:30, default: off, default snooze time: 5min.
4.Operation
Note:
Hold down the UP button or the Down button to select values faster.
Manually Setting the Time, Date & Units:
• Press and hold down the "MODE" button for 2 seconds until the
display begins to flash.
• Set the following information in the order listed:
• 12/24 hour format
• Hours
• Minutes
• Month/Day or Day/Month format
• Year
• Month
• Day
• Day of the week language:German, English, French, Italian,
Spanish, Dutch and Danish
• Rainfall unit
• To select individual values, press UP button or the DOWN button
and confirm each selection by pressing the MODE button.
Note:
You will automatically exit settings mode if no buttons are pressed
for 10 seconds.
5.Alarm Clock:
Setting the alarm
• In standard mode, press "MODE" enters into the alarm mode.
• In alarm mode, hold the "MODE" button for 2 seconds to enter the
alarm setting mode, the setting order is Hour >>> Minute >>> Exit.
Use the "UP" and "DOWN" buttons to set the required hour and
minute.
• Press "MODE" (or no key for 20 seconds) so exit and save the
setting.
• To select individual values, press UP button or the DOWN button
and confirm each selection by pressing the MODE button.
• If you do not make an entry for 20 seconds, setting mode is exited
automatically.
Activating/deactivating the alarm
In alarm mode, press "UP" or "DOWN" to turn the alarm ON or
OFF. The alarm icon will appear to disappear.
Stopping the alarm/snooze function
• When the alarm is triggered, the alarm symbol begins to flash and
an alarm sounds.
• By pressing any button (except the SNOOZE/LIGHT button to stop
the alarm. Otherwise, it will stop automatically after 2 minutes.
Note:
While the alarm signal is sounding, press the SNOOZE/LIGHT
button to activate the snooze function. The alarm will sound after 5
minutes.
6. Temperatue and humidity
6.1 Temperature
• Indoor temperature 0°C ~ 50°C (32°F ~ 122°F), display LL.L when
below 0°C and display HH.H when higher than 50°C.
• Outdoor temperature -40°C ~ 60°C (-40°F ~ 140°F), display LL.L
when below -40°C and display HH.H when higher than 60°C.
• Temperature resolution: 0.1°C
6.2 Humidity
• Indoor humidity range: 10%-99%
• Outdoor humidity range: 10%-99%
• Humidity resolution: 1 %RH
• When alarm ringing, temperature and humidity test will be stopped.
Advertisement
Table of Contents

Subscribe to Our Youtube Channel
Related Manuals for Geevon W208703


Summary of Contents for Geevon W208703
- Page 1 • Day 17. Compartment 2xAA batteries (batteries not included) Thank you for purchasing W208703 Wireless Rain Gauge. Please • Day of the week language:German, English, French, Italian, take a moment to read this guide and store it for future reference.
- Page 2 TROUBLE SHOOTING: Note: • In standard mode, press “RAIN” button can switch check the rainfall, the switch order: Daily → Weekly → Monthly → Total → Accuracy Problem Possible Solution • The daily rainfall will be cleared automatically at 12:00 am •...
- Page 3 FCC Statement Any Changes or modifications not expressly approved by the party responsible for compliance could void the user’s authority to operate the equipment. This device complies with part 15 of the FCC Rules. Operation is subject to the following two conditions: (1) This device may not cause harmful interference, and (2) This device must accept any interference received, including interference that may cause undesired operation.
Need help?
Do you have a question about the W208703 and is the answer not in the manual?
Questions and answers
replace battery in outdoor unit
To replace the battery in the Geevon W208703 outdoor unit:
1. Use high-quality lithium batteries, especially in low temperatures.
2. Do not use heavy-duty or rechargeable batteries.
3. Do not mix old and new batteries, or different battery types.
4. Insert 2xAA batteries into the wireless rain gauge (outdoor unit).
5. Replace batteries immediately if the low battery indicator appears on the display.
Make sure the batteries are properly aligned according to the polarity markings.
This answer is automatically generated
The instructions says not to put in direct sunlight , so where and how to locate rain gauge?
The best location to place a Geevon W208703 rain gauge is in an area that avoids direct sunlight, away from electronic devices that generate magnetic fields, and at least 3 feet (1 meter) from equipment like TVs, computers, microwaves, and radios.
This answer is automatically generated
How do you change the battery on the outdoor unit of W208703?
To change the battery on the Geevon W208703 outdoor unit:
1. Open the battery compartment of the wireless rain gauge.
2. Remove the old batteries.
3. Insert 2xAA batteries (do not mix old and new batteries or different types).
4. Close the battery compartment.
Note: Use lithium batteries in low temperatures, as cold conditions can affect alkaline battery performance.
This answer is automatically generated