Table of Contents
Advertisement
Advertisement
Table of Contents
Troubleshooting

Related Manuals for i-SENS i-SmartCare 10


Summary of Contents for i-SENS i-SmartCare 10
- Page 1 Operator’s Manual PZA1O7619 REV7 2020 - 12...
- Page 2 Software version 1.0.5.0 PZA1O7619 REV7 2020. 12 i-SENS, Inc. 27-36, Gwangun-ro, Nowon-gu, Seoul 01891, Korea Medical Technology Promedt Consulting GmbH Altenhofstrasse 80 66386 St. Ingbert, Germany Copyright © 2020 i-SENS, Inc. All Rights Reserved...
- Page 4 Please take time to read this operator’s manual before setting up and operating the analyzer.
-
Page 6: Table Of Contents
Table of Content Table of Contents 1 Introduction Safety ............................ 8 Symbols and Terminology ....................10 Product Description ......................13 2 Installation Installation Requirements ....................16 Power Cable Connection ....................17 Power-on ..........................18 Printer Paper Installation ..................... 20 Cartridge Installation ......................22 3 Instrument Settings Screen Menu ........................ - Page 7 Table of Content 6 Shutdown Analyzer Shutdown ......................100 Power Recovery ........................ 102 7 Maintenance Calibration ......................... 104 Cartridge Removal ......................106 Cartridge Information ......................109 System Information ......................110 Event Log .......................... 111 Analyzer Status ......................... 112 Cleaning ..........................114 8 Troubleshooting Troubleshooting ........................
-
Page 8: Introduction
1. Introduction 1. Introduction Safety ............................8 Symbols and Terminology ....................10 Product Description ......................13... -
Page 9: Safety
• Make sure to disconnect the power and to clean the unit before storage. (Please refer to 7. Maintenance > Cleaning) • If the analyzer is inoperable, call the maintenance personel or i-SENS. • Do not open, dissemble, repair or modify the unit on your own. - Page 10 1. Introduction Safety, continued Biohazard Caution • All biohazard materials must be handled and/or discarded in accordance with the instructions from hospitals, clinical labs, or testing facilities. • Always protect yourself with proper safety gear such as lab gown, protective gloves, goggles, etc. •...
-
Page 11: Symbols And Terminology
This marking indicates that you must not discard this electrical/electronic product in domestic household waste. Distributors of this product within the EU have taken the necessary step to comply with the Waste Electrical and Electronic Equipment (WEEE) Directive. i-SmartCare 10 Blood Gas Analyzer... - Page 12 1. Introduction Symbols and Terminology, continued Symbols, Symbol Description continued Printer DC Power port Power off Power on This way up: indicates correct upright position of the transport package. Keep dry Fragile, handle with care Stacking limit by number: maximum number of identical packages which may be stacked on one another Operator's Manual...
- Page 13 A statement that alerts the operator to the possibility of device malfunction, device failure, damage to the Caution device or damage to other property associated with the use or misuse of the device. i-SmartCare 10 Blood Gas Analyzer...
-
Page 14: Product Description
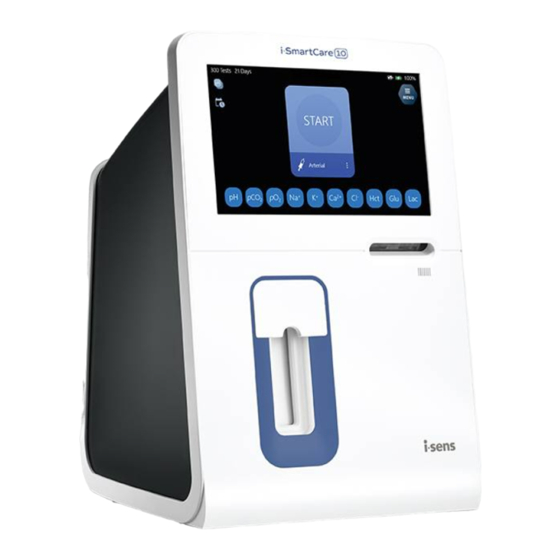
(Na , Ca , Cl ), hematocrit (Hct) and metabolites (Glu, Lac) in whole blood samples. The i-SmartCare 10 Blood Gas Analyzer is intended for in vitro diagnostic use and for use by healthcare professionals. Analyzer Touch Screen Barcode Scanner... - Page 15 1. Introduction Product Description, continued Analyzer, Accessories Power adapter Power cord Printer Paper Cartridge Cartridge Cover CarePak Cartridge i-SmartCare 10 Blood Gas Analyzer...
-
Page 16: Installation
2. Installation 2. Installation Installation requirements .......................16 Power Cable Connection ......................17 Power-On ..........................18 Printer Paper Installation .......................20 Cartridge Installation ......................22... -
Page 17: Installation Requirements
• Operating Temperature : 15 ~ 35 °C ※ It has been confirmed that i-SmartCare 10 is safe to operate in the range of 5 ~ 40 °C according to IEC 61010-1. The recommended range is from 15 to 35 °C for the desirable performance. -
Page 18: Power Cable Connection
2. Installation Power Cable Connection Caution • Make sure the power switch is in “ ” (OFF) position. • Always use a grounded electrical outlet. • Use the provided the power cord and power adapter only. Connect to power 1. Plug the power cord into power adapter’s socket. 2. -
Page 19: Power-On
When the analyzer is started without a cartridge, “No cartridge” status appears. If the unit is rebooted with a usable cartridge, “Cartridge Restart” automatically performs. If the unit is rebooted with a unusable cartridge, “Expired Cartridge” status appears. i-SmartCare 10 Blood Gas Analyzer... - Page 20 2. Installation Power-On, continued Turn on the power, 4. Please check if the power connected icon is indicated on the top continued of the screen. Note: If the power connected icon does not appear, please check whether or not the power cable is properly connected. ...
-
Page 21: Printer Paper Installation
Install printer paper 1. Open the printer cover by pressing the PUSH button located on the top of the analyzer. 2. Place a paper roll in the holder, and align the edge of the paper to the printer output part. i-SmartCare 10 Blood Gas Analyzer... - Page 22 2. Installation Printer Paper Installation, continued 3. Close the printer cover. Install printer paper, continued Note: To avoid paper jams, use the manufacturer’s recommended (or supplied) paper. The roll paper can be purchased at the local distributor. Operator's Manual...
-
Page 23: Cartridge Installation
Note: When the analyzer is running on a battery and the battery level is below 40 %, the cartridge install is not available. 4. Open the cartridge door by pressing the lever down. i-SmartCare 10 Blood Gas Analyzer... - Page 24 2. Installation Cartridge Installation, continued 5. Follow the instructions on the screen. Install Cartridge, continued 6. Insert the cartridge into the analyzer with the label facing towards the front of the analyzer. 7. When “Close cartridge door” message appears, close the door and pull up the lever all the way.
- Page 25 2. Installation Cartridge Installation, continued 8. The i-SmartCare 10 automatically recognizes the cartridge information Install Cartridge, once the cartridge door is closed. continued 9. If the cartridge EEPROM information is valid, the warm-up procedure starts. 10. The warm-up normally takes about 45 minutes.
- Page 26 2. Installation Cartridge Installation, continued 11. When Cartridge Warm-Up is completed, the following Ready screen Install Cartridge, appears. continued Note: Any parameter not supported by the cartridge is marked with a line & displayed as inactive. Depending on the status of the cartridge sensor, the sensor status may be displayed in blue or red.
- Page 27 2. Installation This page is intentionally left blank i-SmartCare 10 Blood Gas Analyzer...
-
Page 28: Instrument Settings
3. Instrument Settings 3. Instrument Settings Screen Menu .........................28 Instrument Setup........................37 Parameter Setup ........................46 Parameter Group Setup ......................48 Unit Setup ..........................50 Sample Setup........................52 QC Setup ..........................58 L-J Chart Setup ........................61 Interface Setup ........................63 Language Setup ........................66... -
Page 29: Screen Menu
Parameter Group widget ⑦ Analyzer operation schedule widget ⑧ Menu Button ⑨ Start analysis button ⑩ Sample type select button Current status of each sensor ⑪ Double-clicking each button will display the latest slope of the sensor. i-SmartCare 10 Blood Gas Analyzer... - Page 30 3. Instrument Settings Screen Menu, continued Using Menu 1. Six category icons appear when MENU is pressed. 2. Press a category icon to select the associated sub-categories. Note: MENU button is disabled on the following screens: – Install Cartridge, Remove Cartridge –...
- Page 31 3. Instrument Settings Screen Menu, continued Menu options i-SmartCare 10 Blood Gas Analyzer...
- Page 32 3. Instrument Settings Screen Menu, continued Icons and buttons Button, icons Function View function button Print results or settings on screen Print to external printer Transmit results to LIS/HIS Return to main screen Go to the list View result Scroll to previous / next page from the list Go to previous / next result screen Go to the search screen / Execute...
- Page 33 Run 1-point calibration, 2-point calibration, calibration Sample Type Syringe/ Capillary/ QC Run QC sampling Run syringe sampling Run capillary sampling QC Level 1 QC Level 2 QC Level 3 Hct Level Low Hct Level High Other QC i-SmartCare 10 Blood Gas Analyzer...
- Page 34 3. Instrument Settings Screen Menu, continued Icons and buttons, Button, icons Function continued Parameter Group Analyzer operation schedule Delete Scan QC barcode Manually input QC Edit Restore default values Save Copy data to USB Operator's Manual...
- Page 35 Screen Menu, continued Icons and buttons, Button, icons Function continued Deselect an item on the list Select an item on the list Scan barcode for data entry Enable the interface Power connected icon Battery level i-SmartCare 10 Blood Gas Analyzer...
- Page 36 3. Instrument Settings Screen Menu, continued Keyboards The i-SmartCare 10 is equipped with various digital keyboards & pads for easy data entry. Alphabet keyboard Numbers and special characters keyboard Date entry keypad Time entry keypad Numeric keypad Operator's Manual...
- Page 37 QC sample introduction Cartridge removal Cartridge installation Data copy to USB Battery status information: “The battery is low” (When informed, please connect the system to the power supply immediately to prevent power loss.) i-SmartCare 10 Blood Gas Analyzer...
-
Page 38: Instrument Setup
3. Instrument Settings Instrument Setup Date and Time 1. Go to MENU > SETUP > Instrument. 2. The following data can be assigned or adjusted under SETUP – Instrument. • Date format • Date & Time • Instrument Name • Default Sample Type •... - Page 39 5. To Change the time, press Date text field and enter the current date using the keypad. 6. Press Time text field and enter the current local time using the keypad. 7. Press button to save the setting. i-SmartCare 10 Blood Gas Analyzer...
- Page 40 3. Instrument Settings Instrument Setup, continued Instrument Name 1. Press Instrument Name text field and enter a desired name using the keyboard. Note: The entered instrument name will appear on all the set-up printouts and the network-transmitted messages. Operator's Manual...
- Page 41 The selected sample type is applied on the main screen as the default sampling condition. Ex) If Syringe Arterial is selected, the sample type will remain unchanged even after operations in other sample type mode. i-SmartCare 10 Blood Gas Analyzer...
- Page 42 3. Instrument Settings Instrument Setup, continued Barometric Pressure 1. Click BP Default Value text field to enter the ambient pressure value Setup where the analyzer is located. Note: BP Default Value is set to 760 mmHg by default. The entered value will be used as a default value on the Sample - Information page and used for output calculation during the entire sample analysis.
- Page 43 Drag the cursor up or down to reach a desired brightness. 2. Press to save the settings and to exit to the main screen. Note: Press button to remain unchanged & to return to the main menu. i-SmartCare 10 Blood Gas Analyzer...
- Page 44 3. Instrument Settings Instrument Setup, continued Print Option 1. Select Print Option tab. 2. Click the Print Title 1 and Print Title 2 text fields to enter titles of the thermal-printout. 3. Select Full or Summary for the Print Type. Note: ...
- Page 45 1. In order to add a printer desired to the unit, Select External Printer tab, and press ADD EXTERNAL PRINTER. 2. The system re-booting will start. 3. Once the re-booting is done, printer setup window will be appear. i-SmartCare 10 Blood Gas Analyzer...
- Page 46 3. Instrument Settings Instrument Setup, continued 4. Select a desired printer and press Next to connect the printer to the External Printer, analyzer. continued 5. Once the installation is finished, Press Finish. The Operating software will start. 6. Select "External Printer" Tab. The installed printer appears in Network Printer List.
-
Page 47: Parameter Setup
Note: Activation of the listed items in the Calculated Parameters section is linked to the selection in the Measured Parameters section. 3. Press to save the settings and to exit to the main screen. i-SmartCare 10 Blood Gas Analyzer... - Page 48 3. Instrument Settings Parameter Setup, continued Note: Parameter Setup, continued The selected parameters from the Parameter Setup affect the followings: – Main screen. – Result screen and result print. – Calibration - List page and print. – QC Result screen and QC result print. Operator's Manual...
-
Page 49: Parameter Group Setup
3. Enter Group Title and select measured and calculated parameters. 4. Press OK to save the setting and to go back to the Parameter Group Setup screen. i-SmartCare 10 Blood Gas Analyzer... - Page 50 3. Instrument Settings Parameter Group Setup, continued Parameter Group 5. Once the configured group is chosen, Delete and Edit buttons appear Setup, as below. continued Note:: Press Edit to edit selected group. Press Delete to delete selected group. 6.
-
Page 51: Unit Setup
2. Units of parameters (Measured Value, Calculated Value, and User input values) can be selected from the drop down lists. 3. Press for further options. • Press button to reset all the entered value to default ones. i-SmartCare 10 Blood Gas Analyzer... - Page 52 3. Instrument Settings Unit Setup, continued Note: Unit Setup, continued Available options for the parameter units are as follows. Parameter Default Unit Optional Unit / pO / BP mmHg / Cl mmol/L mEq/L mmol/L mEq/L mg/dL fraction( - ) mg/dL mmol/L mmol/L...
-
Page 53: Sample Setup
Note: The unit selected from Setup - Unit is used. 3. Using the numeric keypad, enter the low and high range values for each measuring parameter. i-SmartCare 10 Blood Gas Analyzer... - Page 54 3. Instrument Settings Sample Setup, continued 4. Press OK to save the setting and to go back to the Reference Ranges Reference Range, Setup screen. continued Note: The setup will not be saved if any entered value is invalid. ...
- Page 55 2. Once the configuration units are selected from the list of units, the following screen with range enter will be displayed. Note: The unit selected from Setup - Unit is used. 3. Using the numeric keypad, enter low and high values of each parameter’s critical limit. i-SmartCare 10 Blood Gas Analyzer...
- Page 56 3. Instrument Settings Sample Setup, continued 4. Press OK to save the setting and to go back to the Critical Limits Critical Limits, Setup screen. continued Note: The setup will not be saved if any entered value is invalid. ...
- Page 57 1. Select MENU > SAMPLE > Correlation Factors Setup. Setup 2. Turn the Correlation Factors Apply on, the window with default values becomes active. 3. Check each parameter field to enter Slope and Offset values. i-SmartCare 10 Blood Gas Analyzer...
- Page 58 3. Instrument Settings Sample Setup, continued Note: Correlation Factors Setup, Acceptable ranges for slopes and offsets of the correlation factors continued are as follows: Parameter Slope range Offset range 0.00 ~ 9.99 ±99.9999 0.00 ~ 9.99 ±99.99 0.00 ~ 9.99 ±99.9 0.00 ~ 9.99 ±99.9...
-
Page 59: Qc Setup
2. Once selected in the Add QC list, Barcode and Manual buttons are displayed as follows. 3. When using the QC material with the QC barcode provided by i-SENS, press Barcode button and scan the barcode i-SmartCare 10 Blood Gas Analyzer... - Page 60 When the unit is changed from Setup - Unit and the QC Information is manually entered, the QC Range Values are saved automatically in the unit changed. 5. In case of using QC barcodes other than are by i-SENS, press Manual button and enter QC lot information manually. Operator's Manual...
- Page 61 In order to edit the entered QC Lot information, select the QC Lot from the list and delete the entry using Delete button and re-enter with the new QC Lot information. 8. Press to exit to the main screen. i-SmartCare 10 Blood Gas Analyzer...
-
Page 62: L-J Chart Setup
3. Instrument Settings L-J Chart Setup L-J Chart Setup 1. Select MENU > QC > L-J Chart Setup. 2. Select QC level ( ▼ ) on the top of the screen. 3. To set up the SD range, select the SD range in each unit’s SD selection field. - Page 63 4. To manually set up the lower and upper limit, select Lower Limit and L-J Chart Setup, Upper Limit located on the right. continued 5. Using the numeric keypad, enter low and high limits. 6. Press to save the settings and to exit to the main screen. i-SmartCare 10 Blood Gas Analyzer...
-
Page 64: Interface Setup
3. Instrument Settings Interface Setup Note: Interface Setup Please make sure the serial cable is properly connected to the analyzer before starting the interface set-up. 1. Select MENU > SETUP > Interface. Send Option 1. Select Send Option tab. 2. - Page 65 6. Press Handshake text field and select the desired option from the drop-down list. Default is None. 7. If the serial setup is completed, press . To save the settings and to return to the main screen. i-SmartCare 10 Blood Gas Analyzer...
- Page 66 3. Instrument Settings Interface Setup, continued TCP/IP Setup 1. Select TCP / IP Setup tab. Note: If the analyzer is connected to the network, the IP information of IP and DNS will automatically appear in the TCP/IP Setup tab. ...
-
Page 67: Language Setup
3. Press to save the settings and to exit to the main screen. Note: Currently i-SmartCare 10 offers English, Spanish, German, Italian and Japanese as an operating language. The selected language is applied to system UI, voice and print output. -
Page 68: Sample Analysis
4. Sample Analysis 4. Sample Analysis Start Analysis ........................68 Blood Sample........................69 QC Sample ..........................78... -
Page 69: Start Analysis
1. Check if START button is in active status on the main screen as shown below. 2. Select the sample type. Note: Supported sample types are as below. Icon Sampling mode Sample type Arterial Venous Syringe Mixed Venous Other Arterial Capillary Capillary i-SmartCare 10 Blood Gas Analyzer... -
Page 70: Blood Sample
4. Sample Analysis Blood Sample Introduce Sample 1. After selecting the blood sample type (either Syringe or Capillary), press START and wait until sampler reaches to its aspirational position. Syringe mode Capillary mode Note: The sampler will be automatically in position according to its selected mode. - Page 71 Once the aspiration is successfully completed, the screen changes to Sample – Information. Note: If the sample aspiration process is not done properly or the sample aspiration amount is insufficient, the message “Insufficient sample error. Sample is being aborted.” appears. i-SmartCare 10 Blood Gas Analyzer...
- Page 72 4. Sample Analysis Blood Sample, continued Sample Information 1. If the sample aspiration process is done correctly, Sample- Information screen is displayed with the selected sample type on the top of the screen. Note: Items with units appear with the units selected from Setup - Unit. 2.
- Page 73 Note: The sample information may be entered manually by using the keyboard. 4. Once the information is entered, press SAVE button on the top right corner of the screen. Sample-Results screen appears. i-SmartCare 10 Blood Gas Analyzer...
- Page 74 4. Sample Analysis Blood Sample, continued Note: Sample Results Any unsupported parameter in the cartridge is displayed as inactive. The results from the measuring parameters and calculated parameters, which had been selected from the Setup – Parameter, will be displayed.
- Page 75 “Slope Error” message appears. 8. If Calculated tab is chosen, the calculated output using formulae is produced. Note: Any value that cannot be calculated under Calculated tab appears as blank along with the Incalculable message. i-SmartCare 10 Blood Gas Analyzer...
- Page 76 4. Sample Analysis Blood Sample, continued 9. More detailed information on the current blood sample is available Sample Results, under Additional information Tab. continued Note: Sample information is displayed only for the samples that had been selected in the Sample - Information screen. 10.
- Page 77 When the analyzer is running on a battery and the battery level is below 80 %, the print function is not available. When the auto-print option is on, the sample result appears on the screen and is printed in real time. i-SmartCare 10 Blood Gas Analyzer...
- Page 78 4. Sample Analysis Blood Sample, continued If Summary is selected in the Print Type option, only entered Sample Results, sample information will be printed. continued 12. Press to save the results and to exit to the main screen. Operator's Manual...
-
Page 79: Qc Sample
Note: Once the QC is selected, START button color will be changed to purple. The QC sample can be selected only if the QC Lot configuration in the QC-Setup page is selected. i-SmartCare 10 Blood Gas Analyzer... - Page 80 4. Sample Analysis QC Sample, continued Introduce 2. Once START is pressed, the sampler will rise automatically. QC Sample, Please wait until the sampler probe has fully reached to its aspiration continued position. Note: To cancel the QC sample analysis, press X on the lower right hand corner before aspiration occurs.
- Page 81 “Insufficient QC sample error. QC sample is being aborted.” appears. 7. The QC - Information screen will appear. Note: Items with units will display with the units selected from Setup - Unit. i-SmartCare 10 Blood Gas Analyzer...
- Page 82 4. Sample Analysis QC Sample, continued Introduce 8. Select the QC Lot item matching with the current QC sampling. QC Sample, continued Note: QC Lot, which was configurated by the user in the QC Setup, will appear. If required, enter the Operator ID using the barcode or the on- screen keyboard.
- Page 83 2. When the QC result is out of the measuring range, no result will be shown and "Reportable Range Error" message will appears. 3. The results with the Slope Error is not show result value and “Slope Error” message will be appears. i-SmartCare 10 Blood Gas Analyzer...
- Page 84 4. Sample Analysis QC Sample, continued 4. Depends on the QC results, press either Accept or Discard button. QC Results, The result status on the upper right hand corner changes from continued PENDING to ACCEPTED or DISCARDED. Note: Select PENDING if acceptance is not certain. ...
- Page 85 When the analyzer is running on a battery and the battery level is below 80 %, the print function is not available. 6. Press to save the results and to exit to the main screen. i-SmartCare 10 Blood Gas Analyzer...
-
Page 86: Database
5. Database 5. Database Sample Data..........................86 QC Data ..........................90 Calibration Data ........................96 Cartridge Data ........................97... -
Page 87: Sample Data
80 %, the print function is not available. If the analyzer is not connected to the network, button is not shown. Sent results are marked as 3. Press to exit to the main screen. i-SmartCare 10 Blood Gas Analyzer... - Page 88 5. Database Sample Data, continued Sample 1. Select MENU > SAMPLE > Results List. Results List Note: The sample results list is displayed in descending order (the latest result on top). 2. Press and the following functions can be performed. •...
- Page 89 When the “Insufficient sample error” occurs, sample result is not shown in the smart-view window and indicated as “Sample aborted : Insufficient Sample Volume”. 4. Press the button to exit to the main screen. i-SmartCare 10 Blood Gas Analyzer...
- Page 90 5. Database Sample Data, continued Sample 1. Select MENU > SAMPLE > Results Search. Results Search Note: The search criteria are as follows: From and To (date of the search date range) Sample Type Patient ID ...
-
Page 91: Qc Data
LIS/HIS. Note: When the analyzer is running on a battery and the battery level is below 80 %, the print function is not available. 3. Press the button to exit to the main screen. i-SmartCare 10 Blood Gas Analyzer... - Page 92 5. Database QC Data, continued QC Results List 1. Select MENU > QC > Results List. Note: The QC Results will display in descending order (the latest-result on top). 2. Press and the following functions can be performed. • Use to scroll the results.
- Page 93 When the “Insufficient QC sample error” occurs, QC sample result is not shown in the smart-view window and indicated as “Sample aborted : Insufficient QC Sample Volume”. 4. Press the button to exit to the main screen. i-SmartCare 10 Blood Gas Analyzer...
- Page 94 5. Database QC Data, continued QC Results Search 1. Select MENU > QC > Results Search. Note: The search criteria are as follows: From and To (date of the search date range) QC Lot Accepted, Discarded, Pending QC or other results ...
- Page 95 80 %, the print function is not available. If the analyzer is not connected to the network or the external printer is not installed, the button will be deactivated. 6. Press to exit to the main screen. i-SmartCare 10 Blood Gas Analyzer...
- Page 96 5. Database QC Data, continued L-J Chart 1. Select MENU > QC > L-J Chart. 2. Select QC Lot, Parameter and Level on the top of the screen. The following chart appears for the selected parameters. Note: The most recent data is indicated to the right and values (up to 30) are displayed in the chart.
-
Page 97: Calibration Data
When the analyzer is running on a battery and the battery level is below 80 %, the print function is not available. If the analyzer is not connected to the network, the button is not shown. 3. Press to exit to the main screen. i-SmartCare 10 Blood Gas Analyzer... -
Page 98: Cartridge Data
5. Database Cartridge Data Cartridge Data 1. Select MENU > CARTRIDGE > Data. Note: The Cartridge Data list appears in descending order. (the most recent result on top). 2. Press and the following functions can be performed. • Use to the cartridge data list. - Page 99 2. “Data copy in progress. Please wait” message appears. 3. Once the data copy is complete, “Cartridge data copy completed.”, “Remove USB memory” message appears in order. 4. Remove USB memory from the USB port. i-SmartCare 10 Blood Gas Analyzer...
-
Page 100: Shutdown
6. Shutdown 6. Shutdown Analyzer Shutdown ......................100 Power Recovery ........................102... -
Page 101: Analyzer Shutdown
Shutdown Analyzer 1. Select MENU > MAINTENANCE > Shutdown. 2. Press YES and the following message appears. Note: After shutdown, if the analyzer is not restarted within 12 hours, the installed cartridge will be no longer usable. i-SmartCare 10 Blood Gas Analyzer... - Page 102 6. Shutdown Analyzer Shutdown, continued 3. Press YES and the following screen appears. Shutdown Analyzer, continued 4. “Turn off the analyzer” message appears. Then, turn off the power by pressing the “ ” mark. Note: To remove the power cable from the analyzer, unplug the power cord from the outlet first, then remove the power adaptor from the analyzer.
-
Page 103: Power Recovery
• If the analyzer is turned off longer than 12 hours, the cartridge will expire. 1. Cartridge Restart screen appears once the Cartridge restart is in progress. 2. Cartridge Restart normally takes about 19 minutes. 3. Once completed, the analyzer returns to the Ready status. i-SmartCare 10 Blood Gas Analyzer... -
Page 104: Maintenance
7. Maintenance 7. Maintenance Calibration ...........................104 Cartridge Removal ......................106 Cartridge Information ......................109 System Information ......................110 Event Log ..........................111 Analyzer Status ........................112 Cleaning ..........................114... -
Page 105: Calibration
2. Select MENU > CALIBRATION > Run 2P Cal to perform 2-Point Cal. Note: When the slope error appears after the completion of 2-Point Cal, the analyzer automatically repeats 2-Point Cal process up to 2-times. i-SmartCare 10 Blood Gas Analyzer... - Page 106 7. Maintenance Calibration, continued 3. Select MENU > CALIBRATION > Run O Cal to perform O Cal. Run Cal, continued Sensor status 1. The sensor status from the latest calibration performed appears as blue (normal) or red (Slope Error). Note: ...
-
Page 107: Cartridge Removal
The analyzer has been turned off for more than 12 hours. Note: When the analyzer is running on a battery and the battery level is below 40 %, the cartridge replace is not available. i-SmartCare 10 Blood Gas Analyzer... - Page 108 7. Maintenance Cartridge Removal, continued 2. Press Remove button on the Expired Cartridge screen and the Expired Cartridge, following screen appears. continued 3. Start the cartridge removal procedure following the instructions on the screen. Note: Do not put the cartridge cover back on the removed. The cartridge solution may leak out.
- Page 109 Note: Do not put the cartridge cover back on the removed. The cartridge solution may leak out. 4. To install a new cartridge, refer to 2. Installation > Cartridge Installation for detailed procedure. i-SmartCare 10 Blood Gas Analyzer...
-
Page 110: Cartridge Information
7. Maintenance Cartridge Information Cartridge 1. Select MENU > CARTRIDGE > Information. Information 2. Cartridge - Information screen includes the followings: • Cartridge information currently installed: serial number, lot number, installation date & time, expiration date & time, cartridge age •... -
Page 111: System Information
System Information 1. Select MENU > MAINTENANCE > System Information. 2. System Information screen includes the followings: • Software version • Firmware version • Instrument name • Serial number 3. Press to exit to the main screen. i-SmartCare 10 Blood Gas Analyzer... -
Page 112: Event Log
7. Maintenance Event Log Event Log 1. Select MENU > MAINTENANCE > Event Log. 2. The following events are to be recorded in the Event Log: • Power related events (Shutdown, Low Battery, Power Recovery) • Interface transmission related errors •... -
Page 113: Analyzer Status
Analyzer Status Analyzer Status 1. Select MENU > MAINTENANCE > Analyzer Status. 2. Raw Signal tab includes the following information: • Sensors’ raw signals Note: Any unsupported parameters in the cartridge are displayed as inactive. i-SmartCare 10 Blood Gas Analyzer... - Page 114 7. Maintenance Analyzer Status, continued 3. Instrument Status tab includes the following information: Analyzer Status, continued • Measuring temperature • Analyzer temperature (internal) • Battery level • Cartridge installation information, Cartridge door status (open/closed) • Sampler status (open/closed) Sampler door status (open/closed) Note: ...
-
Page 115: Cleaning
3. Clean the sampler cover, screen, and other contaminated parts of the analyzer with the cloth. 4. Wait for 10 minutes. 5. Wipe all surfaces with a wet cloth (water). 6. Finally, wipe the unit with a dry cloth. i-SmartCare 10 Blood Gas Analyzer... -
Page 116: Troubleshooting
8. Troubleshooting 8. Troubleshooting Troubleshooting ........................116 Error Code ...........................122... -
Page 117: Troubleshooting
• The screen does not respond to touching • The screen is frozen • Abnormal screen is conditions are detected 1. Turn off the power. 2. Wait for 10 seconds. 3. Turn on the power back. i-SmartCare 10 Blood Gas Analyzer... - Page 118 9. Check the battery level while the analyzer is on. 10. In case the charging level does not go up, contact your reseller or © i-SENS Customer Service center. 11. The analyzer will operate properly as long as it is connected with the power cable until the battery is replaced.
- Page 119 1. Check if the cartridge is an authorized CarePak cartridge. 2. Check if the expiration date is valid. 3. Check if the cartridge has not been previously used. 4. Re-open and close the cartridge door. i-SmartCare 10 Blood Gas Analyzer...
- Page 120 8. Troubleshooting Troubleshooting, continued Power • Power connected icon is not indicated while power cable is plugged into the analyzer. 1. Check if the connection between the analyzer and the power cable is loose. 2. Fix the loose power connection. In case you experience one of the following issues: •...
- Page 121 RESET switch located on the left side of the printer. 5. Connect the power adapter. When the analyzer is running on a battery and the battery level is below 80 %, the print function is not available. i-SmartCare 10 Blood Gas Analyzer...
- Page 122 8. Troubleshooting Troubleshooting, continued Sample Analysis In case you experience one of the following issues: • The “Insufficient sample amount” appears on the result screen. • The result is out of the measurement range. • A result is suspicious. 1. Try sample analysis again with the same sample. 2.
-
Page 123: Error Code
2. Take note of the error code. 3. Turn off the analyzer. 4. Wait for 10 seconds. 5. Turn on the analyzer. 6. If the error code still appears, please contact your reseller or service engineer immediately. i-SmartCare 10 Blood Gas Analyzer... - Page 124 9. Product Specifications 9. Product Specifications Operation Specifications .....................124 Instrument Specifications ....................126 Cartridge Specifications ......................127 Principles..........................128...
-
Page 125: Operation Specifications
• Operating temperature : 15 ~ 35 °C ※ It has been confirmed that i-SmartCare 10 is safe to operate in the range of 5 ~ 40 °C according to IEC 61010-1. The recommended range is from 15 to 35 °C for the desirable performance. - Page 126 9. Product Specifications Operation Specifications, continued Input Parameters • Input Parameters and Ranges Parameter Description Unit Input range Default Patient Patient Temp. °C 15.0 ~ 45.0 37.0 temperature Total g/dL 0.0 ~ 28.0 hemoglobin Oxygen 0 ~ 100 saturation Fraction of inspired 0 ~ 100 oxygen...
-
Page 127: Instrument Specifications
• Storage temperature: -20 ~ 50 °C • Storage Humidity: 0 ~ 90 % (relative humidity) • Dimension(width x height x depth): 269 mm x 391 mm x 255 mm • Weight: 8.4 kg (accessories excluded) i-SmartCare 10 Blood Gas Analyzer... -
Page 128: Cartridge Specifications
9. Product Specifications Cartridge Specifications Cartridge • Packaging unit: 1 cartridge • Uselife : Maximum 2 weeks or 3 weeks after installation on the analyzer. See Appendix B: ordering information • Shelf life : 6 months from the manufacturing date (unopened) •... -
Page 129: Principles
9. Product Specifications Principles Measuring The i-SmartCare 10 Blood Gas Analyzer measures pH, blood gas (pCO Principles ), electrolytes (Na , Ca , Cl ), hematocrit (Hct) and metabolite(Glu, Lac) using the potentiometry (ion selective electrode), amperometry and conductometry. Measuring principles for each parameter are as follows:... -
Page 130: Appendix A: Collecting And Handling Samples
Appendix A: Collecting and Handling Samples Caution • Observe standard precautions required by a hospital, laboratory, or other research facilities. • Handle and dispose all biological hazard in accordance with the relevant provisions and procedures. • Treat the used cartridge with blood, blood samples and blood sample tools and blood as a biohazard risk. -
Page 131: Appendix B: Order Information
100 Tests / 3 weeks 1063100 200 Tests / 3 weeks 1063200 300 Tests / 3 weeks 1063300 2. Quality Control Please contact your authorized i-SENS sales representative or visit www.i-sens.com for more information on obtaining quality control materials. i-SmartCare 10 Blood Gas Analyzer... - Page 132 Appendix B: Order Information 3. Analyzer Accessories Product Description Part No. Order Unit Power adapter 3152 Power cord 3153 Printer paper 3331 1 pack (4 rolls) Operator's Manual...
-
Page 133: Appendix C: Warranty
• Any damage caused during disassembling, repair or remodeling of the analyzer by a person not authorized from © i-SENS • Breakdown caused by using wrong electrical power • Any failure due to customer’s negligence or lack of care •...
Need help?
Do you have a question about the i-SmartCare 10 and is the answer not in the manual?
Questions and answers