Table of Contents
Advertisement
Advertisement
Table of Contents

Related Manuals for HQUA FS01

Summary of Contents for HQUA FS01
- Page 1 HQUA Instruction Manual for 1/2 HP Floating Fountain HQUA-FS01...
-
Page 2: Table Of Contents
Section 1 Safety Information…………..3 Section 2 General Information………..4-8 2.1 System Components 2.2 Specifications 2.3 Prepping for the Installation 2.4 Installation Section 3 Maintenance& WinterStorage...9 Section 4 Troubleshooting……………….10 Section 5 After-Sales Service…………...11 Our Commitment……...…………………..11 Version No.20180101 HQUA Technical Support Team At TX... -
Page 3: Section 1 Safety Information
Safety Information Section 1 Safety Information Before starting the installation job, it’s very important to read the entire instructions below. Make sure that you understand these in order to avoid any potential hazards. Failure to do so may result in serious personal injury or damage to the equipment. Electric Shock •... -
Page 4: Section 2 General Information
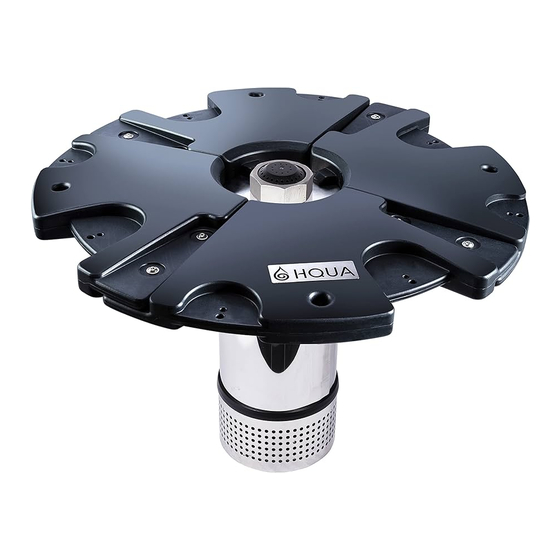
② ③ ① 2.1 System Components ① Floating Fountain Pump HQUA-FS01P 1. Easy to Install 2. Asynchronous Water Cooled Motor, Stainless Steel Shaft Bearing. 3. Energy Efficient, Fully Sealed Motor. 5.8A, 620W 100-120V, 4. Stainless Steel Suction Screen & Body. -
Page 5: Specifications
3. Stakes, cable, carabiners, cable clamps for mooring to secure the fountain. 2.2 Specification Power Max Pond Minimum Item Name Volts Amps Cord Size Depth FS01 110V 100’ 1/2 Acres 40” Pattern Size: 7’×30’ 2.3 Prepping for the installation: Tool Required: • Hammer • Boat/Raft/Swimsuit • 3/16” Allen Wrench •... -
Page 6: Installation
General Information 1. Ensure you have a close power for the connection. If you don’t, we always recommend to hire a licensed electrician to properly run power down to this unit. 2. Mount the Connection Box in a fixed position next to the power source. 3. - Page 7 General Information Fig. 3 3. a, Lay the float plate on the ground with the HQUA logo facing up. b, Place the fountain pump into the center of the float. Make sure the wire is covered by the float. c, Place all the accessories according to the order in Fig. 3. First is the “puzzle plate”, and the gasket, thread fastener, the nozzle, the last is another fastener.
- Page 8 General Information 5. Put the whole fountain assembly into the water and adjust rope by the carabiners or use a boat to help the fountain stay at your ideal position in your pond. Grab the ropes when you adjust the cable clamps, loose one side and through the hole of the stake.
-
Page 9: Section 3 Maintenance& Winterstorage
Maintenance & Winter Storage Section 3 Maintenance & Winter Storage Maintenance • Always unplug system before performing any maintenance or troubleshooting. • Always unplug system and refer servicing to a qualified electrician when: cord is damaged or frayed, compressor, power control, compressor fan, or other electrical components are producing unusual noises or odors. -
Page 10: Section 4 Troubleshooting
ISSUE Solution Intake Plugged or Fountain impeller stuck. Clean the intake. Contact HQUA if it still cannot be fixed. Not enough water in the pond. The water depth should not lower than 40”. Debris caught in nozzle hole or defective. -
Page 11: Section 5 After-Sales Service
HQUA warrants that the FS01 Floating Fountain is free from defects of material and workmanship for a period of 2 years from the date of purchase. During this period, HQUA will repair or replace, at its option, any defective HQUA UV chamber. Please return the defective part to your dealer for claim.
Need help?
Do you have a question about the FS01 and is the answer not in the manual?
Questions and answers