Table of Contents
Advertisement
Quick Links
Advertisement
Table of Contents

Related Manuals for Forte F24WOCVSS

Summary of Contents for Forte F24WOCVSS
- Page 1 Install Instructions & User Guide...
-
Page 2: Table Of Contents
CONTENTS PRECAUTIONS ............. . . 4 IMPORTANT SAFETY INSTRUCTIONS . -
Page 3: Precautions
PRECAUTIONS EXPLANATION OF SYMBOLS WARNING Hazards or unsafe practices which COULD result in severe personal injury or death. CAUTION Hazards or unsafe practices which COULD result in minor personal injury. WARNING: Read and understand all safety precautions. Failure to follow all instructions described in this user manual may result in electric shock, fire and/or serious personal injury. -
Page 4: Important Safety Instructions
IMPORTANT SAFETY INSTRUCTIONS WARNING: When properly cared for, your wall oven has been designed to be safe and reliable. Read all instructions carefully before use. These precautions will reduce the risk of burns, electric shock, fire and injury to people. When using this kitchen appliance, basic safety precautions must be followed; including those in the following pages. - Page 5 • Use an extinguisher ONLY if: You know you have a Class ABC extinguisher, and you already know how to operate it. The fire is small and contained in the area where it started. The fire department is being called. You can fight the fire with your back to an exit.
-
Page 6: Specifications
SPECIFICATIONS Figure 1 23.4"(594mm) 24.1"(612mm) 23.4"(594mm) Width 23.4” (594 mm) Height . ” ( Depth ” ( Weight 7 lbs. (32 kg) Power Supply 240 V / 60 Hz y t i 2.19 Cu. Ft. y t i 2.47 Cu. Ft. Rated Power 2300 W... -
Page 7: Parts And Features
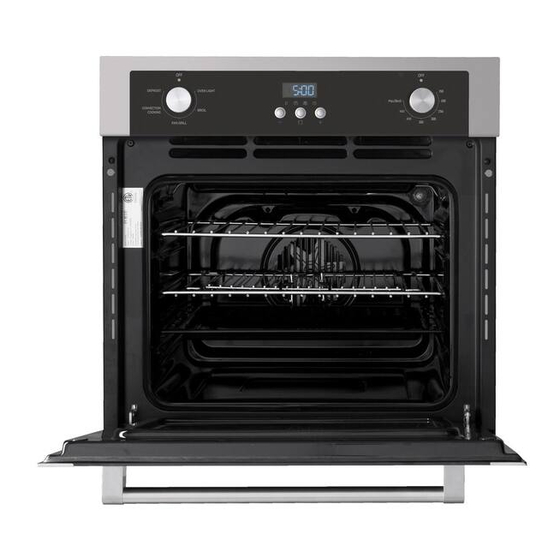
PARTS AND FEATURES PRODUCT PARTS & ACCESSORIES Figure 1 Control Panel Rack Position Guide Oven Rack (2) Cooling Vents Convection Fan and Heating Element Broiler Pan Oven Interior Light Oven Door Broiler Pan Rack Top Central Heating Element Door Handle... -
Page 8: Installation Instructions
INSTALLATION INSTRUCTIONS WARNING: Only a qualified service personnel in compliance with the instructions provided must install the appliance. The manufacturer declines all responsibility for improper installation, which may harm persons and animals and damage property. LOCATION REQUIREMENTS In order to ensure that the built-in appliance functions properly, the cabinet containing it must be appropriate. The figures below and the next page give the dimensions of the cut-out for installation in a wall cabinet unit or under the counter. - Page 9 Figure 3 22.5” (570 mm) 22.5" - 23.0” (575 mm - 585 mm) 22.0” (558 mm) 23. ” 22.3” 1.0” (24 mm) 0.4” (10 mm) 23.4” (594 mm) 0. ” ( Installation Under the Counter IMPORTANT: Installation must be Figure 4 in compliance with the consumption declaration.
- Page 10 ELECTRICAL REQUIREMENTS WARNING: Electrical Shock Hazard • DO NOT use an extension cord. • Failure to follow these instructions can result in death, fire, or electrical shock. • Any additions, changes or conversions required in order for this appliance to satisfactorily meet the application needs must be made by a qualified service personnel in accordance with the manufacturer’s instructions and all codes and requirements of the authority having jurisdiction.
- Page 11 4-WIRE BRANCH CIRCUIT Figure 6 Cable from Power Supply • Disconnect ground from neutral at free end of White Wire Red Wires conduit. • Connect the green ground wire from the oven to the bare or green ground wire in the juction box.
-
Page 12: Before Use
BEFORE USE This multi-function oven combines the advantages of traditional convection ovens with those of the more modern fan assisted models in a single appliance. It is an extremely versatile appliance that allows you to choose easily and safely between different cooking modes. IMPORTANT: The first time you use your appliance, we recommend that set the thermostat to the highest setting and leave the oven on for about half an hour with nothing in it, with the oven door shut. -
Page 13: Operation Instructions
OPERATION INSTRUCTIONS Figure 6 Timer End Cooking Time Set Oven Indicator Light Start Cooking Time Set Clock Cooking Mode Cooking Temperature Function Buttons Selection Knob Selection Knob COOKING MODES • Oven Light: Turns the oven light on when selected. • Broil: Best for melting cheese, toasting and browning. - Page 14 After setting the proper time (hour/minute), the " " symbol above the " " The time countdown begins. When it reaches the set time, the " " symbol above the " " To stop the alarm ringing, press any button. NOTE: This setting does not control the oven.
- Page 15 Setting timer with the end time of cooking Longest time that can be set is hours and 59 minutes. Press the " " button repeatedly until the " " symbol above " " flashes. Press " + " or " - " button and set the time for oven to stop cooking.
- Page 16 The fan in the oven will circulate the air at room temperature around the food. This is recommended for defrosting of any type of food, but in particular for delicate types of food which do not require heat, such as ice cream cakes, cream or custard desserts, and fruitcakes. By using the fan, the defrosting time is approximately halved.
-
Page 17: Care And Maintenance
CARE AND MAINTENANCE CLEANING WARNING: To avoid the risk of electric shock, ALWAYS ensure the appliance is turned off and completely cool before cleaning or doing any sort of maintenance. CAUTION: • To avoid possible burns, use care when cleaning the appliance. •... - Page 18 NOTE: ALWAYS follow label instructions on cleaning products. Interior Lower Grill Element • To remove the element, support one side with your hand while removing the retainer with the other. • When cleaning, make sure not to apply excessive force on the element as it is fragile. •...
- Page 19 Disconnect the oven from the power supply by means of the omni-polar switch used to connect the appliance to the electrical mains, or unplug the appliance if the plug is accessible. Remove the glass cover of the light bulb holder turning Figure 10 counter-clockwise.
-
Page 20: Troubleshooting
TROUBLESHOOTING Problem Possible Causes Solutions Verify that the electrical wires are connected to the mains No power properly. Refer to “Electrical Installation” section on page 11. Will not operate or turn on. Household fuse is blown or Replace the fuse or reset the circuit breaker. circuit breaker is tripped. -
Page 21: Limited Warranty
Your OVEN has been inspected and tested and is warranted subject to following for a period to 12 months from the date of purchase against defects in workmanship and materials. During this period, we undertake to repair or replace any defective part which was originally defective in our opinion.
Need help?
Do you have a question about the F24WOCVSS and is the answer not in the manual?
Questions and answers
HOW TO STOP BLOWER ON OVEN AFTER IT COOLS OFF FORTE 24 INCH CONVECTION
The blower on the Forte F24WOCVSS oven stays on until the oven cools down sufficiently. It turns off automatically once cooling is complete. There is no manual way to stop it before the oven has cooled.
This answer is automatically generated