Table of Contents
Advertisement
Quick Links
Advertisement
Chapters
Table of Contents

Subscribe to Our Youtube Channel
Related Manuals for Dover Imaje S7 Supra

Summary of Contents for Dover Imaje S7 Supra
- Page 2 gˆ”ˆ˜„’ i”š˜•‡›†šŒ•”@š•@š‹ˆ@–˜Œ”šˆ˜ u™ˆ@•‰@š‹ˆ@šˆ˜“Œ”„’ u™ˆ@•‰@š‹ˆ@•–ˆ˜„š•˜@Œ”šˆ˜‰„†ˆ r•›šŒ”ˆ@“„Œ”šˆ”„”†ˆ t˜•›…’ˆ@™‹••šŒ”Š c•”™›“„…’ˆ™ tˆ†‹”Œ†„’@™–ˆ†Œ‰Œ†„šŒ•”™ i”–›šO•›š–›š@†•””ˆ†šŒ•”™ A19620 C...
-
Page 3: Table Of Contents
GENERAL Contents Ink jet printing Dot-matrix characters Deflected continuous ink jet Preparing the printer Initialization Functions depending on the type of printer Editing a message Message Font Variables Parameters Editing symbols Production A19620 C... -
Page 4: General
General Ink jet printing Ink jet printing enables contact-free marking or dating of items. The principle used by IMAJE printers is the "deflected continuous jet" with dot-matrix type characters. Dot-matrix characters Each symbol (letter, digit, punctuation mark, etc.) is contained within a rectangular area known as the "matrix", divided into columns known as "trames"... -
Page 5: Deflected Continuous Ink Jet
General Deflected continuous ink jet The printer head is supplied with pressurized ink. The ink arrives in a cannon (2) with a hole "nozzle" (3) through which the ink is ejected to form a jet. The ink jet is modulated by a piezo-electric resonator (1) to form calibrated and equidistant droplets. -
Page 6: Preparing The Printer
General Preparing the printer Initialization Some of the functions or values contained in the printer must be initialized the first time the machine is used. They will then be stored in memory. This is used to choose the language for operator dialog, to adjust the clock and to configure the link between the printer and another device. -
Page 7: Editing A Message
General Editing a message Message A "message" is anything printed by a head. The message may consist of letters and digits of various alphabets and styles, and even ideograms and drawings. Once created, each message is stored in memory to be printed or modified when required. Font A "font"... -
Page 8: Parameters
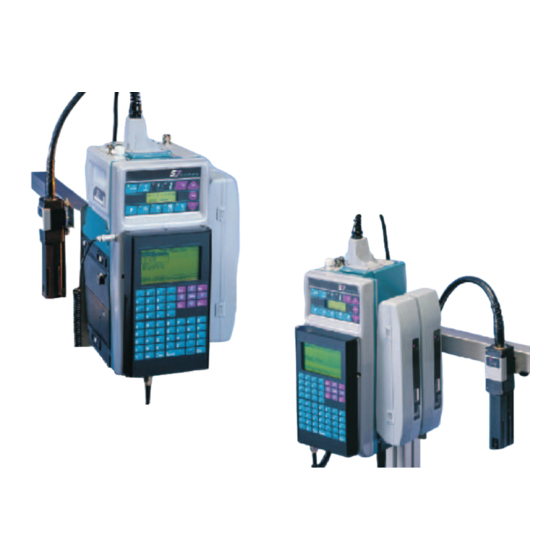
General Parameters In order for the printed message to satisfy your requirements, the printing parameters must be set; i.e. the printer must be adapted to the production line. Because of this, the printing speed must be adjusted according to the movement speed of the item to be marked and the printing direction must be selected according to the reading direction. - Page 9 INTRODUCTION TO THE PRINTER Contents Overall view The printer body The ink and additive cartridges The operator interface The print head The Terminal The Industrial Interface cassette The Extension cassette The head pressurisation accessory and the head drying kit A19620 C...
-
Page 10: Introduction To The Printer
Introduction to the printer Overall view The illustration below gives an overall view of the printer to enable you to identify the different parts of the unit. Extension cassette Ink and additive cartridges Print head Umbilical Terminal Printer body Industrial interface cassette Figure 1 A19620 C... -
Page 11: The Printer Body
Introduction to the printer The printer body This controls the electrical and hydraulic supply to the print head, it handles dialogue with the operator and makes it possible to connect up to the outside environment. The body incorporates the Industrial Interface cassette, the ink and additive cartridges, the Operator Interface and the electrical and hydraulic control modules. -
Page 12: The Print Head
Introduction to the printer The print head Various different types of head are available depending on your printer type: • Straight or angled head. • Single or twin-jet G type head. • Single or twin-jet M type head. This means that between 1 and 8 lines of symbols can be printed depending on the head and fonts used. - Page 13 Introduction to the printer Figure 2 : Single and twin-jet heads, covers removed Removable cover Recuperation tap Recuperation gutter Deflection plates Detection electrode Charge electrode Cannon Top front cover Umbilical Figure 2 A19620 C...
-
Page 14: The Terminal
Introduction to the printer The Terminal The keyboard has 59 keys and is fully sealed against dust and water. It can be cleaned by applying the cleaning solution used in the printer. The display consists of a large liquid crystal screen which is used to display messages in WYSIWYG format (what you see is what you get) and for providing help messages for programming and maintenance. -
Page 15: The Industrial Interface Cassette
Introduction to the printer The Industrial Interface cassette There are two models of Industrial Interface cassettes, depending on your printer type: • The Simple Industrial Interface cassette is used for standard connections: photocells, tachometers and external alarms. • The Complete Industrial Interface cassette is used both for standard connections and also for connections associated with various functions: reversing the direction of the message, initialising the counter, message selection (Parallel Interface, Message Increment), etc. -
Page 16: The Extension Cassette
Introduction to the printer The Extension cassette The Extension Cassette can be used for other printing possibilities, fonts and character generators. It is in fact an extension of the printer, an extension of memory, functions and printing possibilities. In this case it must remain connected to the printer all the time. This cassette can also be used for backing up the library of messages and associated data. -
Page 17: The Head Pressurisation Accessory And The Head Drying Kit
Introduction to the printer The head pressurisation accessory and the head drying kit The printer is systematically shipped with these kits if the ink used is slow or medium-drying (see Figure 1). The head pressurisation accessory is also recommended within dusty and humid environments. Clean air supply maintains a constant hygrometry in the print head for the best performances with slow and medium-drying inks. - Page 18 Introduction to the printer NOTES A19620 C...
- Page 19 USE OF THE TERMINAL Contents Terminal Operating principle Description of the screen Use of the keyboard How to access the function or command you require How to select a message Introduction to the menus How the menus, sub-menus, functions or commands are organised PRODUCTION Menu Printer Message...
-
Page 20: Terminal Operating Principle
Use of the Terminal Terminal Operating principle Description of the screen Menu 1 - Title zone MESSAGE EDITING FRANCE N : 004 Sub-menu 2 - Editing zone Message Font Variables (working zone) Function or commands Open 3 - Description zone 4 - Help zone 1 - Title zone This zone contains the name of the current menu (not for the ideographic languages) and the... - Page 21 Use of the Terminal 3 - Description zone Describes the function indicated. This zone doesn’t exist for ideographic languages. 4 - Help zone Describes the operations to be performed. Describes the components of a message in the MESSAGE EDITING menu: font, date and time stamp, bar code, tabulation, etc.
-
Page 22: Use Of The Keyboard
Use of the Terminal Use of the keyboard 1.2.1 Appearance of the keyboard The keyboard includes: • the letters of the alphabet, the standard numerical keypad, • Chinese, Arabic and Hebrew characters for the corresponding terminals, • number of symbols (%, $, &, , etc.) - does not apply to Chinese terminals, k n g •... - Page 23 Use of the Terminal This key is used to return to the beginning of the message starting from any position. This key provides quick access to the various menus using the upper case initial letter for the menu title, e.g. for "Font".
- Page 24 Use of the Terminal These key combinations are used to adjust the contrast of the display. Does not apply to the standard terminal. These keys change from the Latin alphabet to Chinese, Arabic or Hebrew characters and vice versa. In non-Latin character mode a pictogram is displayed in the help zone. Example :in the case of an Arabic terminal, in Arabic character mode: εA a) In MESSAGE EDITING mode, this key is used for toggling...
-
Page 25: How To Access The Function Or Command You Require
Use of the Terminal How to access the function or command you require MAIN MENU Several menus are shown for you to pRoduction choose from. Select the one you Message editing want. Printer preparation Symbol editing Message composition parameters ↑ ↓ for selection and VALID MESSAGE EDITING Font... -
Page 26: How To Select A Message
Use of the Terminal How to select a message PRODUCTION Printer Message Status mAint. Mode: Name-Number Select: IMAJE CYBERG FRANCE ..........TEST ← : Mode, → : Selection ↑, ↓, shift ↑, shift ↓, home, shift home A message can be selected by its number, which is the "Number-name"... -
Page 27: Introduction To The Menus
Use of the Terminal Introduction to the menus MAIN MENU pRoduction Message editing Printer preparation Symbole editing Printer status/Message selection ↑ ↓ for selection and VALID The main menu is divided into four subsidiary menus: • PRODUCTION: the operator interface is fully suited to everyday use of the printer and the PRODUCTION menu completes the picture. -
Page 28: How The Menus, Sub-Menus, Functions Or Commands Are Organised
Use of the Terminal How the menus, sub-menus, functions or commands are organised The order in which the items are treated in this chapter is the same as the order in which they are presented on the printer screen. The functions in italics are not available for all types of printer. PRODUCTION Status Printer... -
Page 29: Production Menu
Use of the Terminal PRODUCTION Menu PRODUCTION Printer Message Status mAint. The operator interface is fully suited to everyday use of the printer and the PRODUCTION menu completes the picture. The active message appears on the screen with all the variable items which are updated every second. -
Page 30: Message
Use of the Terminal Message Message Select message sAve library Load library Display/init counters 3.2.1 Select message When this function choice is validated, a dialog box presents you with the list of all the messages which are stored in the printer’s memory. Use the arrows and the key to select the message you wish to print. - Page 31 Use of the Terminal 3.2.3 Load library The "Load library" function copies the message library from an extension cassette into the command module. It is only available for S7 Mega and Supra printers. REMARK The memory in the command module is smaller than the memory in the extension cassette.
-
Page 32: Status
Use of the Terminal Status Status Ink M.status: Ready Jet status: Ready Ref P: + 2.39 Acc P: + 2.43 Tamp P: - 0.09 T° C: 20 Jet speed 1: 20.00 m/s This sub-menu is used to display the machine status and operating parameters in real time: •... -
Page 33: Maint
Use of the Terminal mAint mAint. Jet maintenance Fault override List of faults Exchange date Software version This menu provides all the functions necessary for jet maintenance. They can also be called via the operator interface. The terminal can be used when the printer is out of reach. You can also use this submenu to call up information on fault and module replacement histories as well as on the software version. - Page 34 Use of the Terminal 3.4.3 List of faults When this function is selected and validated, a dialog box is displayed giving the list of the last thirty faults and alarms in the order in which they accurred. For each fault or alarm, it is possible to show the last ten printer operating parameter values prior to the fault or alarm occuring.
-
Page 35: Message Editing Menu
Use of the Terminal MESSAGE EDITING Menu MESSAGE EDITING Message Font Variables Parameters The MESSAGE EDITING menu is used for editing a message together with the associated fonts, variables and parameters. The FONT, VARIABLES and PARAMETERS sub-menus can only be used when a message has been opened (using NEW or OPEN). - Page 36 Use of the Terminal 4.1.2 Open The OPEN command enables you to enter an existing message in order to modify its content, format or printing parameters. When OPEN is selected, a dialog box shows you the list of messages in memory. A message is searched either by name or by number. Please follow the instructions at the bottom of the screen for the choice of selection type, then for message selection.
- Page 37 Use of the Terminal 4.1.5 Load printer The command is used for transferring a message which is being edited to the printer, to carry out a print test for example. The message printed will be the current version of the message at the moment it was transferred.
-
Page 38: Font
Use of the Terminal Font Font select Font Select symbols Bolderization Tabulation barCodes This menu provides you with all tools you need for setting out your messages and obtaining top quality markings. These tools or commands can, in some instances, be used at the same time. 4.2.1 select Font When this selection is validated, a dialog box shows all the fonts available in your printer. - Page 39 Use of the Terminal With the S7 MEGA and SUPRA printers you also have: • Industrial Latin matrix 24 and 48 points high. • Other alphabets: Arabic, Greek, etc. • Other fonts: new york, ocrb, etc. • Special fonts: logos. •...
- Page 40 Use of the Terminal • Rapid multiline algorithms: Type of head Number of algorithms Characteristics 3 lines of 5 points high 3 lines of 7 points high 4 lines of 5 points high 2 lines of 7 points high 2 lines of 5 points high 050* 4 lines of 7 points high 3 lines of 5 points high...
- Page 41 Use of the Terminal 4.2.2 Select symbols When this function is validated, a dialog box displays all the symbols or characters associated with the font selected. Some fonts cannot be displayed in their entirety, and in this case use the right and left arrows to see all the characters.
- Page 42 Use of the Terminal 4.2.3 Bolderization This function is used to print characters you want to stand out in the message in bold, without changing their height. A dialog box asks you to enter the bolderization coefficient required. Coefficients are from 1 to 9, with 9 giving the boldest print (the default value is 1). From now on, all the symbols selected will be written on the screen with the bolderization factors chosen incorporated (what you see on the screen is what you get on the print-out).
- Page 43 Use of the Terminal 4.2.5 barCodes 4.2.5.1 Composition and insertion in the message This command enables you to insert up to three codes of different types (bar codes or Datamatrix codes) into the message. A dialog box asks you choose between 3 codes which are identified by their type.
- Page 44 Use of the Terminal 4.2.5.2 Details of each code Industrial codes 2/5 interleaved • Used to transcribe numerical characters only into bar code form. • These characters may be variables (counter, date, ...). • Max. 32 characters. The dialog box is as follows: Counter 2/5 interleaved Date...
- Page 45 Use of the Terminal Distribution codes These codes are only available for S7 MEGA and SUPRA printers. The cursor indicates the bottom of the assembled bar code (bars + numerical translation) irrespective of the position of the translation. You can print the bars and the plain text using the same jet. Pay attention to the height of the bars and the plain text.
- Page 46 Use of the Terminal EAN 128 and code 128 The dialog box is as follows: Counter Ean 128 Date Time Shiftcode Postdate Extern. elemt Aux. char. Mode 128 • Max. 47 characters. • The character set is subdivided into 4 menus which can be found in Mode 128 (Code A, Code B, Code C) and Auxiliary characters.
- Page 47 Use of the Terminal HIBC This code had the same characteristics as code 128 mode C. • The optimisation parameter is not valid. • There is no default mode. • The first two characters are in brackets. The dialogue box is identical to that for EAN 128 / code 128. Datamatrix code This code is only available for S7 MEGA and SUPRA printers.
-
Page 48: Variables
Use of the Terminal Variables Variables Counter Hour Date Optional autodating Postdate Shift code External This menu is used for inserting variable data items into your message. REMINDER We recommend you to enter the parameters before inserting variables into a message. 4.3.1 Counter This menu allows you to insert up to 15 counters into your message one or more times each. - Page 49 Use of the Terminal 4.3.2 Hour This menu is used for inserting time data items into your message. A dialog box prompts you to compose your "date and time-code" variable by entering details about the time (hour, minutes and seconds) and the separator characters to be used (: / .), in the order you require.
- Page 50 Use of the Terminal 4.3.3 Date This menu is used for inserting date data items into your message. A dialog box prompts you to compose your "Date" variable using the following details: Day of the week Day of the month Day of the year Last figure of the year y’...
- Page 51 Use of the Terminal 4.3.4 Optional autodating This function is only available for the S7 MEGA and S7 SUPRA printers. It can be used to insert all time and date variables encoded using the autodating table. Hours Minutes Month Day of the week Day of the month Day of the year Week of the year...
- Page 52 Use of the Terminal 4.3.5 Postdate This menu is used for inserting postdate date items in your message. A dialog box prompts you to compose your "Postdate" variable using the following details: Postdate 1 PostDay month PostDay year PostDay year programmab. J'*1 PostWeek year PostMonth year (Figure)
- Page 53 Use of the Terminal 4.3.6 Shift code A dialog box prompts you to choose between three different shift code display options available. Once you have validated your choice, a character (letter of the alphabet or number) is displayed in your message. NOTE The details of the shift codes can be set using the MESSAGE function in the INITIALIZATION sub-menu under the PRINTER...
-
Page 54: Parameters
Use of the Terminal Parameters Parameters Message Counter Postdate Barcode This menu is used for setting the parameters of the variables required for editing messages. It also includes the message parameters which configure the printer for the installation on the production site. - Page 55 Use of the Terminal • Head sense: Parameter programming depends on the installation of the printer on your production chain and the results you require. The printer proposes to choose the configuration among four which correspond to your application. NOTE In each case, reverse the direction of the item to read the message by transparency.
- Page 56 Use of the Terminal • Set off: This function is used for selecting between object mode, repetitive mode and multitop mode. - "Object" start mode is for printing a single message per item. - "Repetitive" start mode is for continuous printing for as long as the item detector is activated.
- Page 57 Use of the Terminal 4.4.2 Counter A dialog box prompts you to select a counter when you have made your selection, you can access the counter parameters and change them if required. The parameters are as follows: Counter First figure: 000000000 Last figure: 999999999...
- Page 58 Use of the Terminal • Evolution mode Inactive : counter does not change. Input A/Input B : the counter is incremented in response to data from inputs A or B of the Complete Industrial Interface cassette (only with S7 SUPRA printer). Object : the counter is incremented in response to data from the object pulse input.
- Page 59 Use of the Terminal 4.4.3 Postdate A dialog box prompts you to enter the postdate value in days, weeks or months. Postdate Duration 0000 Unit Modulus 0365 Modulo: This parameter is used for postdates greater than 365 days, and only affects the PostDay year programmab.
- Page 60 Use of the Terminal • Type Industrial: 2/5 interleaved, code 39. Distribution : EAN 13, EAN 8, UPCA, UPCE, EAN 128, code 128, HIBC. Two-dimensional: Datamatrix. • Plain text - only for distribution bar codes - allows you to specify whether the numeric equivalent should be present or absent and, if present, where it should be positioned.
-
Page 61: Example Of Message Programmation
Use of the Terminal Example of message programmation Create a message: 7 dot font 16:11:03 Best before: B a t c h 4 8 9 2 7 7 dot font 16 dot font Bolderization 2 Postdate PROCEDURE TO BE FOLLOWED POINTS TO FOR THE EXAMPLE GIVEN BELOW REMEMBER... - Page 62 Use of the Terminal MESSAGE EDITING Font Variables Parameters Message Open Save save As Load printer New is used to create a new message. Delete Close Set-up a new message ↑ ↓ ← → for selection and VALID to validate the step New. MESSAGE EDITING Message Font...
- Page 63 Use of the Terminal To thicken the characters "Batch 48927" you have to bolderize them. then MESSAGE EDITING TEST N : 006 Font Variables Parameters Message select Font The function Bolderization is under the sub- Select symbols menu Font. Bolderization Tabulation Best before: Any character or symbol of any font can be...
- Page 64 Use of the Terminal Before inserting the postdate in the message, initialize the postdate. then MESSAGE EDITING TEST N : 006 Font Variables Parameters Message Message Counter Best before: Postdate B a t c h 4 8 9 2 7 It is advisable to fix the variable parameters Barcode before inserting the variable in a message.
- Page 65 Use of the Terminal Choose 16 dot font to print the postdate in higher character than the rest of the message. then then MESSAGE EDITING TEST N : 006 Font Variables Parameters Message select Font Select symbols Bolderization Best before: Tabulation B a t c h 4 8 9 2 7 barCodes...
- Page 66 Use of the Terminal To insert the postdate then then then MESSAGE EDITING TEST N : 006 Message Font Variables Parameters Counter Hour Date Autodating table Best before : Postdate B a t c h 4 8 9 2 7 Shift code External Insert a counter...
- Page 67 Use of the Terminal MESSAGE EDITING TEST N : 006 Font Variables Parameters Message 16:11:03 The message is created. To print it, you need Best before : B a t c h 4 8 9 2 7 to adjust the message parameters to adapt it to the printer installation.
- Page 68 Use of the Terminal Save a message then then TEST N : 006 MESSAGE EDITING In this sub-menu you can use the "load printer Message Font Variables Parameters function" to do a printing test of the open message (with the key of the operator Open 16:11:03...
-
Page 69: Printer Preparation Menu
Use of the Terminal PRINTER PREPARATION Menu PREPARATION Initialization Options Access code The PRINTER PREPARATION menu is use for adapting the printer for the production site and marking requirements. It is also used to display the available functions and software version and to program an access code in order to protect the menus against unauthorised access. - Page 70 Use of the Terminal 5.1.1 Message General parameters Counter Postdate Shift code Barcode Optional autodating Miscellaneous • The General parameters, Counter, Postdate, Barcode functions are used to enter the default values of the various message parameters and variables. These values should be defined when the printer is installed.
- Page 71 Use of the Terminal Example: Hours coding Table: Hours Field: 1/24 Value: ctrl R : copy • Field: 1/24 tells you that you are entering the code for the first time. Encoding is performed on 24 fields corresponding to the 24 hours of the day. •...
- Page 72 Use of the Terminal Shift code 2: It is used for printing cyclical time data over a period longer than one day (in comparison to the Shift code 1). Starting day: Starting month: Starting time: 00:00 Day interval: Hour interval: 00:00 Mode: Shift code 3:...
- Page 73 Use of the Terminal • Miscellaneous Horiz. resol (1/10): Vert. resol (1/10): Head/obj. distance: Top object mode: continue Operation: Std message Month language 1: Français Month language 2: Français 1st day of the week: Sunday Algo 1 : Algo 2 : Algo 3 : Algo 4 : - Horiz.
- Page 74 Use of the Terminal 5.1.2 Printer This menu is useful when the printer is used for the first time and when component parts are changed. In fact the different settings can be used to initialise the machine. Date/hour Language Head level Communication Miscellaneous •...
- Page 75 Use of the Terminal • Head height: The actual difference in elevation between the head and the ink circuit on the production site can be set via a dialog box. The value is negative if the head is lower than the printer and positive if it is higher.
- Page 76 Use of the Terminal - Fault relay: MACHINE STATUS Machine Power off Stand by Start phase Alarm Stop phase ready to print Mode 1 Non activated Non activated Non activated Non activated Activated Non activated Mode 2 Non activated Non activated Activated Non activated Activated...
- Page 77 Use of the Terminal - Prt spd fault 0V: This function is for inhibiting the "conveyor speed 40" alarm or trame frequency. - Dtop filtering (µs) : Value ranging from 200 µs to 9999 µs. This filtering corresponds to the minimum amount of time that the object detection signal should reach in order to be processed by the printer.
-
Page 78: Options
Use of the Terminal Options Options Machine options Totalizer 5.2.1 Machine options A dialog box list all the different printer possible functions. The functions available are shown in bright letters and the functions which are not available are shown in dotted-line form. 5.2.2 Totalizer This command displays a counter... -
Page 79: Symbol Editing Menu
Use of the Terminal SYMBOL EDITING Menu Symbol Editing Symbol Size The SYMBOL EDITING Menu enables you to create your own symbol or logo. It is only available for the S7 MEGA and S7 SUPRA printers. CAUTION The height of a symbol is defined when it is created. To enable it to be printed, an Imaje font with at least the same height as the symbol must be present in the printer. - Page 80 Use of the Terminal 6.1.1 The New command is for creating a new symbol to be lodged in a font. When choosing New, a dialog box will ask you for: • the title of the font (max. 8 characters). • the number of the font (201 to 255). •...
- Page 81 Use of the Terminal 6.1.5 Delete This command offers the choice of a Symbol or Symbol font deletion. Select Symbol if you want to delete only one symbol. Select Symbol font if you want to delete a complete font of symbols. 6.1.6 Close The Close command is for leaving a font in which you have just created or modified a symbol.
-
Page 82: General Rule For Creating One Or More Symbols In A Font
Use of the Terminal General rule for creating one or more symbols in a font To create the font: • Give the font a name (8 characters). • Give the font a number (201 to 255). • Give a number to the symbol in the font (001 to 224). •... -
Page 83: Drawing A Symbol
Use of the Terminal Drawing a symbol 6.4.1 Screen After definition of the name and number of the font, the number and size of the symbol, the printer will display the following screen. Number of symbols existing in the font Symbol number Number of the font Name of the font... - Page 84 Use of the Terminal 6.4.2 Using the keys In dot by dot mode: >> The cursor can be position in the drawing grid, in the direction of the arrows. For changing the colour of the dot pointed by the cursor. In line mode: —...
- Page 85 Use of the Terminal In zone mode: For selecting the colour of the zone (white or black). Depress 2 keys repeatedly to define a zone. 6.4.3 Other keys, other functions • Screening of the symbol at scale 1: The symbol is displayed in a window at the top right. •...
- Page 86 Use of the Terminal 6.4.4 Symbol display screen FRANCE : 202 003/004 Symbol Size Format: 016*016 num: 003/004 ref: 034 Choice of a symbol in the selected font ← → ← → selection and VALID This screen can be used to display and select a symbol from an existing font in order to enable the shape, size or number to be modified if desired.
- Page 87 USE OF THE OPERATOR INTERFACE Contents Description of the Operator Interface Overall view of the Operator Interface Overall view of the menus Operating mode MESSAGE PARAMETERS MAINTENANCE A19620 C...
-
Page 88: Description Of The Operator Interface
Use of the operator interface Description of the Operator Interface Overall view of the Operator Interface 15 NOV. 03- 08 : 50 No 001 : ESSAI w x y z $ % The Operator Interface includes: 15 NOV. 03- 08 : 50 Two-line liquid crystal display. - Page 89 Use of the operator interface User keys This is to turn the printer on and off. Turning on the printer also starts up the jet. In the PRINTER PREPARATION menu of the Terminal it is possible to program the printer so that it starts as soon as powered up, without having to press the switch.
- Page 90 Use of the operator interface Operating keys This key is used to leave a menu, back up to the original display. Whatever has not been validated is not taken into account. Move forward in the menu. Validates the selection displayed. Move backward in the menu.
- Page 91 Use of the operator interface Modification of a message zone (only for latin languages), load and save library. Setting printer date and time, insertion of an access code. Printer maintenance. Adjusting the contrast of the display. Obtain information on a fault/alarm, clear a fault/alarm. When a fault occurs, the red indicator glows and when an alarm occurs, the red...
-
Page 92: Overall View Of The Menus
Use of the operator interface Overall view of the menus FAULT JET STATUS: START INIT. COUNTER No 01? MESSAGE SELECTION OPEN COVER STOP INK JET? VALUE = 000000000 001 IMAJE -> PRINT UNBLOCK NOZZLE? INIT. COUNTER No 02? VALUE = 000000000 INIT. -
Page 93: Operating Mode
Use of the operator interface Operating mode The operator interface is designed to make everyday use of the printer easier. Pressing one of the three menu keys displays the first level of the menu selected and the indicator light on the key remains on for as long as you are in this particular menu. Use the arrows to select the action you wish to take and press key to access this... - Page 94 Use of the operator interface MODIFY ZONE? No 006 : FRANCE This function is not useable for printer configurated in Chinese, Arabic, Korean and Hebrew. The message has been programmed via the terminal. The message is automatically divided into different zones depending on the constant data items it includes.
- Page 95 Use of the operator interface You want to alter the batch number in MODIFY ZONE 02/02 zone 2. BATCH 48524 The cursor goes to the beginning of the MODIFY ZONE 02/02 zone. Use the arrow keys to place the BATCH 48524 cursor under the character which is to be changed Cursor...
- Page 96 Use of the operator interface SAVE LIBRARY? This feature is used to back up the complete library of messages in a Extension cassette. A warning message is displayed to indicate that this operation will delete all messages present in the cassette. !ERASE CASSETTE! "VALID"...
-
Page 97: Parameters
Use of the operator interface PARAMETERS INIT. COUNTER No 01? VALUE = 000000000 This key enables you to see the correct value of the counters and to return them to their initial value by pressing . The initial value is then displayed. The key allows you to set the printer time and date, and to insert a code to lock access. - Page 98 Use of the operator interface INSERT MINUTE? 18 : 55 SET TIME? 18 : 55 Use the same procedure for setting the SET DATE? day, month and year. 25/10/03 Access lock: indicator light goes on. SET TIME? 17 : 54 PROTECTED ACCESS? CODE? 1, 2, 3, 4 correspond to the...
-
Page 99: Maintenance
Use of the operator interface MAINTENANCE This function is associated with jet maintenance. JET STATUS: START STOP INK JET? In this step, you are going to stop or start up the jet. The first line shows you whether the jet status is on or off, and on the second line the printer asks whether you want to start up or stop the jet. - Page 100 Use of the operator interface ADJUST THE JET? If you validate this function, you will start the jet or jets, fault associated with the jet will no longer be monitored. It will therefore be possible for you to make an adjustment without being interrupted by a fault indication.
- Page 101 Use of the operator interface TEST THE ELECTROVALVES? If you validate this function, the printer will stop and you will control all the electrovalves manually. There are nine electrovalves. Each time you validate, you are either opening or closing the electrovalve concerned. Check, by ear, whether the valve is operating properly.
- Page 102 Use of the operator interface CONTROL JET RECUPERATION: YES You can override the jet recuperation check, i.e. the jet recuperation fault is no longer monitored. Whenever the printer is stopped, this function goes back to its initial value. CAUTION This function should only be used for maintenance purposes, on an exceptional basis.
- Page 103 ROUTINE MAINTENANCE Contents Summary table of regular procedures Shut-down procedures Daily shut-down Before a shut-down lasting between 3 days and 1 week Before a shut-down lasting for more than one week Start-up procedures Daily start-up Start-up after a shut-down lasting between 3 days and 1 week Start-up after a shut-down lasting for more than 1 week Routine maintenance procedures Cleaning the head...
-
Page 104: Routine Maintenance
Routine maintenance Regular procedures Regular procedures are frequent operations which have to be performed in order to optimize printer operation. Summary table of regular procedures Shut-down procedures Frequency Operation Time Comments Should be performed at least Daily shut-down. 8 mins Press once a week. -
Page 105: Shut-Down Procedures
Routine maintenance Shut-down procedures Daily shut-down Position the head on its servicing support. Stop the printer with the jet(s) STOP PRINTER? running. VALID STOP IN PROGRESS PLEASE WAIT When the printer is stopped, fit the ON/OFF? anti-block stopper (if specified on the ink usage specification sheet). -
Page 106: Before A Shut-Down Lasting Between 3 Days And 1 Week
Routine maintenance Before a shut-down lasting between 3 days and 1 week CAUTION This procedure only concerns printers with a dual-jet head. Position the head on its servicing stand. Stop the printer with the jet(s) running: press After the machine stops, close the recuperation gutter. -
Page 107: Before A Shut-Down Lasting For More Than One Week
Routine maintenance Before a shut-down lasting for more than one week Start the flushing procedure by draining the printer completely, then flush using the additive. Two depressed empty cartridges are required. CAUTION Carry out the steps shown below with care so as to avoid any liquid being splashed. -
Page 108: Start-Up Procedures
Routine maintenance Start-up procedures Daily start-up Position the head on its servicing support. Open the head cover. Remove the anti-block stopper (if fitted). Clean the head if there are traces of ink (see procedure "cleaning the head"). Press (or connect only to the main power depending on the start-up configuration). -
Page 109: Start-Up After A Shut-Down Lasting Between 3 Days And 1 Week
Routine maintenance Start-up after a shut-down lasting between 3 days and 1 week CAUTION This procedure only concerns printers with a dual-jet head. • Same procedure as for daily start-up. • Before start-up, open the recuperation gutter. • Remove the nozzle protection (if fitted). Start-up after a shut-down lasting for more than 1 week •... -
Page 110: Routine Maintenance Procedures
Routine maintenance Routine maintenance procedures Cleaning the head Stop the jet and position the head on its servicing support. Close the recuperation gutter. Closed Clean the electrodes and the cannon with cleaning solution. A19620 C... - Page 111 Routine maintenance Dry carefully (air dryer or drying kit). (The operation of the drying kit is specified in the ink technical data sheet). Open the gutter and start up the jet again. Open A19620 C...
-
Page 112: Difficult Start-Up
Routine maintenance Difficult start-up You may observe two kinds of problems at jet start-up: no jet is present, or the jet is uncontrolled and the printhead is dirty with ink. In each case start with a printhead cleaning. If after a few trials the jet is not OK, you will have to perform the complete procedure for difficult start-up. - Page 113 Routine maintenance Validate the next function. INTRODUCE CLEANING SOLUTION? Pour cleaning solution down the cannon for approximately 20 seconds. Finally validate the function. CHECK JET STABILITY? Once the jet is stable, stop the stability check and clean the head. Once this phase is over, start-up the jet again an inspect the present of the jet in the gutter.
-
Page 114: Changing The Ink Or Additive Cartridge
Routine maintenance Changing the ink or additive cartridge This operation is used when the indicators remain lit up. NOTE The cartridge can not be mistaken because of the duct. This is on the right for the ink and on the left for the additive. Remove the corresponding cartridge holder: Cartridge holder... - Page 115 Routine maintenance Replace the old cartridge with the new one. CAUTION Ensure that the new cartridge is of the same type of ink or additive as the old one code indicated on the label). Replace the new cartridge and check that the duct is correctly positioned.
- Page 116 Routine maintenance NOTES A19620 C...
- Page 117 TROUBLE SHOOTING Contents Introduction Preliminary checks Checking general operating parameters Using the Operator Interface Using the Terminal Diagnosis help Introduction Example of diagnosis When the printer is started up When printer is in service Summary table of faults and alarms Adjustments Jet in the gutter adjustment Break-off point adjustment...
-
Page 118: Trouble Shooting
Trouble shooting Introduction This chapter is a trouble-shooting guide which enables any user to locate the origin of a fault logically and quickly. Starting with a general identification of the problem, the method passes through a series of checks to narrow the cause down to the defective item involved without any part having to be removed. This guide list all the possible faults and indicates the action required for resuming normal operation. -
Page 119: Preliminary Checks
Trouble shooting Preliminary checks All trouble-shooting should start with the preliminary checks. These checks consist of a visual inspection for identifying problems associated with dirty parts, leaks of ink or electrical connections. External appearance Sub-assembly to be checked Type of problem looked for •... -
Page 120: Checking General Operating Parameters
Trouble shooting Checking general operating parameters Using the Operator Interface PRESS DISPLAY REMARKS FLUSH THE indicator light is on. INK CIRCUIT? STATUS OF PRINTER PARAMETER? Pref:2.77b / Pr:2.77b Pref : Pressure set-point for printer installation. Pbuffer:-0.11b T=24 : Actual pressure in the Speed j1: 20.03 m/s ink circuit. -
Page 121: Using The Terminal
Trouble shooting Using the Terminal In the STATUS sub-menu under the PRODUCTION menu, a dialog box tells you the status of the machine and of its operating parameters: PRODUCTION Printer Status Message mAint Ink M.status: Ready Jet status: Ready Ref P: + 2.39 Acc P: + 2.43 Tamp P: -0.09 T°C : 20 Jet speed 1: 20.00 m/s ↑... -
Page 122: Diagnosis Help
Trouble shooting Diagnosis help Introduction The tables shown in this chapter consist of two columns under the following headings: • Problems. • Remedies. In the table, each of the problems is identified by a number in bold type. Each problem may be solved by several "Remedies". Example of diagnosis Problems Actions and remedies... -
Page 123: When The Printer Is Started Up
Trouble shooting When the printer is started up Problems Remedies 1- Display and screen Off. 1a- Check power supply. 1b- Check the power supply cable and connection. 1c- Change the 1.25 a time delay fuse. 2- Terminal screen off, power to 2a- Check Terminal connection and cable. -
Page 124: When Printer Is In Service
Trouble shooting When printer is in service Problems Actions and remedies 1- Ink level: LOW-50- 1a- Prepare a new ink cartridge. 2- Additive level: LOW-51- 2a- Prepare a new additive cartridge. 3- Ink level: EMPTY-52- 3a- Replace the ink cartridge. or draining cartridge absent. - Page 125 Trouble shooting Problems Actions and remedies 10- Droplet detection -81-82- 10a-Clean and dry the head electrodes, re-start the jets. 10b-Make sure the ink used in the printer is valid: expiry date (see date shown on cartridge). If the ink is past its use-by date, drain the printer and use a more recent ink cartridge.
- Page 126 Trouble shooting Problems Actions and remedies 18- Objects not printed and no 18a-Check the contents of the message selected for printing. fault indicated. 18b-Check the "Set-off mode" "Margin" "Print speed" and "Tacho" print parameters. 18c-Perform print test using the Key. Check photocell and tachometer pulse generator operation and connections.
-
Page 127: Summary Table Of Faults And Alarms
Trouble shooting Summary table of faults and alarms Alarm or Number Fault displayed Fault 01 to 03 Data memories 04 to 08 Data memories 46 - 47 Data memories 13 - 17 - 19 Data memories 22 - 26 Data memories 30 - 31 Data memories 09 and 11... -
Page 128: Adjustments
Trouble shooting Adjustments Jet in the gutter adjustment Special tools (service kit): - Cannon direction tool (ring spanner). - Goggles. - Bifocal magnifying glass. - Hex. Allen key, 1.5. - Head cleaning kit. - Tweezers. To avoid getting ink in the eyes, goggles must be worn during these operations. PRELIMINARY CHECKS 6 - Unfasten the cannon-holder 7 - Bring the jet to point A by tilting... - Page 129 Trouble shooting 8 - Centre the jet in the charge 9 - Centre the jet in the gutter 10 -Repeat points 7, 8 and 9 until electrode by sight using the lower using the upper cam (see the jet is centred in the gutter and cam (see Figure 1).
-
Page 130: Break-Off Point Adjustment
Trouble shooting Break-off point adjustment Special tools : • Bifocal magnifying glass. • Hex head screwdriver 2 mm. PREPARATION CHECKS AND TESTS 1 - Place the head on the 4 - Close the head covers. Clear maintenance stand. any faults. Start the jet(s) and leave them 5 - Perform some printing tests running for at least 1/2 an hour. - Page 131 CONSUMABLES Contents Consumables Definitions Units Labelling Consumables and the application Consumables and the printer Ink usage specification Consumption Consumables and safety Consumables, guarantee and responsibility A19620 C...
-
Page 132: Consumables
Consumables Consumables Definitions The term consumables refers to products consumed during printing or used to ensure correct operation of the printer. This includes: • Ink: Used for printing. Its formula contains all elements required for: - stability in the container (expiration date) and in the machine, - printing performance (adhesion to the identified product and resistance to specific constraints). -
Page 133: Labelling
Consumables Labelling This serves three purposes: • Identify the supplier, indicating the contact details. • Inform the user about the product itself: - article reference, - manufacturing batch number: to be quoted if you need to contact our Technical Support, - use before date: limit date up to which the original quality of the product is guaranteed. -
Page 134: Consumables And The Application
Consumables Consumables and the application Qualification of the application is the sole responsibility of the customer. In order to assist with this qualification (which covers the ink, ink jet equipment, nature of products, manufacturing process, printing requirement specifications, etc.), Imaje makes a wide range of printers and inks available to its current and potential customers for producing print samples. -
Page 135: Consumables And Safety
Consumables Consumables and safety The use of our consumables implies the knowledge of some of the associated physical and chemical characteristics, as well as the safety recommendations for storage, handling and use of these products. All of this information is included on a material safety data sheet (msds), which available up on request from our sales offices. -
Page 136: Consumables, Guarantee And Responsibility
Consumables Consumables, guarantee and responsibility Our consumables have been specially designed to operate with Imaje printers and give the best results in terms of ease of use and consumption. The use of consumables other than those proposed by Imaje invalidates the equipment guarantee and any complaints concerning a deterioration of performance leading to production stoppages. - Page 137 TECHNICAL SPECIFICATIONS A19620 C...
- Page 138 Technical specifications Physical characteristics Dimensions : mm (inches) Weight : Performances parameters Printing Max. speed (according to type of head and to type of printer) Functions available (see features on following page) Operating mode possible Operating characteristics Power sources Operating limits Operating temperature Humidity Installation details...
- Page 139 Technical specifications • Printer body 390x210x80 (15.35x8.27x7.09) • Print head (straight) 225x45x45 (8.86x1.77x1.77) • Consumable products cartridge 230x60x35 (9.05x2.36x1.38) (small)-250x55x55 (9.84x2.16x2.16) (large) • Cassette 140x140x40 (5.51x5.51x1.57) • Terminal 255x155x35 (10.04x6.1x1.38) • Complete machine less than 10 kg (22 • Cartridge less than 0.5 kg (1.1 (small) - less than 0,8 kg (1.76 ) (large)
- Page 140 Technical specifications TERMINAL Physical characteristics Dimensions (mm) 255x55x35 (10.04x6.1x1.38 in) Weight (kg) < 0.5 (1.1 Type Standard, Chinese, Arabic, Hebrew. Keyboard 59 keys. Display LCD, WYSIWYG, 128 x 240 pixels, up to 8 lines of text or 48 points. Interface with printer Type V24/RS232C asynchronous serial interface.
- Page 141 Technical specifications Symbols editing Height: from 5 to 48 points Width: from 1 to 127 points Algorithm • Quality, 30 mm (1.18 inches) for G head and 20 mm (0.79 inches) for M head. • Rapid multiline, 10 mm (0.39 inches) for G head and 8 mm (0.31 inches) for M head.
- Page 142 Technical specifications NOTES A19620 C...
- Page 143 INPUT/OUTPUT CONNECTIONS Contents Industrial Interface cassettes Connection Inputs Outputs Message selection Extension Cassette Serial link Extended library A19620 C...
-
Page 144: Input/Output Connections
Input/Output connections Industrial Interface cassettes There are two types of Industrial Interface cassettes depending on the configuration of your printer: • The Simple Industrial Interface cassette, which includes: - TOP, TACHY 1, TACHY 2 inputs. - Alarm and Fault outputs. •... - Page 145 Input/Output connections Terminal identification INPUTS: INH + Item TOP pulse inhibition INH - INVMES + Message direction reversal INVMES - RAZCP A + Reset to initial counter value RAZCP A - RAZCP B + Reset to initial counter value RAZCP B - INCCP A + INCCP A - Increment of a counter parameter with this input...
- Page 146 Input/Output connections TOP + Start print TOP - TACHY1 + Tacho 1 input TACHY1 - TACHY2 + Tacho 2 input TACHY2 - BIB + Message increment or decrement direction BIB - D0 à D7 Parallel interface data OUTPUTS: SYNC + Message synchronisation SYNC - ALC F...
-
Page 147: Inputs
Input/Output connections Inputs 1.2.1 Input details The input circuits act as a high speed photocoupler with an isolation voltage of 3 kV. • Operating voltage between 10 and 24 V. • Input current regulated within the operating voltage range. • Max. operating frequency: 6.25 kHz, 200 kHz for the tachometric input. 1.2.2 TOP: object detection cell •... - Page 148 Input/Output connections 1.2.4 TACHY 1, TACHY 2: tachometric pulse generator • Purpose: When the speed of the conveyor is variable, the TACHY+ and TACHY- terminals on the Industrial Interface cassette can be used for connecting up a tachometer for sequencing printing (it makes no difference whether the connection is made on the Tachy 1 or Tachy 2 terminal).
-
Page 149: Outputs
Input/Output connections Outputs 1.3.1 ALC: alarm output This output is used for announcing a printer malfunction which does not prevent printing. The alarm is activated to attract the operator’s attention so that he can then eliminate the cause of the problem. - Page 150 Input/Output connections 1.3.2 ALDEF: fault output This output is used for announcing a printer malfunction which prevents printing. It can also be activated on start-up if the printer is not ready. This output can be connected to a flashing light or audible alarm and in addition, to the conveyor power supply to halt the production line.
-
Page 151: Message Selection
Input/Output connections Message selection 1.4.1 Message increment Message selection is made by means of the BIB and INCMES inputs. The BIB at high level input is used to increment. The BIB at low level input is used to decrement. Depending on the level of the BIB input, each pulse on the INCMES input changes the number of the active message for printing. -
Page 152: Extension Cassette
Input/Output connections Extension Cassette Serial link The Extension cassette makes it possible for you to control the printer from a computer or PC, using a RS232/V24 serial link, that may also work as current loop or RS422 serial link. Extended library When an Extension cassette is used the library contains up to 880 messages. - Page 153 REVISION Update of the manual • The revision index A corresponds to the first edition of this manual. • The revision index changes with every modifications. • The modified pages are mentioned in the following table. This one indicates all updating since the first edition.
- Page 154 09/2002 A19620 C...
Need help?
Do you have a question about the Imaje S7 Supra and is the answer not in the manual?
Questions and answers