Table of Contents
Advertisement
Quick Links
User Manual
Direct Connect
Water Dispenser
With R.O. System
MODEL: CCDC02
1. READ these instructions carefully before installing and operating the wa-
ter dispenser. Keep them for further reference.
2. Record in the space below the "SERIAL NO." found on the nameplate on
your water dispenser and retain this information for future reference.
SERIAL NO.:
Please save sales receipt for warranty.
Advertisement
Table of Contents
Troubleshooting

Summary of Contents for commercial cool CCDC02
- Page 1 Direct Connect Water Dispenser With R.O. System MODEL: CCDC02 1. READ these instructions carefully before installing and operating the wa- ter dispenser. Keep them for further reference. 2. Record in the space below the “SERIAL NO.” found on the nameplate on your water dispenser and retain this information for future reference.
-
Page 2: Table Of Contents
CONTENTS SAFETY INFORMATION Important Safety Instructions ............................3-4 Grounding Instructions ................................. 5 SET UP & USE Installation Guide ..................................6 Parts & Features ..................................7 Before Using Your Water Dispenser ..........................8 Installation ....................................9-13 Operating Instructions ..............................14-16 Cleaning and Maintenance ............................17-18 TROUBLE SHOOTING &... -
Page 3: Safety Information
SAFETY INFORMATION DANGER WARNING CAUTION DANGER - Immediate hazards WARNING - Hazards or unsafe CAUTION - Hazards or unsafe which WILL result in severe practices which COULD result in practices which COULD result in personal injury or death severe personal injury or death minor personal injury IMPORTANT SAFETY INSTRUCTIONS WARNING... - Page 4 SAFETY INFORMATION 11. The water dispenser should not be recessed or built-in to an enclosed cabinet. It is designed for freestanding installation only. 12. Do not operate in the presence of explosive fumes. 13. All repair or maintenance should be done by a qualified professional. 14.
-
Page 5: Grounding Instructions
SAFETY INFORMATION GROUNDING INSTRUCTIONS ELECTRICAL REQUIREMENTS The electrical requirements are a 115 volt 60 Hz, AC only, 15 amp. It is recommended that a separate circuit serving only the product be provided. The product is equipped with a 3-wire cord having a 3-prong grounding plug. It must be plugged into a wall receptacle that is properly installed and grounded. -
Page 6: Set Up & Use
SET UP & USE INSTALLATION GUIDE 1. Unpack your water dispenser by removing all packaging materials like carton, base, foams, adhesive tape, etc. 2. Remove all accessories, internal packaging material used to hold shelves, ice tray, etc. in place. 3. Clean the remains of all adhesive tap used and remove all printed material supplied. -
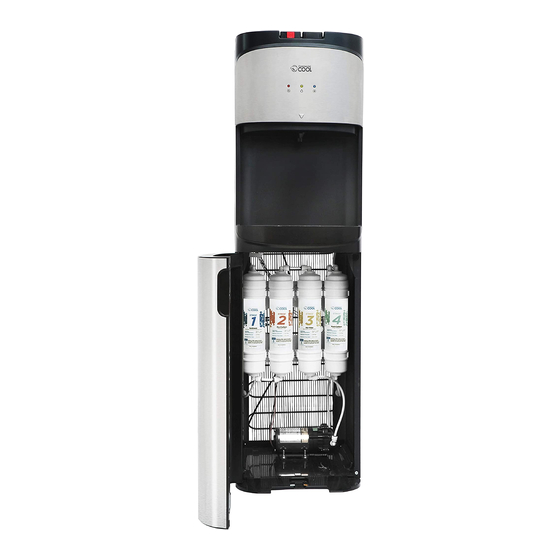
Page 7: Parts & Features
SET UP & USE PARTS & FEATURES Adapter Filter Flushing 3 Way Adapter with Valve (metal) Adapter (plastic) (4) Filters Cooling Switch Note: Depending on the type of plumbing Heating Switch and type of pipes, some installation parts required may not be included with the water dispenser. -
Page 8: Before Using Your Water Dispenser
SET UP & USE PROTECTION FROM HEAT AND MOISTURE • Do not install your water dispenser in any location where heavy moisture is present or if the location is not properly insulated. This water dispenser is not designed to operate in temperature setting below 50˚ Fahrenheit or above 100˚... - Page 9 SET UP & USE NOTE: Depending on the type of plumbing and type of pipes, some installation parts required may not be included with the water dispenser. • Follow the steps to connect the water dispenser to a cold water supply or split an existing connection, such as one to a refrigerator ice maker.
- Page 10 SET UP & USE 4. Remove the nut from the Metal Adapter with Valve and insert the 1/4” plastic tube through the nut. Insert the tube onto the protruding part of the Adapter where the nut was located until it reaches the threading. Note: Tube can be cut according to the appropriate length needed.
- Page 11 SET UP & USE INSTALLATION TO A COLD WATER SUPPLY BY SPLITTING AN EXISTING CONNECTION This type of connection can be used to split an existing connection such as one established from a water source to a refrigerator ice maker. •...
- Page 12 SET UP & USE 5. Connect the end of the 1/4” plastic tube to the water inlet located on the back of the unit. Insert the open end of the plastic tube into the water inlet. Make sure the plastic tube is tight and secure. water outlet water inlet CONNECTING THE R.O.
- Page 13 SET UP & USE Follow the Instructions to prime and install the filters (SEE FILTER INSTALLATION) • After all the installation steps are complete. turn ON the valves to the water source and plug cord into a properly grounded wall outlet. The power light will illuminate.
-
Page 14: Operating Instructions
SET UP & USE OPERATING INSTRUCTIONS DISPENSING COLD WATER • Once you have turned the cooling switch into the ON position it will take initially 1 hour for the water to cool. During this time the cold indicator light above the cold water icon will be steady and the compressor could run continuously. - Page 15 SET UP & USE FILTER INSTALLATION WARNING: Be sure to unplug from the electrical supply source and shut off the water supply valve before replacing the filters. Your water dispenser comes with a 4-stage filtration system. The filters should be replaced every 6 months. When the filters need to need to be replaced there is an audible beep, beep.
- Page 16 SET UP & USE 4. Turn the Valve of the Metal Adapter at the water source back to the off position; remove the filter from the Filter Flushing Adapter. 5. Remove the end of the ¼” plastic tube from the Filter Flushing Adapter by pressing in on the push to disconnect the ring and pulling out the tube.
-
Page 17: Cleaning And Maintenance
CLEANING AND CARE CLEANING AND MAINTENANCE CLEANING THE INTERIOR CAUTION OF THE WATER DISPENSER NOTE: Only remove the parts as To avoid personal injury or described in the instruction. product damage always read and It is recommended that you clean the follow manufacturer’s instructions and interior of the water dispenser every 6 warnings before using any... - Page 18 CLEANING AND CARE 5. Allow approximately 1 liter of the 3. Place a large bucket beneath the drain cleaning solution through the spout outlet located on the back of the unit. by pressing the hot and cold water Remove the drain cover and allow the buttons.
-
Page 19: Troubleshooting & Warranty
TROUBLESHOOTING & WARRANTY BEFORE YOU CALL FOR SERVICE BEFORE YOU CALL FOR SERVICE IF THE WATER DISPENSER FAILS TO OPERATE: A) Check to make sure that the unit is plugged in securely. If it is not, remove the plug from the outlet, wait 10 seconds and plug it in again securely. B) Check for a blown circuit fuse or a tripped main circuit breaker. -
Page 20: Troubleshooting
TROUBLESHOOTING & WARRANTY TROUBLESHOOTING Troubleshoot your problem by using the chart below. If the water dispenser still does not work properly, contact W Appliance Co. customer service center or the nearest authorized service center. Customers must never troubleshoot internal components. TROUBLE POSSIBLE CAUSE POSSIBLE REMEDY... -
Page 21: Limited Warranty
TROUBLESHOOTING & WARRANTY LIMITED WARRANTY Any repair, replacement, or warranty service, REPAIR OR REPLACEMENT AS PROVIDED UNDER THIS WARRANTY IS THE EXCLUSIVE REMEDY OF and all questions about this product should be THE CUSTOMER; W Appliance Co. SHALL NOT BE 1 (855) 855- directed to W Appliance Co. - Page 22 © 2020 W Appliance Company. All Rights Reserved. September 2020...
Need help?
Do you have a question about the CCDC02 and is the answer not in the manual?
Questions and answers