Sunbeam Mixmaster Compact MX5900 Instruction Booklet
Twin-motor stand/hand mixer
Hide thumbs
Also See for Mixmaster Compact MX5900:
- Instruction booklet (40 pages) ,
- Instruction booklet (40 pages)
Table of Contents
Advertisement
Quick Links
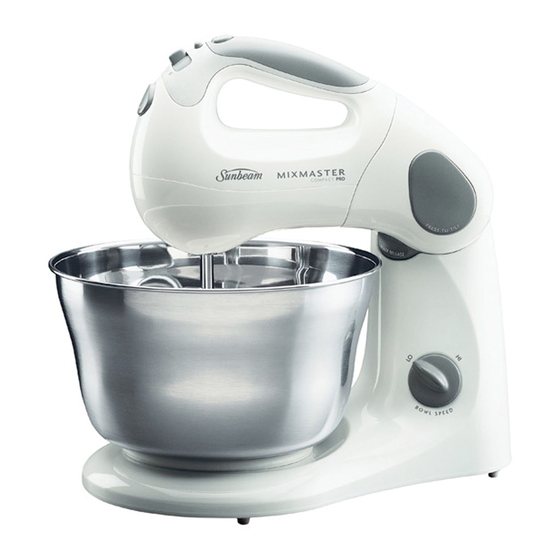
Mixmaster Compact
Instruction Booklet
This book covers the use and care of the following Sunbeam Mixmaster Compact:
MX5900 Sunbeam Mixmaster Compact – 350 watt twin-motor stand/hand mixer.
MX5950 Sunbeam Mixmaster Compact Pro – 400 watt twin-motor stand/hand mixer.
Please read these instructions carefully
and retain for future reference.
Advertisement
Table of Contents

Related Manuals for Sunbeam Mixmaster Compact MX5900


Summary of Contents for Sunbeam Mixmaster Compact MX5900
- Page 1 Mixmaster Compact Instruction Booklet This book covers the use and care of the following Sunbeam Mixmaster Compact: MX5900 Sunbeam Mixmaster Compact – 350 watt twin-motor stand/hand mixer. MX5950 Sunbeam Mixmaster Compact Pro – 400 watt twin-motor stand/hand mixer. Please read these instructions carefully...
-
Page 2: Table Of Contents
Contents Sunbeam’s Safety Precautions Features of your Mixmaster Compact Using your Mixmaster Compact Role of the Twin-Motor 3-Way Beating Action 8 Mixing Guide Oven Temperature Guide Care and Cleaning Let’s Talk Ingredients Cookery Tips for Best Results Helpful Hints for a Successful Dough... -
Page 3: Sunbeam's Safety Precautions
If you have any concerns regarding the performance and use of your appliance, please visit www.sunbeam.com.au or contact the Sunbeam Consumer Service Line. Ensure the above safety precautions are understood. • Do not operate for more than 3 minutes at a time when mixing heavy loads. -
Page 4: Features Of Your Mixmaster Compact
The eject button effortlessly releases the beaters or dough hooks for easy cleaning. Twin motor 3-way beating action Sunbeam have further developed the famous 3-way beating action. The patent pending twin- motor design enables one motor to drive the individual beaters, each turning in opposite directions. - Page 5 Boost button The Boost feature provides that extra power when you need it. Tilt back locking head button The head of the Mixmaster tilts back and locks securely into position to allow for easy removal of the mixing bowl and beaters. Hand beater release button Designed for maximum use the Mixmaster Compact transforms into a convenient hand...
- Page 6 The eject button effortlessly releases the beaters or dough hooks for easy cleaning. Twin motor 3-way beating action Sunbeam have further developed the famous 3-way beating action. The patent pending twin- motor design enables one motor to drive the individual beaters, each turning in opposite directions.
- Page 7 Boost button The Boost feature provides that extra power when you need it. Tilt back locking head button The head of the Mixmaster tilts back and locks securely into position to allow for easy removal of the mixing bowl and beaters. Hand beater release button Designed for maximum use the Mixmaster Compact transforms into a convenient hand...
-
Page 8: Using Your Mixmaster Compact
Using your Sunbeam Mixmaster Compact Before using your Mixmaster Compact Before assembling your Sunbeam Mixmaster Compact, be sure the power cord is unplugged from the power outlet and the speed control switch is in the ‘0’ OFF position. 1. Press the ‘tilt’ button, located on top of the neck of the Mixmaster Compact. - Page 9 Using your Sunbeam Mixmaster Compact (continued) Figure 4 Using your Mixmaster Compact 1. With the speed control switch in the ‘0’ OFF position, plug the power cord into a 230-240V AC power outlet. 2. Use the speed control switch to turn the Mixmaster Compact ‘ON’...
-
Page 10: Role Of The Twin-Motor 3-Way Beating Action
Role of the Twin-motor 3-way beating action One motor is located in the head of the Mixmaster. This drives the individual beaters, turning each in opposite directions. The second motor is located in the neck of the Mixmaster and drives the turntable, in turn rotating the bowl. -
Page 11: Oven Temperature Guide
Oven Temperature Guide For your information, the following temperature settings are included as a guide. These settings may need to be adjusted to suit the individual range. Description of Oven Temperatures Cool Very Slow Slow Moderately Slow Moderate Moderately Hot Very Hot Note: If using fan forced ovens be sure to turn the temperature down by 20-30°C. -
Page 12: Care And Cleaning
Storage Keep your Sunbeam Mixmaster Compact in a convenient position on your kitchen bench ready for use at all times. Place the beaters and dough hooks into the bowl (storage of beaters and dough hooks in a drawer with other kitchen equipment may cause damage). -
Page 13: Lets Talk Ingredients
Lets Talk Ingredients Listed below is a guide regarding some of the ingredients used in the recipes in this book. Shortenings The word, shortening, is a term used to describe any one of the solid fats (animal, vegetable or a mixture) which is suitable for general use. - Page 14 Lets Talk Ingredients (continued) Measuring Ingredients Careful and correct measurement of all ingredients is essential for recipe success. Australian Standard Metric cup and spoon measures are used in all recipes in the book. All cup and spoon measurements should be level.
-
Page 15: Cookery Tips For Best Results
Cookery Tips for Best Results 1. Before starting, read the recipe completely. 2. Refrigerated ingredients, ie butter and eggs should be at room temperature before mixing begins. Set these ingredients out ahead of time. 3. Before starting your recipe preheat oven to baking temperature recommended in the recipe. -
Page 16: Helpful Hints For A Successful Dough
Helpful Hints for a Successful Dough Step 1: Preparing the yeast For the dry yeast to be activated it needs to ferment. To do this place warm milk, sugar and the tepid water into a bowl, add dry yeast and mix. Stand in a warm place until mixture starts foaming ie bubbles. - Page 17 Helpful Hints for a Successful Dough (continued) Step 3: The finishing touches To add interest to breads • Sprinkle loaves or buns with sesame, poppy, or caraway seeds before baking. • Top loaves with shredded cheese during the last few minutes of baking. •...
-
Page 18: Helpful Hints For Better Cake Making
Helpful Hints for Better Cake Making • Always have ingredients at room temperature. Warm the bowl to be used in really cold weather. • Add flavouring and essences to the shortening for a better flavour. • Add the sugar to the softened shortening and beat until the colour lightens slightly;... - Page 19 Helpful Hints for Better Cake Making (continued) Heavy, Close Texture Too much fat or sugar, over mixing, under baking, or too hot an oven. Fruit Sinks Mixture too soft, damp fruit, too little flour, ingredients not correctly balanced, over beating. Some Hints on Sponge Making •...
-
Page 20: Recipes
Recipes BAKING Tips • Goats milk and skim milk can be used in these recipes. • Margarine’s and low fat butter’s can also be used in these recipes. Basic White Loaf 1 sachet dry yeast 1 tablespoon sugar 1 cup lukewarm water cup lukewarm milk 60g butter, melted 4 cups plain flour... - Page 21 Recipes (continued) Bread rolls 1. Follow steps 1 - 5 from ‘Basic White Loaf’ recipe. 2. Punch down, fold sides to centre and turn the dough over. Knead lightly on a well floured surface. Cut the dough into 12 portions and roll each portion across the bench, until an even soft ball is achieved.
- Page 22 Recipes (continued) Sultana Loaf 1 sachet dry yeast 2 tablespoons sugar 60g butter or margarine, melted cup lukewarm milk cup water 4 cups plain flour or bread flour 2 tablespoons sugar, extra 2 tablespoons powdered milk 1 teaspoon salt 1 cup sultanas 1.
- Page 23 Recipes (continued) Plaited sweet loaf 1. Follow steps 1 - 5, from ‘Sultana Loaf’ recipe. 2. Punch down, fold sides to centre and turn the dough over. Knead on a lightly floured surface with well floured hands, until the dough is smooth, soft and elastic. Cut dough in half and roll out one half on a floured surface and shape into a 60cm x 30cm rectangle, about 2cm thick.
- Page 24 Recipes (continued) Wholemeal Loaf 1 sachet dry yeast 2 tablespoons sugar 2 cups lukewarm water 30g butter, melted 2 cups plain flour cups wholemeal flour 1 teaspoon salt 1. Combine the yeast, sugar, water and butter in a small bowl and allow to stand in a warm place until mixture begins to froth.
-
Page 25: Celebration Cakes
Recipes (continued) CELEBRATION CAKES Foundation Butter Cake 125g butter or margarine 4 drops vanilla extract cup caster sugar 2 eggs 2 cups self raising flour 1 cup milk 1. Preheat oven to 180°C and grease a 20cm round cake tin or similar. 2. - Page 26 Recipes (continued) Marble Cake Divide batter into 3, leave one plain, add pink food colour to second portion and 2 tablespoons of cocoa, bicarbonate of soda and 1 tablespoon milk to the remaining cake batter. Drop spoonfuls of alternate colours into a 20cm ring tin, or place each coloured cake mixture into 3 separate tins and bake.
-
Page 27: Icing, Fillings, Frosting & Creams
Recipes (continued) ICING, FILLINGS, FROSTINGS AND CREAMS Fluffy Butter Frosting cup butter or margarine 4 cups pure icing sugar, sifted pinch salt 3-4 tablespoons milk teaspoon vanilla 1. Place all ingredients into the Mixmaster bowl and on ‘LO’ speed, mix until all ingredients are well combined, creamy, light and fluffy in texture. -
Page 28: Brunch, Lunch And Afternoon Tea
Recipes (continued) BRUNCH, LUNCHTIME AND AFTERNOON TEA Cinnamon and Apple Tea Ring DOUGH: 1 sachet dry yeast 2 tablespoons sugar 60g butter, melted cup lukewarm milk cup water 4 cups plain flour 2 tablespoons sugar, extra 2 tablespoons powdered milk 1 teaspoon salt 1 cup sultanas APPLE FILLING:... - Page 29 Recipes (continued) Cinnamon and Apple Tea Ring continued 10. Bake for approximately 30-35 minutes or until golden brown. Remove from the tin and glaze while still warm. 11. To glaze, place water, sugar and gelatine into a small saucepan. Stir over medium heat until sugar has dissolved, approximately 2 minutes.
-
Page 30: Pre-Dinner Nibbles
Recipes (continued) PRE-DINNER NIBBLES Fritter Batter 1 cup plain flour 3 teaspoons baking powder pinch salt 1 egg cup milk 1. Sift flour, baking powder and salt into the Mixmaster bowl, add egg and milk and beat on ‘LO’ speeds until combined and mixture is smooth, approximately 1-2 minutes. - Page 31 Recipes (continued) Fillings for the Choux Pastry Puffs: Basic White Sauce 2 tablespoons butter or margarine 2 tablespoons flour teaspoon salt teaspoon cayenne pepper cup milk 1. Melt butter or margarine in a saucepan, but do not boil. 2. Remove from heat, add flour, salt and pepper, stir until smooth.
-
Page 32: After-Dinner
Recipes (continued) AFTER DINNER Sweet Crepes cups plain flour pinch salt 2 eggs cups milk 1 tablespoon oil 1. Combine all ingredients together in the Mixmaster bowl. Beat on “LO” speeds for 2 minutes until smooth. 2. Allow to stand for 1 hour. 3. -
Page 33: Kids Treats
Beat on “LO” speed until mixed. 2. Increase to “HI” speeds and beat for 1-2 minutes until smooth. 3. Fold in melted butter. Place spoonfuls onto a hot Sunbeam Frypan and cook until bubbled, turn to brown. Note: Suitable to freeze and reheat. Serving suggestions: Serve pikelets hot or cold. - Page 34 Recipes (continued) Cornflake Cookies 125g cup butter or margarine cup caster sugar 1 egg vanilla essence cup currants cup coconut cups self raising flour pinch salt 2 cups cornflakes, crushed 1. Preheat oven to 180°C. Grease and line baking trays. 2.
- Page 35 Recipes (continued) Meringues 2 egg whites 90g caster sugar 90g icing sugar, sifted 1. Preheat oven to 120°C. Grease two baking trays and line with baking paper. 2. Using the Mixmaster bowl, beat egg whites until stiff but not dry, on “HI” speed.
- Page 36 Notes...
- Page 37 Notes...
- Page 38 Notes...
- Page 39 Consumer Hotline Australia 1800 025 059 New Zealand (09) 912 0747 www.sunbeam.com.au is a registered Trademark of Sunbeam Corporation Limited. ACN 000 006 771. © Sunbeam Corporation Limited 2003.
Need help?
Do you have a question about the Mixmaster Compact MX5900 and is the answer not in the manual?
Questions and answers