Table of Contents
Advertisement
Quick Links
Operating Manual Instructions
1. Product Overview
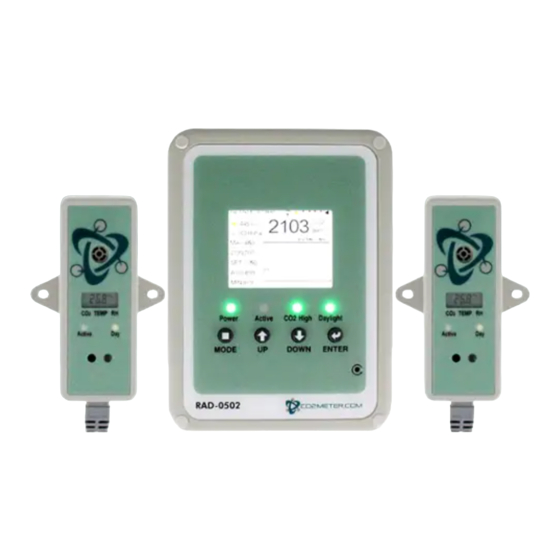
Model: RAD-0502 CO2 Controller for Grow Rooms
Thank you for selecting the RAD-0502 CO2 Controller for Grow Rooms, which is designed to
regulate CO2 levels and allows growers to set high/low targets to maximize plant yields
and profitability.
The CO2 Controller for Grow Rooms uses a dual beam NDIR technology to accurately
measure CO2 concentrations up to 3,000ppm. With a built-in temperature measurement
and photo sensor, the controller can turn off relays during dark periods to save Carbon
Dioxide (during green house mode). Furthermore, the CO2 grow controller is an ideal solution
for many growers who utilize the device across indoor greenhouses, cultivation centers,
hydroponic rooms, or anywhere regulated CO2 levels are important for plant growth.
• Accurate CO2 control for small to large sized indoor grow facilities
• Control 2 zones with 2 sensors
• Customizable CO2 set points for high and low target levels
• Dual beam NDIR technology accurately measures CO2 concentrations 0-3,000ppm
• Built-in temperature, humidity, and light
• Relay output can automatically control CO2 generator or compressed CO2 tanks
• Versatile modes for greenhouse or HVAC
2. Package Content and Unit Layout
The RAD-0502 package comprises the following parts:
•
(1) Indoor CO2 Controller
(2) Remote CO2 Sensors
•
•
(2) Relay Cables
•
(1) Wall Plug Safety Strap
•
(2) Mounting Brackets
•
(6 pieces) Screws
•
(1) Power Supply
•
(3 pieces) International Power Adapters
Advertisement
Table of Contents

Related Manuals for CO2 Meter RAD-0502


Summary of Contents for CO2 Meter RAD-0502
- Page 1 1. Product Overview Model: RAD-0502 CO2 Controller for Grow Rooms Thank you for selecting the RAD-0502 CO2 Controller for Grow Rooms, which is designed to regulate CO2 levels and allows growers to set high/low targets to maximize plant yields and profitability.
- Page 2 Indoor CO2 Grow Controller Main Unit A. LCD Display B. Green LED (lights when relay activate) C. Green LED (power on indicator) D. Green LED (lights when CO2 concentration is above set point) E. Green LED (lights when daytime) F. UP button G.
-
Page 3: Connection Diagram
3. Connection Diagram Please Note: The CO2 Controller is designed for indoor greenhouse application, or for ventilation LCD Display Symbols Symbol Meaning Description CO2 concentrations shown in CO2 levels ppm (parts per million) Display shows current humidity. Can be Humidity changed by pressing "MODE"... - Page 4 Symbol Meaning Description Set point Displays the user's set point Zone Displays the user's set zone Displays the time interval represented by Interval each column of the table Displays the duration of the Expect desired light intensity and selected time range Set point Displays the set point line in the chart indicator lines...
-
Page 5: Safety Precautions
• Our replacement sensor can NOT be used to monitor additional grow spaces, this device can ONLY monitor CO2 concentrations in up to (2) grow zones. Please Note: the RAD-0502 may NOT be used for CO2 safety per OSHA guidelines as •... -
Page 6: Product Care
6. Product Care Co2Meter wants you to get the most out of your product or sensor technology. In order to do so, please observe the following care instructions. • Repair - Do NOT attempt to repair the product or modify the circuitry by yourself. •... - Page 7 10. Change Table Time Range 8. On the main CO2 Grow Controller, press the enter key for 5 seconds to switch the time range from CO2 TEMP and RH tables. The time range of each column in the table can be respectively 5 minutes without CO2.
-
Page 8: Product Help
12. Product Help The CO2 Grow Controller can further explain the icons and acronyms in the help options menu Press and hold the mode key for 3 seconds in order to enter the setting screen Press the enter key to enter into the help settings screen or hold and press the mode key to return to the main menu Press the up or down key to find the correct setting for information that is needed 13. - Page 9 15. CO2 Concentration and Control Range Setting The values of CO2 1 and CO2 2 can be set in both GH and HVAC mode to control the CO2 concentrations. The following operation is an example below of CO2 and GH mode. The following operation below is also based on the display table after "section 15"...
- Page 10 7. Press enter to confirm your setting or press the mode key to cancel the setting 18. The Range Setting of Temperature and Humidity This RAD-0502 CO2 Grow Controller can determine a required temperature and humidity range by setting the upper and lower limits of temperature and humidity. This device can also record the effective light time by setting the value point of light intensity and avoiding frequent turnoff of the relays by setting a buffer of light intensity.
- Page 11 19. Temperature and Humidity Calibration The RAD-0502 CO2 Grow Controller can also calibrate the temperature and humidity for the device. The following display example below illustrates temperature calibration. 1. Press and hold the mode key for 3 seconds to enter into the setting mode 2.
- Page 12 20. Relay Selection for Temperature, Humidity, and Light The RAD-0501 CO2 Grow Controller can be selected to turn on one of the relays for temperature, humidity, and light. The following display below is an illustration of how to turn on the temperature relays.
-
Page 13: Light Setting
1. Press and hold the mode key for 3 seconds to enter into the setting mode 2. Press the up or down key to select TEMP or press and hold the mode key for 3 seconds to return to the main display screen 3. - Page 14 24. Light Hysteresis Setting In greenhouse mode when the light intensity decreases, it is lower than the light set point minus the light hysteresis. This means the CO2 relay will always be turned off. When the light intensity increases higher than the light set point, the CO2 relay will determine whether to open or close according to the current CO2 concentration.
- Page 15 26. Light Expose Time Setting The RAD-0502 CO2 Grow Controller can set the automatic or manual time interval of the relay control. The following illustration below is an example of setting a time interval in automatic mode. 1. Press the up or down keys to select the light hysteresis setting 2.
-
Page 16: Time Setting
29. Cycle Display and Back-light Sleep Settings The RAD-0502 CO2 Grow Controller can choose to turn on or off the cyclic display and back- light sleep. You can select "ON" when the cyclic display needs to be turned on and select "OFF"... -
Page 17: Buzzer Setting
7. Press the enter key to confirm the setting or the mode key to cancel the setting 31. Buzzer Setting The RAD-0502 CO2 Grow Controller can choose to turn ON or OFF the buzzer alarm. 1. Press and hold the mode key for 3 seconds to enter into the setting mode 2. - Page 18 7. Press the enter key to confirm the setting or the mode key to cancel 33. Calibration "Clear" Setting The RAD-0502 CO2 Grow Controller can clear the calibration data for CO2, TEMP, and RH. 1. Press and hold the mode key for 3 seconds to enter into the setting mode 2.
-
Page 19: Technical Specifications
34. Recovery Setting 1. Press and hold the mode key for 3 seconds to enter into the setting mode 2. Press the up or down keys to select recovery setting or press and hold the mode key for 3 seconds to return to the main display mode 3. - Page 20 36. Dimensions Main Indoor CO2 Grow Controller Unit Indoor CO2 Grow Control Sensor...
-
Page 21: Fault Codes And Troubleshooting
37. Fault Codes and Troubleshooting This section includes a list of Frequently Asked Questions for problems you may encounter with the RAD-0502 CO2 Indoor controller for grow rooms. Fault Description of the fault Suggested Action EU IconD Ambient temperature exceeded the This error will disappear when the temperature returns temperature range 0°...
Need help?
Do you have a question about the RAD-0502 and is the answer not in the manual?
Questions and answers