
Subscribe to Our Youtube Channel
Related Manuals for TS DigiTrak Autopilots

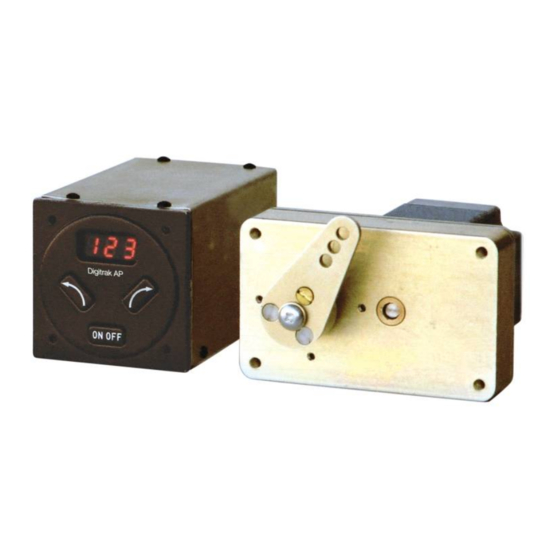
Summary of Contents for TS DigiTrak Autopilots
- Page 1 Installation & User Guide DigiTrak Autopilots TRUTRAK FLIGHT SYSTEMS 1500 S. Old Missouri Road Springdale, AR 72764 Ph. 479-751-0250 Fax 479-751-3397 www.trutrakflightsystems.com...
-
Page 2: Table Of Contents
INSTALLATION MANUAL DigiTrak Autopilots TABLE OF CONTENTS Power Up ..................................1 Basic Operation ................................1 Nav Mode Operation ..............................1 Mechanical Considerations............................2 Magnetic Considerations ..............................2 RFI / EMI Considerations.............................3 Electrical Wiring................................3 Connecting GPS Units Garmin 430/530 ..................................4 UPS GX-50/60/65 ..................................4 Garmin-35 Smart Antenna ................................. 4 Initial Checkout ................................5... -
Page 3: Power Up
Power Up NOTE: When powering up the autopilot ensure that the aircraft is as still as possible for 10 seconds. The power up of the autopilot takes approximately ten seconds. During the power cycle it is very important that the aircraft be as still as possible for the initialization of the internal gyro. -
Page 4: Mechanical Considerations
Mechanical Considerations The installation information in this section is extremely important and must be clearly understood by the installer. Improper servo installation or failure to observe and diagnose installation problems prior to flight can result in extremely serious consequences, including loss of ability to control the aircraft. -
Page 5: Rfi/Emi Considerations
disturbance. Shielding has no effect on this problem; the only solution is to keep strobe light wiring as far away as possible from any electronics which can be affected by pulsating magnetic fields. RFI/EMI considerations The autopilot programmer is shielded and does not generate any appreciable level of electromagnetic interference. Moreover, the servo lines (except for power and ground) are low-current and cannot contribute to RF interference. -
Page 6: Garmin 430/530
Specific connections for certain commonly-used in-panel GPS units Note that the information in the tables is based upon the best information available from each manufacturer’s documentation at the time of publication. Please consult the appropriate installation manual for confirmation of wiring information. Garmin 430 and 530 connections to DigiTrak autopilot P4001 [P5001] on Signal Name... -
Page 7: Garmin-35 Smart Antenna
Garmin-35 “Smart Antenna” connections to DigiTrak autopilot Garmin-35 Signal Name Signal Name P101 on Wire Color (Garmin) (DigiTrak) DigiTrak Autopilot Primary Power Black GROUND Ground White GPS RS 232 OUT 1 Primary Serial Input There is no necessary setup procedure for the Garmin-35 unit. It may require up to 45 minutes to achieve a position fix the first time it is powered on;... -
Page 8: First Flight
While the autopilot is in its disengaged (off) mode, press and hold simultaneously. The display will now show “–| – |–” with the center dash character blinking, indicating the Manual Gyro Set operation. Continue to hold both buttons in for a few seconds while the autopilot is not being moved about, to re-center the gyro manually The next step in the check-out procedure is to verify that the servo runs, and in the correct direction. -
Page 9: Magnetic Calibration
Press and hold the buttons simultaneously until the first setup screen is shown on the display. The digit “1” will be flashing, followed by the activity value that was set earlier during pre-flight setup. Use to select the value zero (0), and observe the resulting control movement. -
Page 10: Digitrak Wiring Diagram
INSTALLATION NOTES: USE #20 AWG FOR POWER AND GROUND WIRES AS SHOWN BELOW IN HEAVY LINES (PINS 1,9, 8 AND 15 ON CONTROL UNIT J101, AND PINS 1 AND 9 ON 9-PIN CONNECTOR J201). ALL OTHER WIRING #20 TO #24 AWG. INSTRUMENT LAMP DIMMER CONTROL IS OPTIONAL. - Page 11 TRUTRAK FLIGHT SYSTEMS 1500 S. Old Missouri Road Springdale, AR 72764 Ph: 479-751-0250 Fax: 479-751-3397 www.trutrakflightsystems.com info@trutrakflightsystems.com...
Need help?
Do you have a question about the DigiTrak Autopilots and is the answer not in the manual?
Questions and answers