Table of Contents
Advertisement
Introduction...................................................................................................................2
Authorized Online Retailers............................................................................... 2
Description............................................................................................................2
Parts and Devices............................................................................................... 2
Lesson 1: Basic Robot Car Assembly......................................................................7
Objective............................................................................................................... 7
Parts and Devices............................................................................................... 7
Hardware Installation.......................................................................................... 9
Connection......................................................................................................... 13
Software Installation......................................................................................... 15
Testing.................................................................................................................19
Lesson 2: IR Remote Controlled.............................................................................20
Objective.............................................................................................................20
Parts and Devices............................................................................................. 20
Hardware Installation........................................................................................ 21
Software Installation......................................................................................... 23
Testing.................................................................................................................26
Trouble shooting................................................................................................26
Lesson 3: Line Tracking........................................................................................... 28
Objective.............................................................................................................28
Parts and Devices............................................................................................. 28
Hardware Installation........................................................................................ 29
Software Installation......................................................................................... 31
Testing.................................................................................................................34
Lesson 4: Don't Touch Me....................................................................................... 35
Objective.............................................................................................................35
Parts and Devices............................................................................................. 35
Hardware Installation........................................................................................ 36
Software Installation......................................................................................... 41
Testing.................................................................................................................44
Lesson 5: Obstacle Avoidance................................................................................45
Objective.............................................................................................................45
Parts and Devices............................................................................................. 45
Hardware Installation........................................................................................ 46
Software Installation......................................................................................... 47
Testing.................................................................................................................49
Lesson 6: Imitation Driving with Bluetooth............................................................ 51
Objective.............................................................................................................51
Parts and Devices............................................................................................. 51
Hardware Installation........................................................................................ 52
Software Installation......................................................................................... 53
Explanation of APP UI...................................................................................... 56
Testing.................................................................................................................58
Table of Contents
1
Advertisement
Table of Contents

Subscribe to Our Youtube Channel
Related Manuals for OSOYOO 3


Summary of Contents for OSOYOO 3
-
Page 1: Table Of Contents
Lesson 2: IR Remote Controlled................20 Objective......................20 Parts and Devices..................... 20 Hardware Installation..................21 Software Installation..................23 Testing.........................26 Trouble shooting....................26 Lesson 3: Line Tracking................... 28 Objective......................28 Parts and Devices..................... 28 Hardware Installation..................29 Software Installation..................31 Testing.........................34 Lesson 4: Don’t Touch Me..................35 Objective......................35... -
Page 2: Introduction
Buy from Buy from Description Osoyoo Model-3 Robot Learning Kit is designed for beginners to learn Arduino programming and get hands-on experience on robot design and assembly. We have developed a step-by-step tutorial which evolves from a simple car without any control to a multi-function robotic car controlled by mobile APP. - Page 3 Device Picture Qty. Link OSOYOO UNO R3(fully compatible with Arduino Click here to buy UNO R3) OSOYOO Motor Shield Click here to buy V1.0 IR receiver Click here to buy 4 Buzzer Sensor Module Click here to buy Tracking Sensor...
- Page 4 Bluetooth Module Click here to buy IR remote controller Click here to buy Mount Holder for Click here to buy Ultrasonic Sensor Car Chassis Click here to buy Motor with wires Click here to buy Wheels Click here to buy Universal Wheel Click here to buy 9V Battery Box...
- Page 5 9V Battery Click here to buy Phillips Screwdriver Click here to buy Hex Screwdriver Click here to buy 20pin 15cm Female to Click here to buy Female Cable 7pin 25cm Female to Click here to buy Female Cable 3pin 15cm Female to Click here to buy Female Cable Rubberized Tape...
-
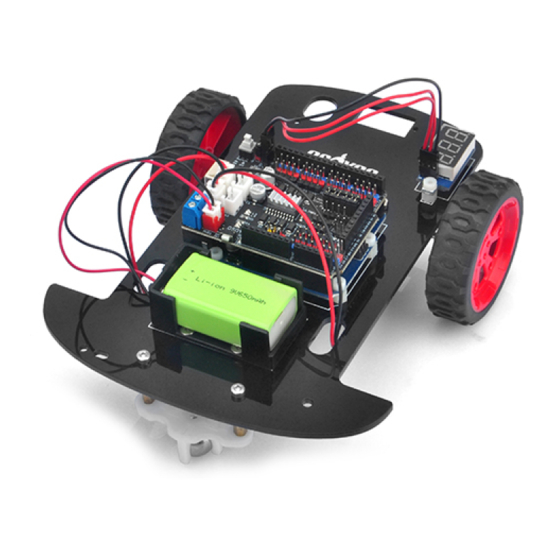
Page 7: Lesson 1: Basic Robot Car Assembly
Lesson 1: Basic Robot Car Assembly Objective Welcome to the first lesson of Osoyoo Model-3 Robot Learning Kit! In this “Hello World” version lesson, we will install the most important framework of the robot car and program the car to do some simple movements. - Page 8 Arduino Click here to buy UNO R3) OSOYOO Motor Click here to buy Shield V1.0 3 Voltage Meter Click here to buy 4 Car Chassis Click here to buy 5 Motor with wires Click here to buy 6 Wheels...
-
Page 9: Hardware Installation
8 9V Battery Box Click here to buy 9 9V Battery Click here to buy 10 Phillips Screwdriver Click here to buy 11 Hex Screwdriver Click here to buy 20pin 15cm Female Click here to buy to Female Cable 3pin 15cm Female Click here to buy to Female Cable Hardware Installation... - Page 10 Step 2. Install the motor under the chassis with M3 Hex screws and nuts as follow: Step 3. Install the universal wheel with the M3 Hex screws and copper pillars:...
- Page 11 Step 4. Install the universal wheel under the chassis with the M3 Hex screws: Step 5. Install OSOYOO UNO Board on the chassis with M3 plastic screws, pillars and nuts: Step 6. Install the battery box on the chassis with M3 Phillips screws and nuts:...
- Page 12 Step 7. Plug the OSOYOO Motor Shield V1.0 Board in OSOYOO UNO board: Step 8. Install the voltage meter on the chassis with M3 plastic screws, pillars and nuts:...
-
Page 13: Connection
Connection Step 1. Connect OSOYOO Motor Shield V1.0 with the motor:... - Page 14 More detail about OSOYOO Motor Shield V1.0 please refer to this link: https://osoyoo.com/2020/08/06/osoyoo-motor-shield/ Step 2. Connect OSOYOO Motor Shield V1.0 with the battery box: Step 3. Connect OSOYOO Motor Shield V1.0 with the voltage meter:...
-
Page 15: Software Installation
Step 4. Install the wheels: Now hardware installation is almost done. Before we install the battery into the box, we need to upload the sample code into Arduino first. Software Installation Open-source Download Arduino IDE here: Arduino https://www.arduino.cc/en/Main/Software?setla Software(IDE) ng=en 7 zip is a free Download 7zip here for free utility... - Page 16 Step 2: Download https://osoyoo.com/picture/2WD_Car_V2.0/code/lesson-1.zip unzip it, you will see a folder called lesson-1. Step3: Connect UNO R3 board to PC with USB cable, open Arduino IDE, choose corresponding board/port for your project. Notice: Shut off your battery or Unplug your power adapter when upload...
- Page 17 Step 4: Click file -> click Open -> choose code “lesson-1.ino”, load the code into Arduino, and then upload the sketch to the board.
-
Page 19: Testing
(make sure polar direction is correct, otherwise it can destroy your device and cause fire hazard). Put the car on the ground, turn on the switch of OSOYOO Motor Shield V1.0, the car should go forward, then go backward, then left turn, then right turn, then stop. -
Page 20: Lesson 2: Ir Remote Controlled
Lesson 2: IR Remote Controlled Objective In this tutorial, we will use Osoyoo Model-3 Robot Learning Kit to make a simple remote controlled smart car. Once the car installation is completed, we will use an Infrared Remote to control the car movements including go forward, go back, left turn and right turn. -
Page 21: Hardware Installation
1 IR receiver Click here to buy 2 IR remote controller Click here to buy 3 Hex Screwdriver Click here to buy 20pin 15cm Female to F Click here to buy emale Cable Hardware Installation Step 1: Install the smart car basic frame work as per Lesson 1. If you have already... - Page 22 Add an IR receiver module onto the car. Install the IR receiver module with 2pcs M3 plastic screws, M3 plastic pillars and M3 plastic nuts as follow: Step 3: Connect S-VCC-GND or the IR Receiver with D12-5V-GND of OSOYOO Motor Shield V1.0, as the following photo: (Remember: DO NOT remove any...
-
Page 23: Software Installation
Software Installation Open-source Download Arduino IDE here: Arduino https://www.arduino.cc/en/Main/Software Software(IDE ?setlang=en 7 zip is a free Download 7zip here for free utility that https://www.7-zip.org/ un-zips zip files Step 1: Install latest Arduino IDE (If you have Arduino IDE version after 1.1.16, please skip this step). - Page 24 Download IRremote library from https://osoyoo.com/picture/2WD_Car_V2.0/code/IRremote.zip, then import the library into Arduino IDE (Open Arduino IDE-> click Sketch->Include Library->Add .Zip Library) Step 3: Download https://osoyoo.com/picture/2WD_Car_V2.0/code/lesson2.zip and unzip the download zip file lesson2.zip, you will see a folder called lesson2. Step 4: Connect UNO R3 board to PC with USB cable, Open Arduino IDE ->...
- Page 25 Step 5: Choose corresponding board and port for your project,upload the sketch to the board.
-
Page 26: Testing
In order to solve this problem. Please take following steps: Step A) Get the IR code of each button in your IR remote. Copy code from following link: https://osoyoo.com/wp-content/uploads/samplecode/irdemo2.ino Upload above sketch into your Arduino and open the serial monitor in your upper-right corner. - Page 27 Step A). If you don’t know how to change, just send email to support@osoyoo.info and give us the code of each button from Step A), I can help you to change the code and email new sketch file to you.
-
Page 28: Lesson 3: Line Tracking
Lesson 3: Line Tracking Objective In this lesson, we will add a 5-line tracking sensor to the framework built in Lesson 1. If you have not completed installation in Lesson 1, please review Lesson 1 The software in this lesson will read data from the tracking sensors and automatically guide the car to move along the black track line in the white ground. -
Page 29: Hardware Installation
1 Tracking Sensor Click here to buy 2 Hex Screwdriver Click here to buy 7pin 25cm Female Click here to buy to Female Cable Hardware Installation Step 1: Start the installation from previous status of Lesson 1 . If you have installed Lesson 2, no need change anything, just keep the hardware wire connection as is. - Page 30 M3*10 hex screws, M3*30+6 copper pillars and M3 nuts as following: Step 3: Connect GND-VCC pin of tracking sensor module to GND-5V of OSOYOO motor shield V1.0; connect IR1, IR2, IR3, IR4, IR5 pins to A0, A1, A2, A3, A4...
-
Page 31: Software Installation
Install latest Arduino IDE (If you have Arduino IDE version after 1.1.16, please skip this step). Download Arduino IDE from the follow link, then install the software: https://www.arduino.cc/en/Main/Software?setlang=en Step 2: Download http://osoyoo.com/picture/V2.0_Model_3_Robot/code/lesson3.zip, unzip the download zip file lesson3.zip, you will see a folder called lesson3 . - Page 32 Step 3: Connect UNO R3 board to PC with USB cable, Open Arduino IDE -> click file -> click Open -> choose code “lesson3.ino” in lesson3 folder, load the code into arduino. Notice: Shut off your battery or Unplug your power adapter when upload sketch code to Arduino.
- Page 33 Step 5: Adjust the sensitivity of tracking sensor modules. Turn on and hold the car and adjust the potentiometer on the tracking sensor with cross screwdriver until you get the best sensitivity status: the signal indicate LED light will turn off when sensor is above white ground, and the signal LED will turn on when the sensor is above black track.
-
Page 34: Testing
Testing Prepare a black track (the width of the black track is more than 20mm and less than 30mm) in white ground. Please note, the bend angle of track can’t be larger than 90 degree. If the angle is too large, the car will move out of the track. -
Page 35: Lesson 4: Don't Touch Me
Lesson 4: Don’t Touch Me Objective In this lesson, we will install an ultrasonic sensor on the robot car and program the car to keep some distance of object to move. You must complete Lesson 1 (assembling the car) before you continue on with this lesson. -
Page 36: Hardware Installation
Servo Motor Click here to buy Mount Holder for Click here to buy Ultrasonic Sensor Buzzer Sensor Module Click here to buy 20pin 15cm Female to Click here to buy Female Cable Hardware Installation Step 1: Install the smart car basic frame work as per Lesson 1. If you have already completed installation in Lesson 1, just keep it as is. - Page 37 Step 2: Install servo motor at the front of car chassis with 2pcs M2.2*8 Self Tapping Screws as following: Step 3: Install ultrasonic module to mount holder with 4pcs M1.5*8 screw and M1.5 nuts Step 4: Install mount holder for Ultrasonic Module on servo motor with M2*4 Self...
- Page 38 Install buzzer module on car chassis with 1pc M3 plastic screw, M3 plastic pillar and M3 plastic nut. Step 6: Connect SG90 servo motor to OSOYOO motor shield V1.0 as following graph: (Remember: DO NOT remove any existing wires installed in Lesson 1)
- Page 39 Step 7: Connect ultrasonic module with OSOYOO motor shield V1.0 as below connection diagram:...
- Page 40 Step 8: Connect buzzer module with OSOYOO motor shield V1.0 as below connection diagram.
-
Page 41: Software Installation
Software Installation Open-source Download Arduino IDE here: Arduino https://www.arduino.cc/en/Main/Software?setla Software(IDE) ng=en 7zip is a free Download 7zip here for free zip utility that https://www.7-zip.org/ un-zips zip files... - Page 42 Step 3: Connect Arduino UNO to PC with USB cable, Open Arduino IDE -> click file -> click Open -> choose code “lesson4.ino” in lesson4 folder, load the code into arduino.
- Page 43 Step 5: Ultrasonic sensor servo initial direction alignment After power on the car, you will hear a long beep sound, then the servo will make some movement and finally stops at a direction for 2 seconds. During this first 2 seconds, you must make sure the Ultrasonic sensor(two eyes) is facing straight forward.
-
Page 44: Testing
Testing Turn on the car, move object or your hand before ultrasonic module, and then the car will move in some distance of object or your hand. when you close the car, the car will move back, just as it says don’t touch me. when object or your hand leave the ultrasonic module, the car will stop moving. -
Page 45: Lesson 5: Obstacle Avoidance
Lesson 5: Obstacle Avoidance Objective In this lesson, you must complete lesson 4 before you continue on with this lesson. we use the ultrasonic module to “see” obstacle and measure the distance. If the distance is less than predefined threshold value, the buzzer will beep and the car will turn around from the obstacle automatically. -
Page 46: Hardware Installation
Servo Motor Click here to buy Mount Holder for Click here to buy Ultrasonic Sensor Buzzer Sensor Module Click here to buy 20pin 15cm Female to Click here to buy Female Cable Hardware Installation Install the smart car basic frame work as per Lesson 4 .If you have already completed installation in Lesson 4, just keep it as is. -
Page 47: Software Installation
Step 3: Connect Arduino UNO to PC with USB cable, Open Arduino IDE -> click file -> click Open -> choose code “lesson5.ino” in lesson5 folder, load the code into arduino. - Page 48 Step 4: Choose corresponding board/port for your project,upload the sketch to the board.
-
Page 49: Testing
Step 5: Ultrasonic sensor servo initial direction alignment After power on the car, you will hear a long beep sound, then the servo will make some movement and finally stops at a direction for 5 seconds. During this first 5 seconds, you must make sure the Ultrasonic sensor(two eyes) is facing straight forward. - Page 50 obstacle is detected, the car will go forward. If any obstacles is detected, the car will stop, the ultrasonic module will turn from right to left to detect surrounding obstacle. The robot car will decide to make left turn, right turn or backward according to obstacle sensor data and our obstacle avoidance algorithm.
-
Page 51: Lesson 6: Imitation Driving With Bluetooth
Lesson 6: Imitation Driving with Bluetooth Objective In this lesson, we will use Mobile to control our robot car and make an imitation driving. Since is a mock driving, we will use a virtual steering wheel and gear in our APP to imitate their counterparts in real car. You must complete Lesson 1 (assembling the car) before you continue on with this lesson. -
Page 52: Hardware Installation
Install the smart car basic frame work as per Lesson 1. If you have already completed installation in Lesson 1, just keep it as is. Step 2: Insert Bluetooth Module into OSOYOO motor shield V1.0 Bluetooth slot as following graph (Remember: DO NOT remove any existing wires installed in Lesson 1):... -
Page 53: Software Installation
Download 7zip here for free zip utility that https://www.7-zip.org/ un-zips zip files OSOYOO Search “OSOYOO imitation driving” in imitation driving Google Play or Apple APP store Robot APP Step 1: Install latest Arduino IDE (If you have Arduino IDE version after 1.1.16, please... - Page 54 Step 3: Connect Arduino UNO to PC with USB cable, Open Arduino IDE -> click file -> click Open -> choose code “lesson4.ino” in lesson4 folder, load the code into arduino.
- Page 55 Step 5: Install APP into your mobile phone: 1) Install APP on Android device as following In Google Play store search APP name “OSOYOO imitation driving”, download the APP as following and install it in your smart phone If you can not use Google Play to find the APP, please Download the APP from following link: https://osoyoo.com/driver/v1car.apk...
-
Page 56: Explanation Of App Ui
In Apple APP store search APP name “OSOYOO imitation driving”, download the APP as following and install it in your smart phone Explanation of APP UI (UI is different between Android and IOS) BT Search button: When click this button, you will see a Bluetooth ... - Page 57 change from Disconnected to Connected. You can only control your car when Bluetooth is connected. Engine toggle : When Engine toggle is set to OFF(white), car will stop and all buttons in the APP will be disabled. When Engine toggle is set to ON(red), car will start to move.
-
Page 58: Testing
Step 2) Go to your mobile phone ->Setting ->Bluetooth setting and search a Bluetooth device called HC-02, pair it with code 1234 Step 3) Open OSOYOO imitation driving Robot APP, Click BT Search button and find the bluetooth you have paired Step 4) Turn on Engine toggle, click Speed+ to make the robot speed up as the robot car is very slow at first.
Need help?
Do you have a question about the 3 and is the answer not in the manual?
Questions and answers