
Related Manuals for OSOYOO Mecanum Omni


Summary of Contents for OSOYOO Mecanum Omni
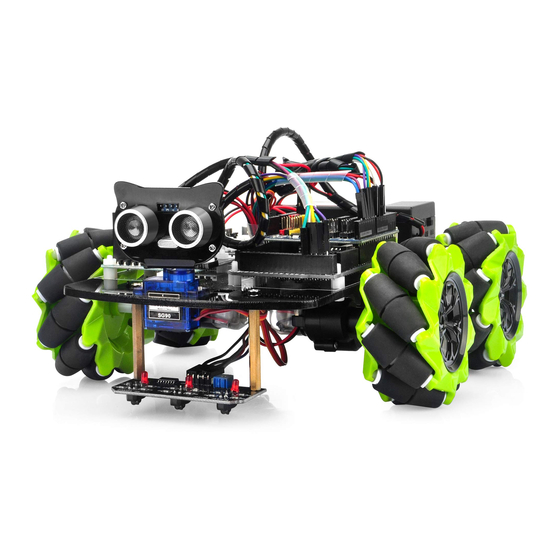
- Page 1 Mars Explorer Mecanum Wheel Robotic Kit (Arduino Mega2560) More information: http://osoyoo.com/?p= 30176...
- Page 2 The kit comes with OSOYOO MEGA2560 board (fully compatible with Arduino MEGA2560) and OSOYOO ESP8266 Wifi Shield. Besides, we have designed five step by step lessons which help students to learn Arduino robot programming from scratch. If you are an experience DIY player or Arduino programmer, you can also get a lot of knowledge from this kit’s open source code and hardware to make interesting DIY...
-
Page 3: Table Of Contents
CONTEXT Lesson 1: Assembling the Car ..................4 Lesson 2: Obstacle Avoidance Robot Car ..............17 Lesson 3: Tracking Line ....................23 Lesson 4: Bluetooth Imitation Robot Car ..............27 Lesson 5: Wifi IoT Control Robot Car ..............33... -
Page 4: Lesson1 Assembling The Car
Mecanum Omni direction wheel is a very interesting wheel which allows robot car make omni-directional movement( parallel shift to left and right). In this project, we will show how to use Arduino to control an Osoyoo Brand Mecanum wheel robot car to make some basic movement including go forward, backward, left turn, right turn, parallel left shift, parallel right shift etc. - Page 5 Picture 2: Chassis screw location map (view from top) Step 1) Install Cooper standoff on the chassis If your motors have already connected with a copper standoff, please skip this step and directly go to Step 2 Follow the picture below to install 4 copper standoff on the positions of the blue lines first, then fasten the 4 motors onto the 4 standoffs.
- Page 6 Picture 4: Motor installation guide map Step 2) If you have already installed motor and standoff in Step 1, please skip this step and go to Step 3 The four motors have two types of standoff positions: Type A have standoffs installed on the RED wire side of the motor (see picture 5 top two motors) Group B have standoffs installed on the Black wire side of the motors(see picture 5 lower two motors)
- Page 7 Picture 6: Type A and Type B motors location map in chassis. Picture 7: Wheel installation map...
- Page 8 Step 3) Connect wheels to the motors The Mecanum wheel has some sub-wheels on the main wheel. The four Mecanum wheels have two types by the sub-wheel directions. Check the type A wheel and type Wheel by following picture 8 left side. You must 100% sure that correct type of wheel is installed into correct position as per picture 8 right side, the rolling direction of each wheel will determine the whole car moving directions showed in the picture.
- Page 9 Picture 9: different rotation combination of 4 wheels will result in different car movement directions. Following pictures shows how they works. Step 4) Install Mega2560, 2x Model X boards(L298N), Wifi shield onto the chassis Picture 10: MEGA2560, Model X, voltage meter guide Picture 11: Battery box installation location...
- Page 10 Picture 12: Wifi shield installation guide...
- Page 11 Caution: When insert/remove the 6-pin parallel cable plug into Model X 6-pin male socket, please hold the black plastic pin-holder to do operation. Never drag the wires to pull the plug out of the socket, otherwise it will damage the wires. Picture 13: Connect Model X board (L298N) to front motors Picture 14: connect another model X board to rear motors.
- Page 12 Note: wire (purple wire) is connected to D22 which is located on the SECOND female hole from right in following picture 10. Many people treat the first hole as D22. THIS IS WRONG. Picture 16: Front Model X board IN1,IN2,IN3,IN4 pin connect to D22,D24,D26,D28...
- Page 13 Picture 17: Connect Rear model X control pins to Mega2560 Picture 18: Connect Model X to Voltage meter...
- Page 14 Open-source Arduino Download Arduino IDE here: Software(IDE) https://www.arduino.cc/en/Main/Software?setlang=en...
- Page 15 , then install the software. Step 2: Download https://osoyoo.com/driver/mecanum_acrylic_chassis/mecanum-2560- lesson1.zip, unzip the download zip file lesson1.zip, you will see a folder called lesson1 . Step 3: Connect mega2560 board to PC with USB cable, Open Arduino IDE -> click file ->...
- Page 16 After running Lesson 1 code, the car will move Forward/Backward Left/Right Turn Right Parallel Shift/Left Parallel Shift Down Left Diagonal / Up Right Diagonal Up Left Diagonal / Down Right Diagonal If the car does not move as per this sequence, you need check the wire connection. Youtube Video Link: https://www.youtube.com/embed/15qYSh9M5AE...
-
Page 17: Lesson 2: Obstacle Avoidance Robot Car
“see” obstacle and measure the distance. If the distance is less than pre-defined threshold value, the car will turn around from the obstacle automatically. OSOYOO Mecanum Wheels Robotic Car Chassis x1(2xleft-wheels/2xright-wheels and Motor x 4) OSOYOO Mega2560 board fully compatible with Arduino OSOYOO Wifi shield x 1... - Page 18 Step 3: Remove screws on copper pillars and install servo motor at the front of upper car chassis with 2pcs M2.2*8 Self Tapping Screws. Step 4: Install mount holder for Ultrasonic Module on servo motor with M2*4 Self Tapping screw. (Please note: please upload code to adjust servo motor direction before fixing this screw)
- Page 19 If you just finishes Lesson 1, please keep all lesson 1 connections same as it is. STEP5:Connect Servo 3-pin head to any Model X board servo slot(yellow to S pin, red to 5v,brown to G pin), then connect another S pin to Wifi board D13. STEP6:Connect Ultrasonic sensor module to wifi board as following graph.
- Page 20 Download Arduino IDE from https://www.arduino.cc/en/Main/Software?setlang=en , then install the software. Step 2: Download https://osoyoo.com/driver/mecanum_acrylic_chassis/mecanum-2560- lesson2.zip , unzip the download zip file lesson2.zip, you will see a folder called lesson2 . Step 3: Connect mega2560 board to PC with USB cable, Open Arduino IDE -> click file ->...
- Page 21 Step 4: Choose corresponding board/port for your project, upload the sketch to the board. Step 5:Ultrasonic sensor servo initial direction alignment After turning on the battery, the servo will make some movement and finally stops at a direction for 5 seconds. During this first 5 seconds, you must make sure the Ultrasonic sensor(two eyes) is facing straight forward.
- Page 22 and make your Ultrasonic sensor position change, you must remember to do sensor direction alignment again. Youtube Video Link: https://www.youtube.com/embed/5VRMH276oas Important parameters in the sketch file Following parameters in Line 32 to 39 of mecanum-2560-lesson2.ino are very important to make performance tuning. See the comments in the #define statements: #define FAST_SPEED 110 //The difference between FAST_SPEED and SPEED determines the slight turning sharpness...
-
Page 23: Lesson 3: Tracking Line
OSOYOO Mecanum wheels robotic car chassis x1 (2xleft-wheels/2xright-wheels and Motor x 4) OSOYOO Mega2560 board fully compatible with Arduino UNO/Mega2560 x1 OSOYOO Wifi shield x1... - Page 24 Start the installation from previous status of Lesson 1 If you have installed Lesson 1, no need change anything, just keep the hardware wire connection as it is. Connect VCC pin of tracking sensor module to 5V of wifi shield; Connect GND pin of tracking sensor module to GND of wifi shield Connect L, C, R pins to D2, D3, D4 with 5pin 20cm female to female cable as the following photo shows (Remember: DO NOT remove any existing wires installed in Lesson 1).
- Page 25 Step 2: Download https://osoyoo.com/driver/mecanum_acrylic_chassis/mecanum-2560- lesson3.zip , unzip the download zip file lesson3.zip, you will see a folder called lesson3 . Step 3: Connect mega2560 board to PC with USB cable, Open Arduino IDE -> click file -> click Open -> choose code “lesson3.ino” in lesson folder, load the code into arduino as following: Step 4: Choose corresponding board/port for your project, upload the sketch to the board.
- Page 26 Prepare a black track (the width of the black track must be between 20mm and 30mm) in white ground. Please be noted that the bend angle of track can’t be too sharp otherwise the car will move out of the track. Turn on the car and put the middle of tracking sensor module facing over black track, and then the car will move along the black track automatically.
-
Page 27: Lesson 4: Bluetooth Imitation Robot Car
Since is a mock driving, we will use a virtual steering wheel and gear in our APP to imitate their counterparts in real car. In this lesson,Mecanum Omni wheel will allows robot car make omni-directional movement( parallel shift to left and right). - Page 28 STEP2: Bluetooth Module should be inserted into bluetooth 6-pin slot in OSOYOO Wifi Board...
- Page 29 Download Arduino IDE from https://www.arduino.cc/en/Main/Software?setlang=en , then install the software. Step 2: Download https://osoyoo.com/driver/mecanum_acrylic_chassis/mecanum-2560- lesson4.zip , unzip the download zip file lesson4.zip, you will see a folder called lesson4 . Step 3: Connect mega2560 board to PC with USB cable, Open Arduino IDE -> click file ->...
- Page 30 Mobile APP: Go to your Google Play or Apple APP store and search APP name “OSOYOO imitation driving”, Download the APP as following and install it in your smart phone. Power on the robot, and open APP. 1) If you have not paired Bluetooth module with your cell phone, please pair the bluetooth module first before open the APP.
- Page 31 2) After bluetooth HC02 device is paired, open the APP. If you are using Android APP, Click BT Search Button to connect APP to HC02 device, if it is iOS APP, just click connect. 3) Click Engine Switch to start/stop the car 4) Click Speed +/- button to accelerate or reduce speed 5) Rotate the mobile phone to change direction(steering wheel will rotate while you are turning the phone).
- Page 32 After batteries are running low, you might need to increase the value of these 3 constants. You can gradually add or reduce 10 each time on these values and compare which values have best tracking performance.
-
Page 33: Lesson 5: Wifi Iot Control Robot Car
In this project we will connect Robot Car to Wifi and Use an APP to control the car through Internet. This is a typical Internet of Things(IoT) Application. OSOYOO Mecanum Wheels Robotic Car Chassis x1(2x left-wheels/2x right-wheels and 4x motor) OSOYOO Mega2560 board fully compatible with Arduino... - Page 34 Open-source Arduino Download Arduino IDE here: Software(IDE) https://www.arduino.cc/en/Main/Software?setlang=en 7 zip is a free zip Download 7zip here for free utility that un-zips zip https://www.7-zip.org/ files Step 1: Install latest Arduino IDE (If you have Arduino IDE version after 1.1.16, please skip this step).
- Page 35 STEP3: Search Google Play or Apple Store with the Keywords “OSOYOO Wifi UDP Robot Car Controller ” and Download the APP. DOWNLOAD APP FROM https://osoyoo.com/driver/arduino-udp/udp-robot.apk...
- Page 36 192.168.4.1 and It is not connected to WAN. (1) Please download sketch from following link: https://osoyoo.com/driver/mecanum_acrylic_chassis/mecanum-2560-lesson5A.zip. Unzip the file and you will see a folder named mecanum-2560-lesson5A,upload the code into Arduino (2) Open your Arduino Serial monitor, and you will see a similar result as AP mode. A new Wifi SSID “osoyoo_robot”...
- Page 37 address is 192.168.4.1, port No.8888 . (4) Connect your cell phone to “osoyoo_robot” wifi hot_spot,you can use Mobile phone control the robot car. (5)You can click the “< " ">” ” ^” ” v ” direction keys to make the car move. Use “||”...
- Page 38 You can use Mobile APP to access the robot car’s IP address and control its movement. (1) Please download STA mode sketch code from https://osoyoo.com/driver/mecanum_acrylic_chassis/mecanum-2560-lesson5B.zip . Unzip the file and you will see a folder named mecanum-2560-lesson5b, then load themecanum-2560- lesson5b.ino code into Arduino...
- Page 39 (3) Upload the sketch to Arduino. Finally, click the Serial monitor window in upper right corner of Arduino IDE and set 9600 baud,then you will see following result: (4)In this mode, your will see an IP address which is our LAN IP address assigned by my router.
- Page 40 set this IP address to your APP Setting section (no need change default port 8888 in APP). (5)Now your Robot car is connected to your LAN, you can use Mobile phone under same LAN to control the robot car. If your APP is in WAN, you need to go to your Router Control Panel, forward Port 80 to Robot car LAN IP address, then you can use Router IP to control the car.
- Page 41 SPEED value determines forward moving speed TURN_SPEED value determines turning speed SHIFT_SPEED value determines parallel shifting speed...
Need help?
Do you have a question about the Mecanum Omni and is the answer not in the manual?
Questions and answers