
Subscribe to Our Youtube Channel
Related Manuals for SAINT-GOBAIN PRIVA-LITE

Summary of Contents for SAINT-GOBAIN PRIVA-LITE
- Page 1 ® PRIVA-LITE SWITCH P ATTENTION!! CAREFULLY READ ALL INSTRUCTIONS BEFORE INSTALATION USE ONLY VALIDATED SILICONES INSTALLATION GUIDE - ENGLISH ACTIVITÉ Titre présentation Version 8.2 Update 14/09/2020...
- Page 2 ® PRIVA-LITE SWITCH P INSTALLATION GUIDE CONTENTS ® 1. RECEPTION of PRIVA-LITE Switch P 2. GLASS INSTALLATION 3. ELECTRICAL INSTALLATION p.25 4. MAINTENANCE AND CARE INSTRUCTIONS p.40 PRIVA-LITE...
- Page 3 ® PRIVA-LITE SWITCH P ® 1. RECEPTION OF PRIVA-LITE SWITCH P PRIVA-LITE...
- Page 4 In case of visual damage : Grey : OK Make written reserve to transporter. RED : Not OK Take pictures of damaged rack, and Tilt Watch Send pictures and copy of OC to Glassolutions Saint-Gobain within 2 working days following the delivery. PRIVA-LITE...
- Page 5 2- Unscrew the 2 screws at the back of the cover (screws marked in red). 3- Remove plastic and protections If applicable, remove the green tape used for edge protection. If there is no need, leave a green tape, it will be additional protection of glass edges. PRIVA-LITE...
- Page 6 Glassolutions Saint-Gobain Information on visual defects or breakages must be sent to Saint- Gobain within 2 working days after reception of PRIVA-LITE®. Claims for visible problems will not be accepted after 2 days, PRIVA-LITE...
- Page 7 • If any missing item, please check them on the packing list, and send it to Saint-Gobain Glassolutions. Missing items must be claimed to Saint-Gobain within working...
- Page 8 • ® Do not expose PRIVA-LITE to direct sunlight or to humidity. BEFORE INSTALLING the PRIVA-LITE® Glass • Plan the electrical Installation (cable route, electrical box). • Install the cables (1 or 2 cables per glass) in the profiles or ceilings.
- Page 9 2. PRIVA-LITE® GLASS INSTALLATION PRIVA-LITE...
- Page 10 2.1 PRIVA-LITE® GLASS INSTALLATION IN PROFILES Installation is the responsibility of the installer. ® PRIVA-LITE must be installed by a professional glazier, according to the rules applicable to laminated safety glasses. Important installation rules: ® 1- Only PRIVA-LITE - approved products may come in contact with the edge of the glass and be used inside the profile.
- Page 11 2.11 – PRIVA-LITE® SWITCH P IPX7 : INSTALLATION IN PROFILE PRIVA-LITE® SWITCH P STANDARD IPX7 : EVA molding and one cable (Example with top cable exit) : APPROVED MULTISIL SILICONE ONLY MOLEX GLASS CABLE : 5,5 mm Minimum profile height...
- Page 12 2.12 – PRIVA-LITE® HOTMELT : Installation in profile PRIVA-LITE® SWITCH P IPX4 : 2 cables with Hot Melt HOT MELT U PROFILE GLASS CABLE APPROVED SILICONE or GASKETS (no silicone oil allowed for install !) LC FILM GLASS Top cable...
- Page 13 To the power supply unit MOLEX CONECTORS EVA MOLDING ELECTRODE TOP NON ACTIVE AREA SANDBLASTING (Option) 14 mm +/-2mm OPTIONAL SANDBLASTING 5mm +1/-1mm Faces 1 and 4 Left and right STICKER JOINT TRANSPARENT AREA IF NO SANDBLASTING 3mm +/-2mm PRIVA-LITE...
- Page 14 2 wooden blocks with a screw to move closer together the adjacent panels. Only products approved for PRIVA-LITE® may come in contact with the edge of the glass. No other product such as glue, adhesive, sealant, gasket, plastic strip …...
- Page 15 - Need only 2mm joint, instead of min 4mm for silicone (better and cleaner finishing) - Contributes to overall solidity : Validated as ‘linked joining’ for the french DTU 35.1. ® - Only the TESA ACX7058 is compatible with PRIVA-LITE . Use of other tape voids the product warranty.
- Page 16 5. Slide the glasses together and adjust vertical fitting of both glass walls. PRIVA-LITE...
- Page 17 2.3 – PRIVA-LITE® SWITCH P DOUBLE GLAZING INSTALLATION If used in façade or exposed to sun or heat, PRIVA-LITE ® must always be installed as Isolated Glass Unit (IGU), protected from heat ® with solar control external glass, and PRIVA-LITE on INSIDE.
- Page 18 2.4 - INSTALLATION DOORS AND WINDOWS The glass must be connected directly to transformer at all time. The cable should be prodected by a lead cover, for example Assa Abloy EA 280. ASSA ABLOY EA280 Flexible cable cover PRIVA-LITE...
- Page 19 2.41 - PIVOTAL DOORS - 4 SIDES FRAME ® PRIVA-LITE may be installed in pivotal doors, using a 4 side frame. Protect cable exits (EVA molding or Hotmelt) to avoid damage. Use cable protection (see previous page) Make sure that the pressure on glass does not exceed 10N/cm².
- Page 20 2.42 - PIVOTAL DOOR WITH HOLES AND NOTCHES Transparent zone on glass edge It is possible to order PRIVA-LITE® with pre- 3mm (+2/-2) cut totches and holes, installation must take care of those rules : LC Film Inactive electrode zone :...
- Page 21 The use of a second profile, or a wider/deeper profile, may be necessary to accommodate the cable. Minimal radius curve of cable : 45mm. ® Note, that only the cables supplied by Saint-Gobain for PRIVA-LITE are allowed between glass and transformer.
- Page 22 Never expose the PRIVA-LITE® to temperatures over 70°C For external applications, the SGG LITE-FLOOR must be laminated with a solar control glazing. In case of double skin, the area between the SGG LITE-FLOOR and PRIVA-LITE® has to be correctly ventilated to avoid overheating and condensation. PRIVA-LITE...
- Page 23 2.7 PRIVA-LITE® SWITCH P installation in wet room / bathroom PRIVA-LITE® Switch P / Molex glass is IPX7, so it is splash-proof. However, it must be installed in accordance with local electrical regulations and the following rules: The PRIVA-LITE® Switch P can only be installed in a bathroom in a non-volume area and according to the following rules: •...
- Page 24 ® 2.7 PRIVA-LITE installation in wet room / bathroom 11. BATHROOM APPLICATION Below are examples of bathroom areas according to the NFC15-100/2016 standard Bathtub (or shower with basin) Shower (without basin) Installation in wet rooms must in all cases be validated by professional electrician. Refer to...
- Page 25 PRIVA-LITE® SWITCH P 3. ELECTRICAL INSTALLATION PRIVA-LITE...
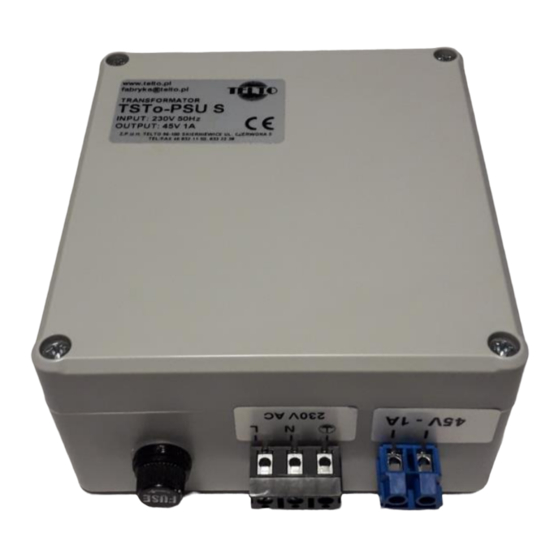
- Page 26 PSU S Power supply may be connected to one, or several PRIVA-LITE® SWITCH P panels, up to a total surface of 5,25 sqm per PSU S. • Only validated Glassolutions Saint-Gobain extension cables are allowed to connect the PRIVA-LITE® SWITCH P panels to the power supply units. •...
- Page 27 3.21. QG6 TRANSFORMER : CHARACTERISTICS Type Size Weight Voltage Power Current Surface (L x W x H) 5,25 m² PSU S 115 x 125 x 60mm 880gr Input : 230V AC 50 VA Output :45V AC PRIVA-LITE...
- Page 28 Power supply units must be installed in tempered, dry and ventilated areas. – Plan locations for additional equipment installing (radio switch receiver, timer switch,…). – Make sure that the selected location is less than 20 m away from the farthest PRIVA-LITE® panel. PRIVA-LITE...
- Page 29 If the framing is conductive (aluminum, lacquered steel, stainless steel,…), it is then necessary to connect them to earth. Make sure that all profile segments are interconnected. If not, each segment must be independently connected to Earth. Glass + Extension cables PSU S Earth … Junction box Profiles PRIVA-LITE...
- Page 30 PSU S + TELECO + Timer Conductive profile Junction box Input Output PE N L PSU S PrivaLite Earth PrivaLite PrivaLite … 230 VAC – 50Hz Extension cable Junction box 0 VAC - Neutral Antenna Programming TIMER Electrical cabinet buton P1 (HOLE) PRIVA-LITE...
- Page 31 Programming the Remote Control TELECO ( TRRL868G03P ) Antenna Programming buton P1 (HOLE) PRIVA-LITE...
- Page 32 Junction box Output PSU S Earth … 230 VAC – 50Hz Extension cable Junction box 0 VAC - Neutral Antenna Programming butonP1 Electrical cabinet (HOLE) The Daisy interface must be within the range of your WiFi network Configuration instructions – PRIVA-LITE...
- Page 33 1. Press 5 times* P1 and hold the last time. The buzzer emits a continuous sound. 2. Press the button in the application relative to the code to be memorized. Successful memorization is indicated by the intermittent sound of the buzzer. PRIVA-LITE...
- Page 34 Connect the white and blue wire to Output on PSU S. The MOLEX connector is designed to fit to the connector of the glass. The MOLEX cable may be cut to the desired length. 2- Red/Blue shielded cable (for PRIVA-LITE® SWITCH P nonstandard ‘Hotmelt’ IPX4 glasses): The two cables (red and blue) are shielded with mesh.
- Page 35 3.6 Q-REMOTE CONTROL INSTALLATION Q-remote control set : Contains one transmitter + one radio-emitter Emitter works up to 150m from receiver in favourable conditions. Emitter is allowed in wet rooms and shower cabins. Receiver Transmitter Transmitter in its wall fixation PRIVA-LITE...
- Page 36 3.6 Q-REMOTE CONTROL INSTALLATION Drawing for the electrical connection of Q-Remote control receiver to PSU S. Install Receiver near transformer in electrical closet PRIVA-LITE® SWITCH P Glass PSU S Output 45VAC connection with Wago PRIVA-LITE...
- Page 37 Press PROG button 2secs. Wait 2 light. Press again 2Secs. Wait 2 lights Press SENDER button 2secs – wait 2 light - Press again 2 secs. Press PROG button 2secs. Wait light. Press again 2secs. Programming button Transmitter Receiver PRIVA-LITE...
- Page 38 SWITCH P 4 – MAINTENANCE AND CARE PRIVA-LITE...
- Page 39 (OFF) over time, to not leave the PRIVA-LITE panels continuously in transparent mode (ON). PRIVA-LITE® SWITCH P must be switched OFF during at least 4 hour per 24h, this is a requirement for warranty of product.
- Page 40 - Preferably use softened or demineralised water. If this is not possible, then a little liquid soap can be used to soften water. Please note that the following Washing-up liquids and cleaning agents have been tested and approved by Saint-Gobain R&D department to be used with the PRIVA-LITE®...
- Page 41 Never attempt to clean off a specific mark on the surface of PRIVA-LITE® SWITCH P without applying little water first. If you need further information concerning the PRIVA-LITE® SWITCH P , then please contact Saint-Gobain Glassolutions for advice and information.
- Page 42 Saint-Gobain are replaced by the present document. Saint-Gobain has taken every reasonable measure to ensure that the information contained in the present leaflet was exact at the time of its publication. However, Saint-Gobain keeps the right to modify, or add any information without notice. PRIVA-LITE...
Need help?
Do you have a question about the PRIVA-LITE and is the answer not in the manual?
Questions and answers