
Related Manuals for Dahua Technology D-LCH75-MC410-B


Summary of Contents for Dahua Technology D-LCH75-MC410-B
- Page 1 Smart Interactive Whiteboard Quick Start Guide ZHEJIANG DAHUA VISION TECHNOLOGY CO., LTD. V1.1.0...
-
Page 2: Foreword
Quick Start Guide Foreword General This manual introduces the functions and operations of the smart interactive whiteboard (hereinafter referred to as "the whiteboard"). Read carefully before using the whiteboard, and keep the manual safe for future reference. Safety Instructions The following signal words might appear in the manual. Signal Words Meaning Indicates a high potential hazard which, if not avoided, will result in... - Page 3 Quick Start Guide format) cannot be opened. ● All trademarks, registered trademarks and company names in the manual are properties of their respective owners. ● Please visit our website, contact the supplier or customer service if any problems occur while using the device.
-
Page 4: Important Safeguards And Warnings
Quick Start Guide Important Safeguards and Warnings This section introduces content covering the proper handling of the whiteboard, hazard prevention, and prevention of property damage. Read carefully before using the whiteboard, and comply with the guidelines when using it. Storage Requirements ●... - Page 5 Quick Start Guide with liquid on the whiteboard to prevent liquid from flowing into it. ● Operate the whiteboard within the rated range of power input and output. ● Do not disassemble the whiteboard without professional instruction. ● Use the whiteboard under allowed humidity and temperature (0 °C to 40 °C, or 32 °F to 104 °F) conditions.
-
Page 6: Table Of Contents
Quick Start Guide Table of Contents Foreword .........................................I Important Safeguards and Warnings ............................. III 1 Introduction......................................1 2 Packing List ......................................2 3 Installation ....................................... 3 3.1 Preparation ....................................3 3.2 Installation Accessories ................................4 3.3 Installation Procedure................................4 4 Appearance ......................................11 Appendix 1 Cybersecurity Recommendations ......................... -
Page 7: Introduction
Quick Start Guide 1 Introduction The smart interactive whiteboard is an integrated multimedia device, which integrates large-screen HD display, computer, TV, electronic whiteboard, audio amplifier, application, and central control system. The whiteboard supports the following functions and features: ● 4K HD LCD display. ●... -
Page 8: Packing List
Quick Start Guide 2 Packing List Check whether there is any obvious damage on the packing box. Unpack the box and check whether the components are complete according to the packing list. Table 2-1 Packing list Name Quantity Name Quantity Smart interactive whiteboard Power cord Stylus pen... -
Page 9: Installation
Quick Start Guide 3 Installation 3.1 Preparation To ensure correct function and safety, remember to check whether your site is ready for the installation in the first place. Step 1 Check the grounding. The IR touch technology adopted by the whiteboard requires that the site should be grounded as follows: ●... -
Page 10: Installation Accessories
Quick Start Guide 3.2 Installation Accessories Figure 3-1 Installation accessories Table 3-1 Accessory description Name Quantity Vertical bracket Horizontal bracket ø6 × 50 wall-mount screw Plastic expansion plug for screw Gasket The brackets have been installed on the whiteboard when you receive it. 3.3 Installation Procedure Step 1 Insert 2 M5 ×... - Page 11 Quick Start Guide Figure 3-2 Insert screws into vertical brackets Figure 3-3 Install gaskets Step 2 Mark screw locations on the wall and then drill holes. 1) Identify a suitable installation position, and then mark the screw locations.
- Page 12 Quick Start Guide Figure 3-4 Installation dimensions (55/65-inch series)
- Page 13 Quick Start Guide Figure 3-5 Installation dimensions (75/86-inch series) 2) Drill holes at the marked locations. Figure 3-6 Required hole diameter and depth Step 3 Use 6 × 50 mm wall-mount screws to attach the horizontal bracket onto the wall and keep it horizontal.
- Page 14 Quick Start Guide Figure 3-7 Install the horizontal bracket Step 4 Attach the vertical brackets onto the wall. You can use the holes on the vertical brackets to adjust the height of the whiteboard. Install the hooks on the rear panel of the whiteboard with screws.
- Page 15 Quick Start Guide Figure 3-9 Attach the vertical brackets (65-inch series) Figure 3-10 Attach the vertical brackets (75-inch series)
- Page 16 Quick Start Guide Figure 3-11 Attach the vertical brackets (86-inch series) Step 5 Tighten the screws at the bottom of the vertical brackets to secure the brackets. Make sure that the appropriate screwdriver is used. Figure 3-12 Secure the vertical brackets...
-
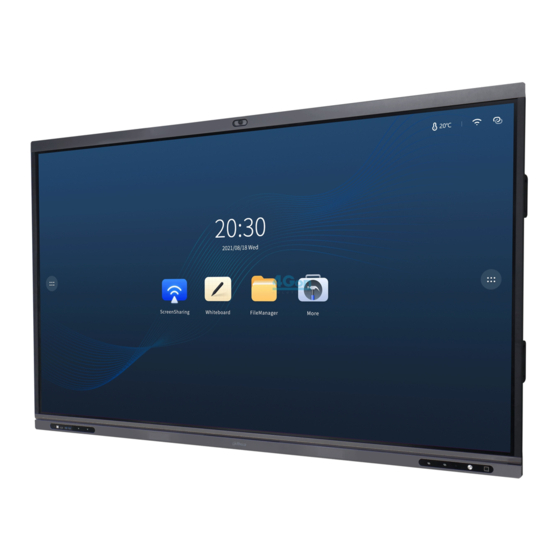
Page 17: Appearance
Quick Start Guide 4 Appearance Figure 4-1 Appearance (55-inch series) Figure 4-2 Appearance (65/75/86-inch series) Table 4-1 Appearance description Description LCD. - Page 18 Quick Start Guide Description Power input port. Inputs 100–240 VAC power. After connecting to power supply, press the rocker switch to turn on the whiteboard. USB 3.0 port. Magnetic stylus pen attach area. Speaker. Plays multimedia sound. Indicator light. The light is red when the whiteboard is on standby and blue when the whiteboard is in normal use.
- Page 19 Quick Start Guide Table 4-2 Port description Name Description Micro USB Used for debugging Android system. HD audio and video signal input port. Connects to the computer, set- HDMI IN top box, and other video devices with HDMI output ports. Connects to USB devices such as mobile hard disk, USB flash drive, USB 3.0 USB keyboard, and USB mouse.
-
Page 20: Appendix 1 Cybersecurity Recommendations
Quick Start Guide Appendix 1 Cybersecurity Recommendations Cybersecurity is more than just a buzzword: it’s something that pertains to every device that is connected to the internet. IP video surveillance is not immune to cyber risks, but taking basic steps toward protecting and strengthening networks and networked appliances will make them less susceptible to attacks. - Page 21 Quick Start Guide 1024–65535, reducing the risk of outsiders being able to guess which ports you are using. 6. Enable HTTPS We suggest you to enable HTTPS, so that you visit Web service through a secure communication channel. 7. MAC Address Binding We recommend you to bind the IP and MAC address of the gateway to the device, thus reducing the risk of ARP spoofing.
- Page 22 Quick Start Guide device. More information Please visit Dahua official website security emergency response center for security announcements and the latest security recommendations.
- Page 23 Quick Start Guide...
Need help?
Do you have a question about the D-LCH75-MC410-B and is the answer not in the manual?
Questions and answers