Table of Contents
Advertisement
Quick Links
IMPORTANT
Installer and Users please note:
These instructions should be read carefully and left with the user of the product for future reference.
Before Use
You must inspect the product including its cable and plug for any signs of damage. If the product is
damaged, DO NOT use it, and contact your supplier immediately.
Product Safety
• This product can be used by children aged from 8 years and above and persons with reduced
physical, sensory or mental capabilities or lack of experience and knowledge if they have been given
supervision or instruction concerning use of the product in a safe way and understand the hazards
involved.
• Children shall not play with the product.
• Cleaning and user maintenance shall not be made by children without supervision.
• For indoor use only.
• Make sure that air intakes and exhausts are not obstructed.
• Do not use this product in the immediate surroundings of a bath, shower or swimming pool.
• Do not place the mains lead beneath a carpet or rug.
• Do not insert any object into this product through the grilles. This may damage the heater or result
in overheating or electric shock.
PAT Testing
When used in a workplace, this product must be safety-tested yearly by a qualified electrician (PAT
Tested) in order to comply with the Electricity at Work Regulations. If hired out, it must be PAT
tested prior to each hire. We recommend that it is PAT tested regularly when used in a domestic
environment.
General Safety Requirements
Domestic wiring must be tested periodically by a qualified electrician at least once every 10 years or
at every change of occupancy. For office and retail premises, and buildings such as village halls, the
wiring must be inspected at least once every 5 years. It is recommended that all building be fitted
with smoke alarms (it is mandatory for new buildings).
Disposal and Recycling
You must not dispose of this appliance with domestic household waste. Most local authorities have
specific collection system for appliances and disposal is free of charge to the end-user. When
replacing an existing appliance with a similar new appliance your retailer may take the old appliance
for disposal.
2
Advertisement
Table of Contents

Related Manuals for Eagle P650C


Summary of Contents for Eagle P650C
- Page 1 IMPORTANT Installer and Users please note: These instructions should be read carefully and left with the user of the product for future reference. Before Use You must inspect the product including its cable and plug for any signs of damage. If the product is damaged, DO NOT use it, and contact your supplier immediately.
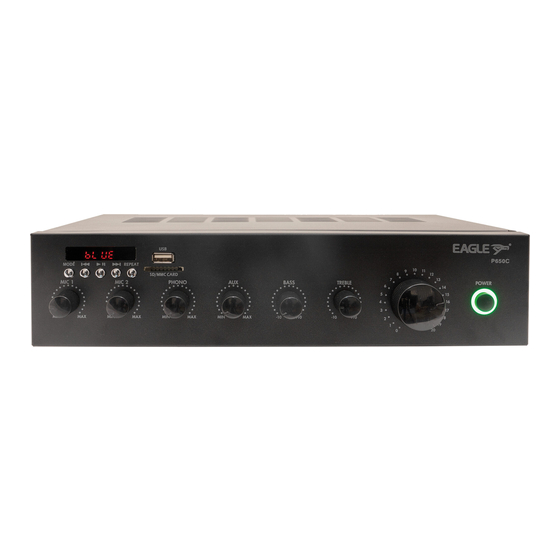
- Page 2 Front Panel and Rear Panel Layout ❼ ❶ ❷ ❸ ❹ ❺ ❻ ❶ Mic volume controls ❷ Phono ❸ Aux volume control ❹ Tone controls ❺ Master volume control ❻ Power switch ❼ Media Player MP3 Player, FM Radio & Bluetooth ❶...
- Page 3 The P650C must be earthed. NEVER disconnect the earth, even in an attempt to prevent „hum‟. If the earth were disconnected, it could result in equipment connected to the input (even indirectly through a mixer), such as microphones, becoming live in the event of a fault (such as a liquid spillage into the amplifier).
- Page 4 Outputs Connect the loudspeakers to the screw terminals on the rear panel. Low Impedance Connect low-impedance speakers between the 4 or 8Ω terminal and the COM terminal. DO NOT connect a combined impedance lower than 4 Ω. Make no connections to the 100V terminal. The following combinations MAY be connected 1 ×...
- Page 5 The amplifier has a built-in digital Media Player which has 4 modes, Bluetooth, USB, SD card and FM tuner. Pressing the MODE button selects either Bluetooth FM tuner. Output from the media player is controlled by the master volume and the Vol- and Vol+ on the remote control by pressing and holding the Previous or Next buttons.
- Page 6 FM Tuner Pressing the mode button until “FM” appears in the upper part of the display enters FM tuner mode. The display will show the current radio frequency in MHz’s. Connect an FM antenna to the socket on the rear panel. Press Play/Pause to initiate the auto-tune process, which will scan for the strongest frequencies and store them automatically as P01, P02, P03, etc.
Need help?
Do you have a question about the P650C and is the answer not in the manual?
Questions and answers